Premmerce WooCommerce Product Filter
The Premmerce WooCommerce Product Filter plugin is a convenient and flexible tool for managing filters for WooCommerce products. Among the main features of this plugin there is a single widget that manages the display of all available filters. Comparing to the standard WooCommerce filters, Premmerce WooCommerce Product Filter has a well-thought-out caching system for the load speed optimization.
The only plugin you need for managing your WooCommerce Filter

Displaying all available filters using a single widget

An option to filter search results

Optimize page load speed by loading filter deferred

Showing filtering results without reloading the page

Possibility to show filters in the form of color check boxes or lables

Displaying only available attributes depending on the category

You can use any custom taxonomy for filtering your products

Also includes filter by price, active filters widget, brands widget
The only filter plugin that has all you need for the SEO Settings


The main features of the Premmerce WooCommerce Product Filter:
- displaying all available filters and using a single widget for it
- flexible settings for each filter in one place
- price filter
- the Premmerce Active Filters widget
- integration with the Premmerce WooCommerce Brands plugin
- improved caching system
- displaying only available attributes depending on the category
- the ability to filter search results
The store load speed research
We’ve tested the WooCommerce load speed and observed its improvement when using Premmerce WooCommerce Product Filter.
You can find the full research here:
New! Finally – Premmerce Advanced WooCommerce Swatches
After dozens of tests and the development of quite a few great features, we are proud to introduce to you our ideal WooCommerce Swatches plugin, that is fully compatible with all other Premmerce plugins.
There are free and paid versions, but at the same time they both have great functionality and will improve your store results dramatically.
Among the main features:
- The ability to highlight the main attributes and display them on the product category page
- The possibility to add a description to the attribute
- Perfect compatibility with the Premmerce WooCommerce Product Filter plugin
- The ability to add a product variation to the cart directly on the product category page (Premium only)
- The ability to present variation as an image, color, label or radiobox.
The list of plugin premium features:
Being able to handle heavy traffic loads and imply the fastest filters for WooCommerce in its basic version, the Premmerce WooCommerce Product Filter plugin greatly expands the SEO capabilities in its Premium version. Now you can generate landing pages with unique titles, SEO-text, human-friendly URL based on combinations of category + brand + product attributes.
All the Premium version features:
- Generating pages from the Clean URL based on the selected category + brand + attribute (you can specify an unlimited number of attributes)
- The ability to specify any title for each generated page
- Specify any h1 for each generated page
- Specify any meta description for each generated page
- Specify SEO-text for each generated page
- Using the variables, set the mask for automatic generation of h1, title, meta description
- Bulk generation of landing pages based on the multiple choice of categories + brands + attributes
- For all pages for which the rules haven’t been created, you can specify a common mask
- Automatic adding of all generated pages to the Sitemap (if you use Yoast SEO)
- Setting up rules for creating URL. Setup a prefix for brands and attributes and a terms separator
- Displaying the attribute ‘color’ using the icon of the selected color on the page with filters
- Displaying attributes as LabelWe’ll describe all these features in detail below.
Video presentation
Creating landing pages based on filters
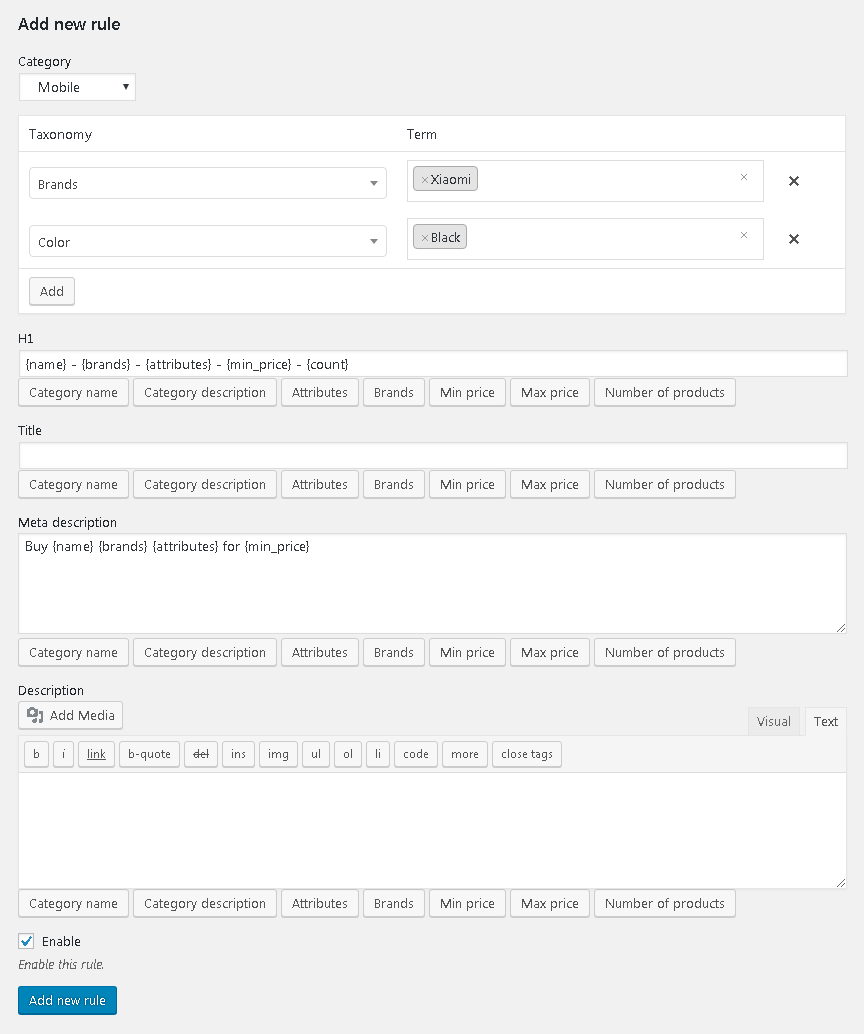
WooCommerce Product Filter Premium allows you to create landing pages based on the choice of filter configuration. The rule that generates these pages consists of the following elements:
Premmerce WooCommerce Product Filter
Get started giving your customers a better way to filter your products to increase site usability and revenue.
Category (you can choose any category in the store for which the attributes are assigned) + Brand (if our Premmerce WooCommerce Brands plugin is activated) + Product Attribute / Attributes (you can choose any number of attributes and their terms).
This way you’ll create landing pages for already filtered pages of products with a specified category, brand, and attributes. For example, the following pages can be created:
Smartphones (category) + Apple (brand) + 7S (attribute) + Gold (attribute) + 64 Gb (attribute)
And for this page you can specify a unique h1, title, meta description and SEO-text.
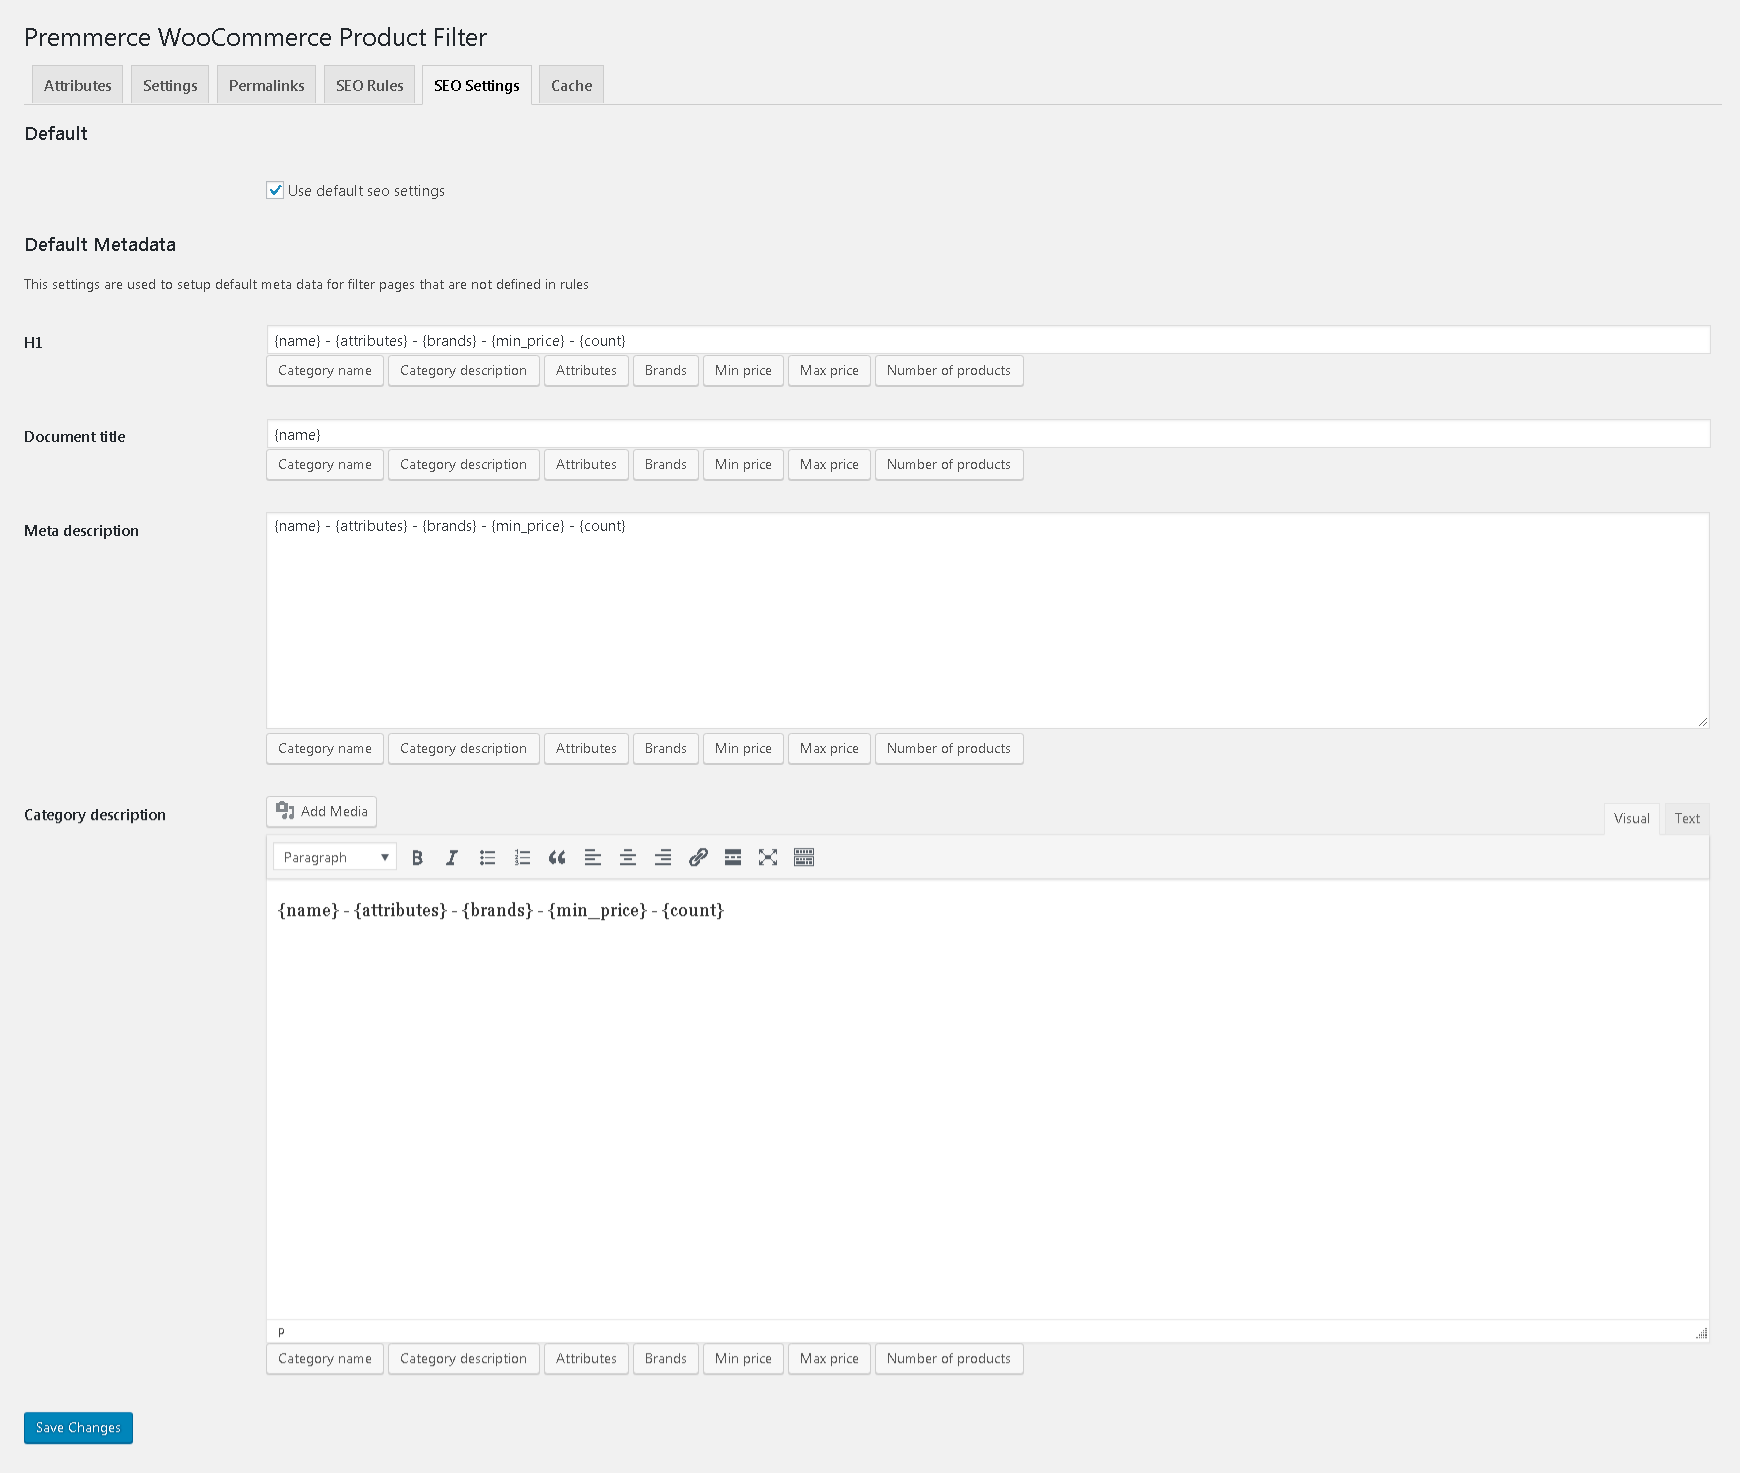
If there are many filters in the store, then thousands of page variants with different attribute terms are possible, and in order not to set values for each page separately, you can use variables and create a mask to which the category name, category description, brands and attributes, the minimum and the maximum price and quantity of products from this page will be automatically added.
In the dashboard it looks like this:
Thus, thanks to our WooCommerce Product Filter Premium, you can easily promote low-frequency queries, as well as increase the number of landing pages in the store.
Bulk generation of landing pages
If you have many categories, brands, and product attributes in the store, it’s quite challenging to create unique descriptions of all possible options of categories + brands + attributes.
However, in order to get as many pages of your store as possible available in the search result, you can still generate a number of pages with Clean URL and unique titles.
For example, in the category of telephones you have many brands and many attributes in the filters.
You choose the needed categories, brands and attributes for these product categories and create large number of unique pages.
It may look like this:
This feature allows you to manage metadata in a more effective way, and set more targeted descriptions or headers for the specific categories, brands, colors, and other variables.
Default settings
And if you want to set a mask for all possible options of categories + brands + attributes that you have in the store, you can use the default settings.
Thus, metadata will be generated automatically, following the template you set in all categories, which greatly simplifies filter management.
Automatic adding of pages to the Sitemap
After the optimization of the category filters, it is important to let the search crawlers know that now you have many more landing pages than before. So, when you create a page based on filters either manually or automatically, the plugin automatically adds new pages to the Sitemap, which is generated by the Yoast SEO plugin.
Important!
This functionality works only with the Yoast SEO plugin.
The links management
The WooCommerce Product Filter Premium plugin allows you to customize Permalinks, making URL as human-friendly and short as possible.
By default, the link looks the following way:
site.com/product-category/electronics/headphones/attribute-color-black/attribute-product_brand-jbl/
Due to the inbuilt link manager you can change:
- attribute prefixes (replace attribute with options-, other words and symbols or just remove attribute)
- a brand prefix (replace filter_product_brand e.g. by simply brand- or remove)
- a separator (if you are creating a page where there are, for example, 2 colors – gold and black, you can put a separator between them, for example ‘or’ and then the URL will look like options-color-gold-ili-black)

So you can customize the URL of your online store to your needs.
After setting up the link looks like this:
site.com/product-category/electronics/headphones/brand-jbl/options-color-black-or-gold
Also, using the WooCommerce Permalink Manager plugin, you can minimize the length of the link by deleting / product-category, / catalog and / product. After installing the Permalink Manager plugin, the links begin to look the following way:
site.com/headphones/brand-jbl/options-color-black/
These settings will positively affect the promotion of your site.
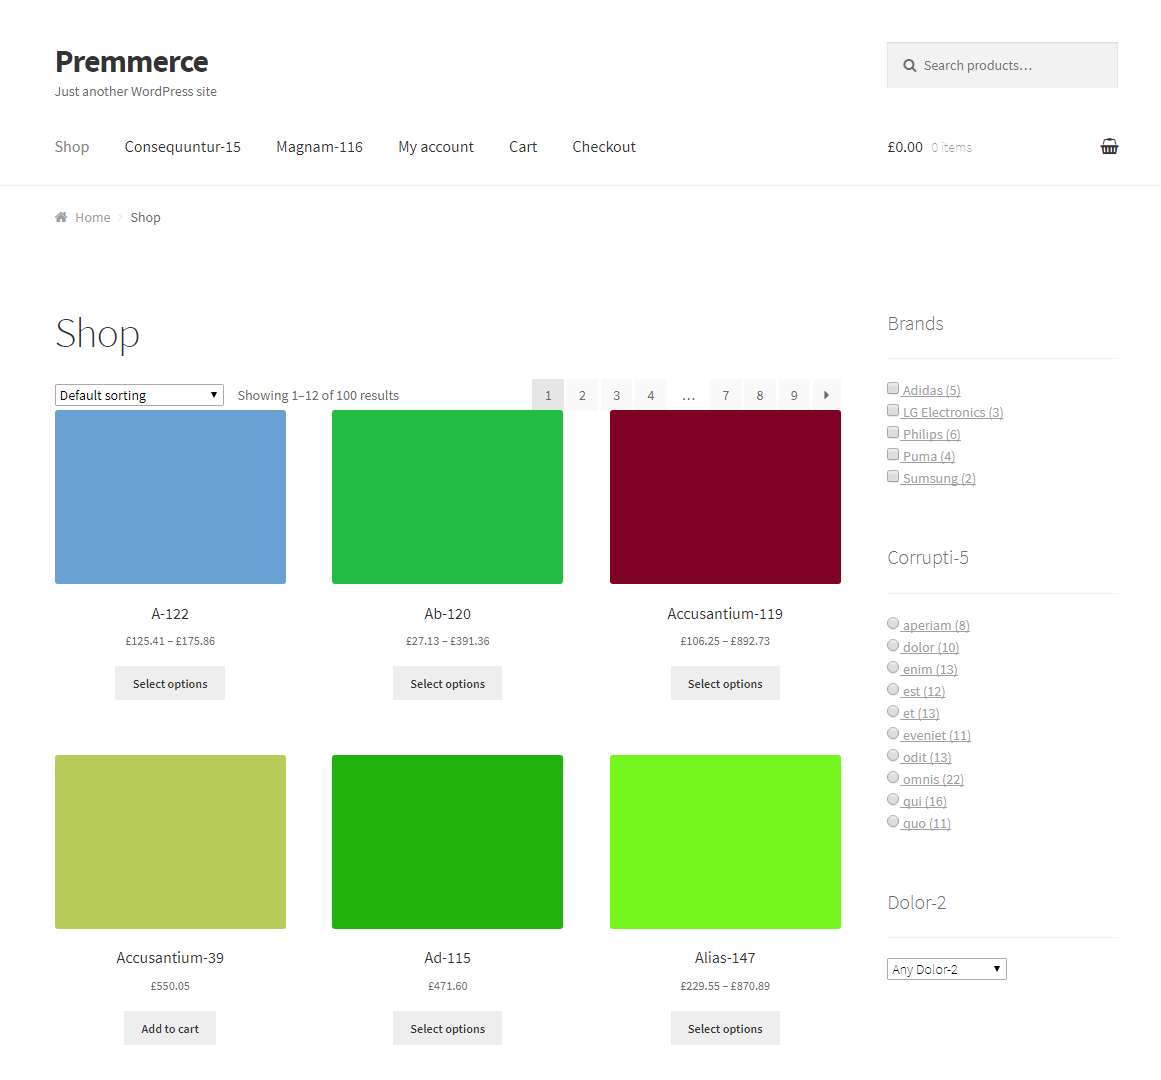
Displaying colors and labels on the filter page
And the last change is that now instead of naming filters by a color, you can set colors from the palette, which will not only look nice but will also help your customers navigate through the filters.
You can also display attributes as labels. If you choose such displaying option, you’ll get the following result:

The ‘Premmerce WooCommerce Product Filter’ Demo
You can see how the plugin works in the SalesZone theme.
Also, you can create your own demo store and test this plugin in the Premmerce Suite, which contains all the plugins and themes developed by our team here: Premmerce WooCommerce Demo.
This plugin interacts very well with the other Premmerce plugins, such as:
- Premmerce WooCommerce Brands
- Premmerce Search
Installation
You can install this plugin from the official WordPress plugin directory or download and install it manually from our repository on GitHub:
1. Unzip the downloaded zip file.
2. Upload the plugin folder into the ‘wp-content/plugins/’ directory of your WordPress site.
3. Activate ‘WooCommerce Permalink Manager’ from the Plugins page.
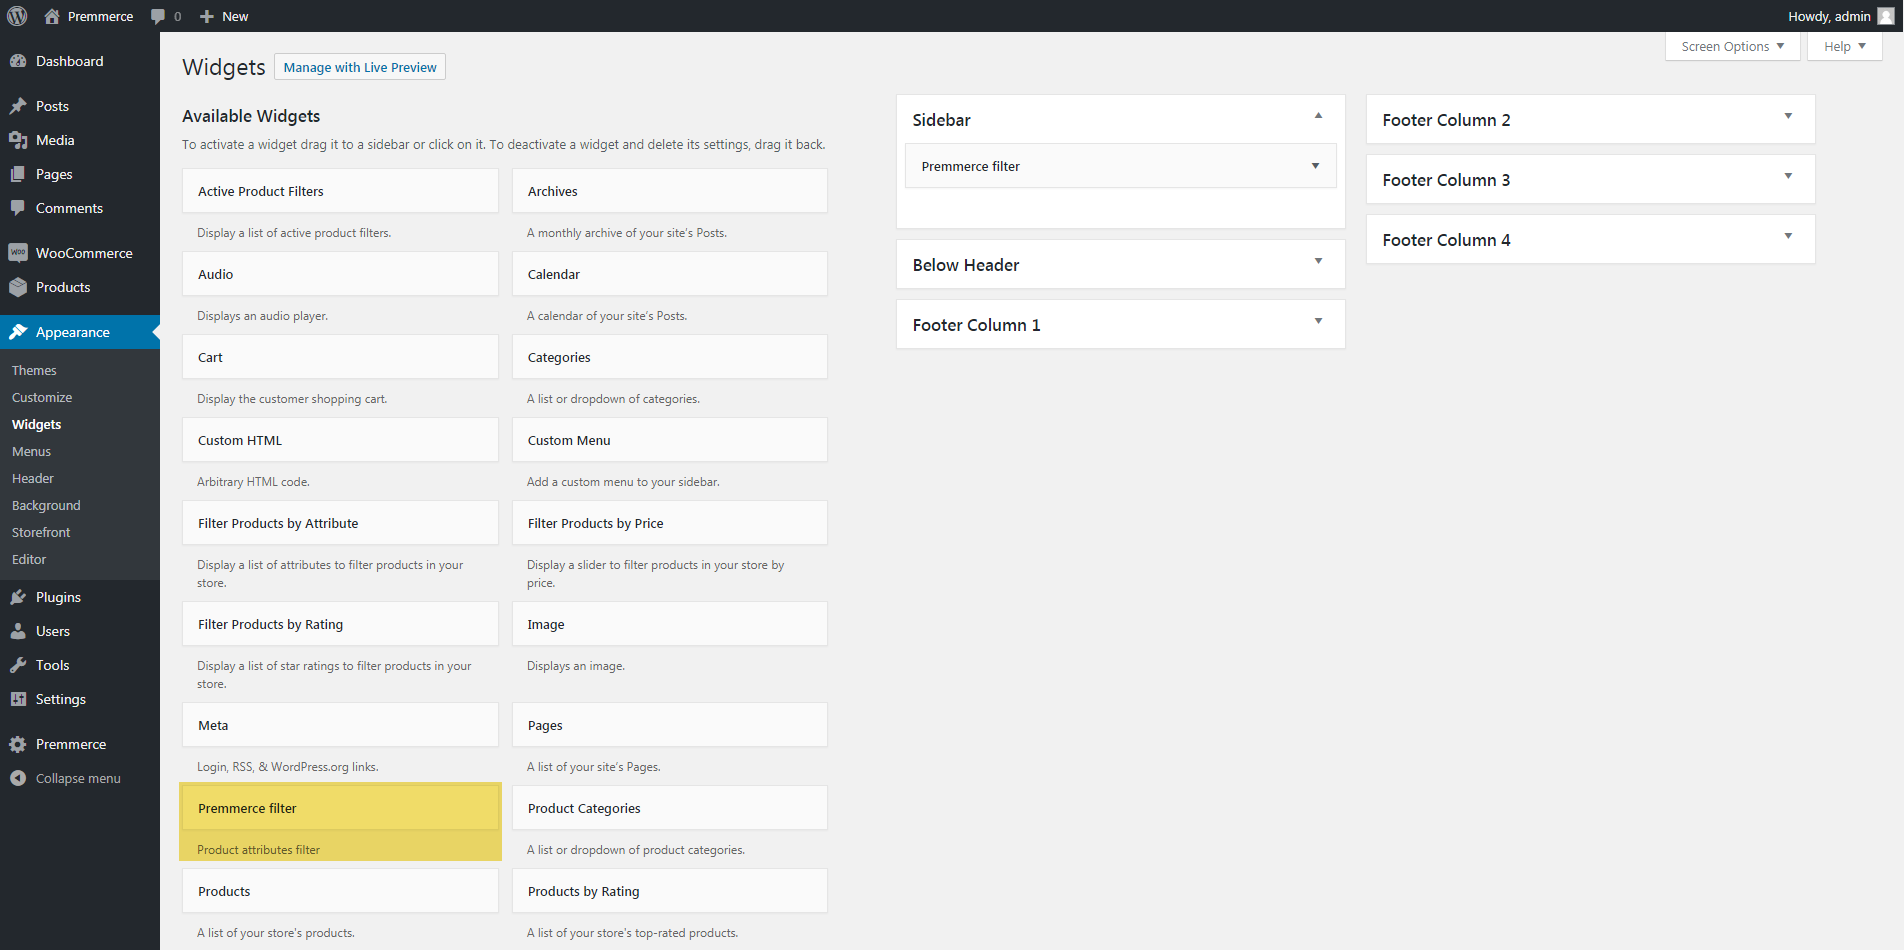
The Premmerce Filter widget
The filter for all product attributes, which can be selected in the settings, is added to the store page with the help of Premmerce Filter widget. It is displayed as a regular WordPress widget via the Widgets page in the dashboard:
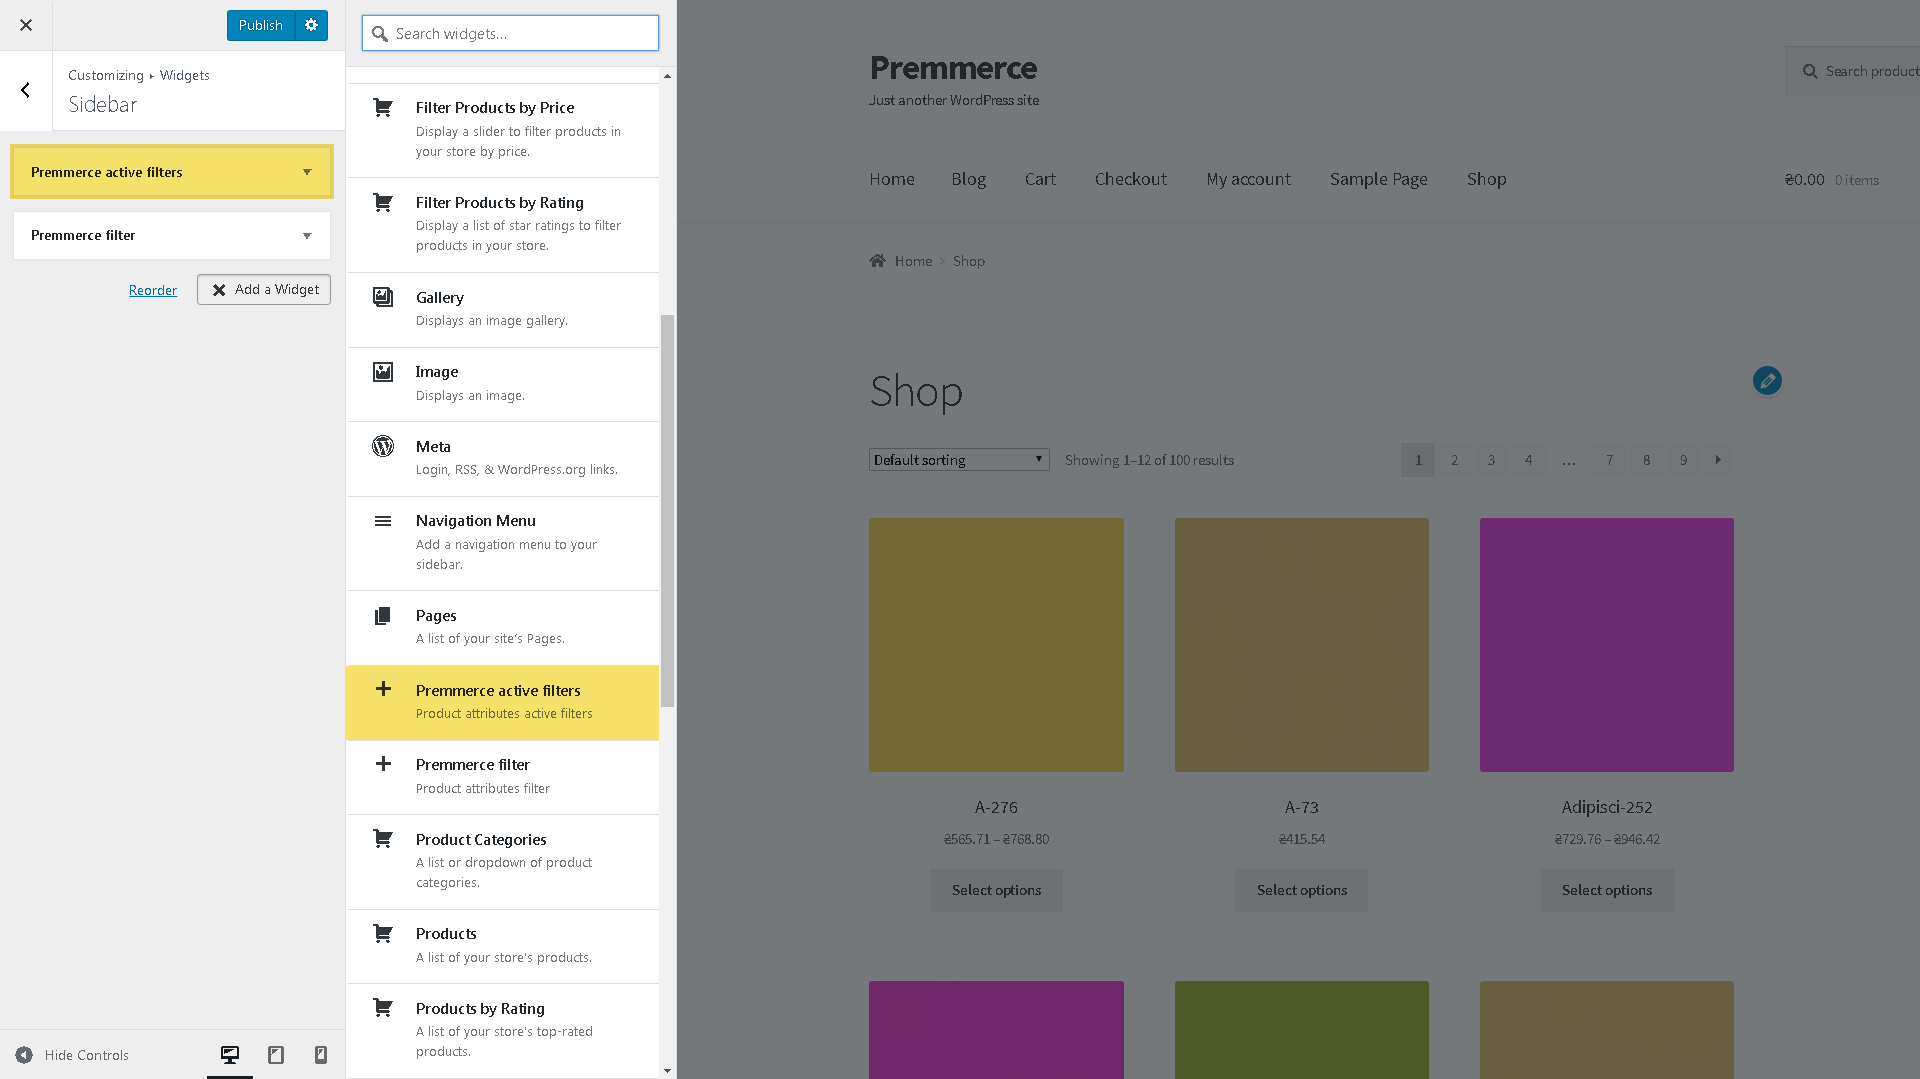
or via the Customizer:

All widget settings are on the Premmerce WooCommerce Product Filter page.
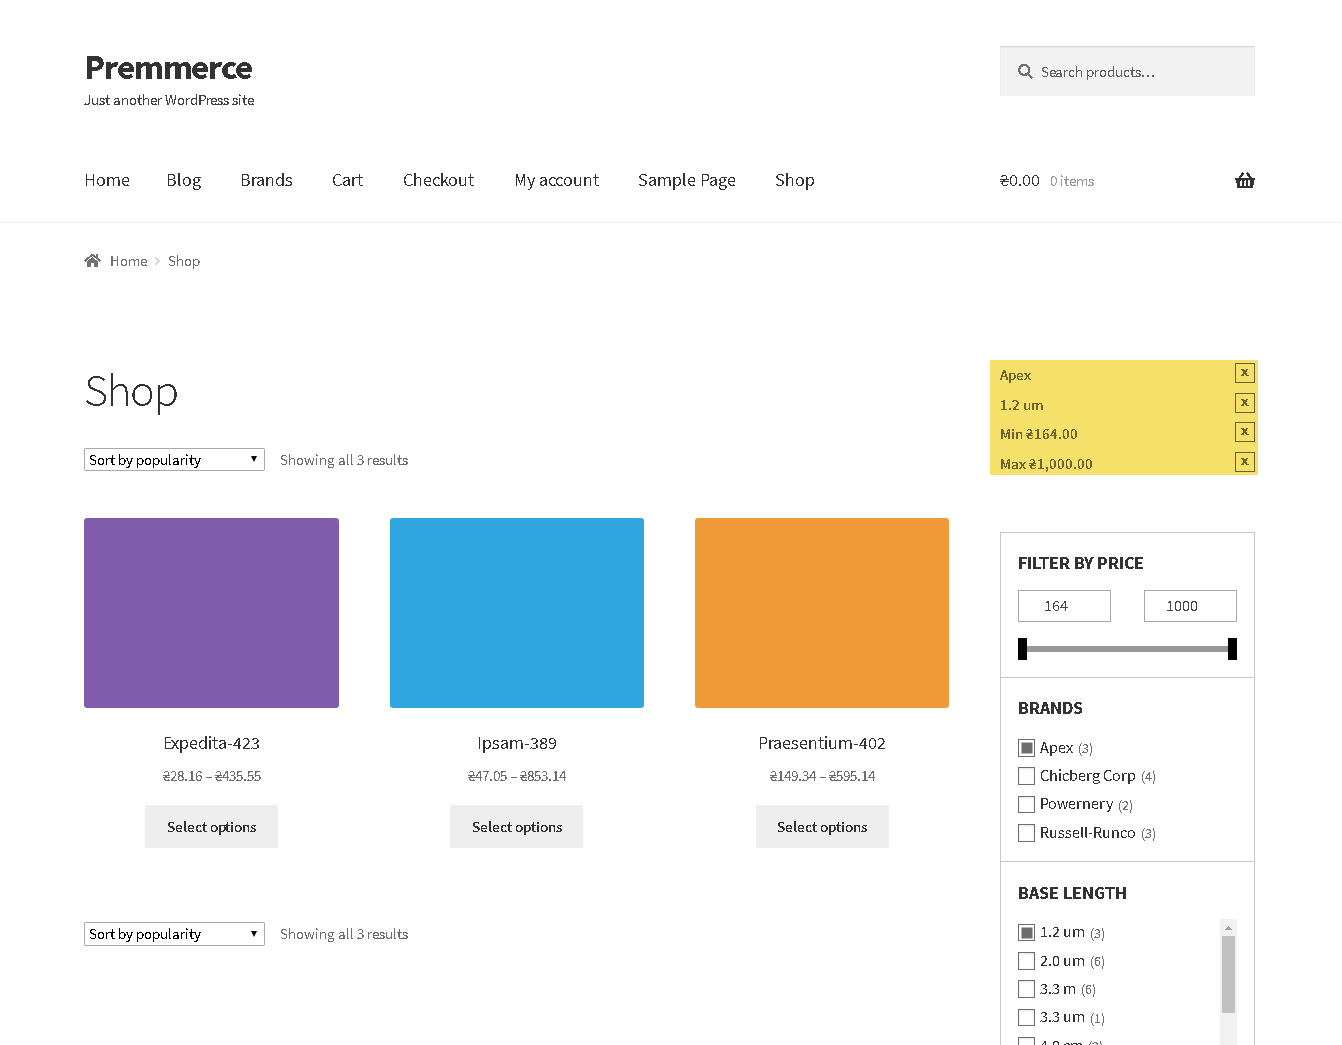
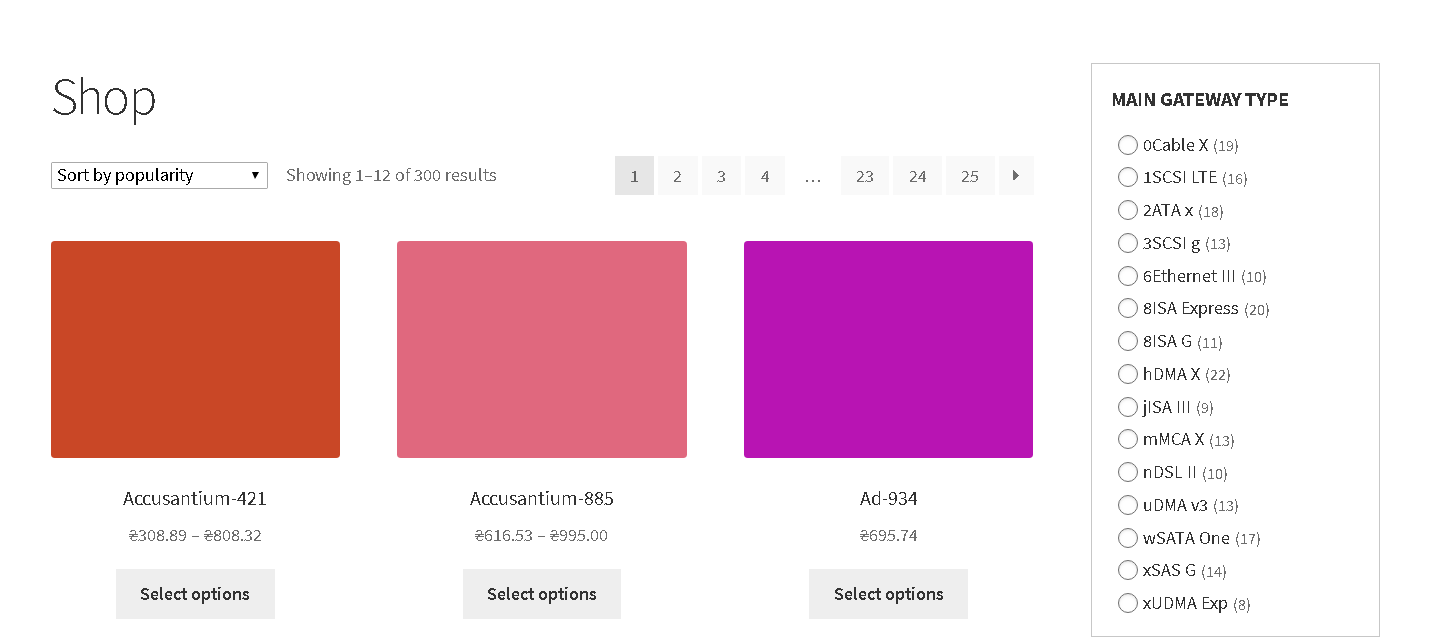
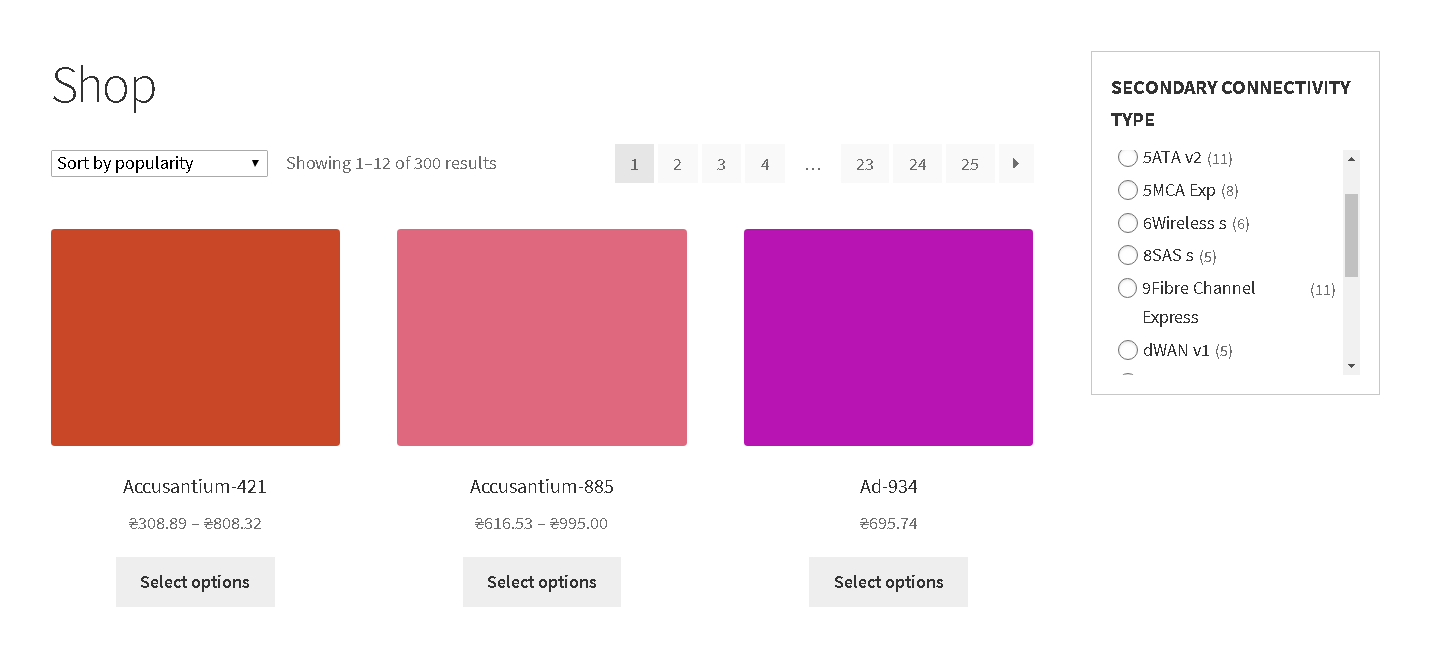
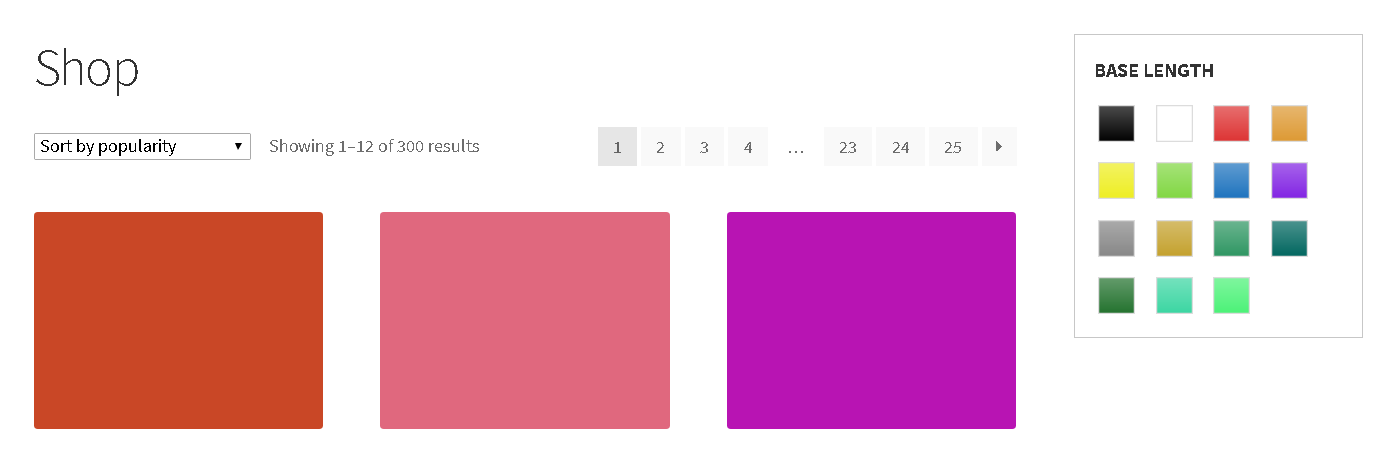
An example of displaying the filter on the Shop page:
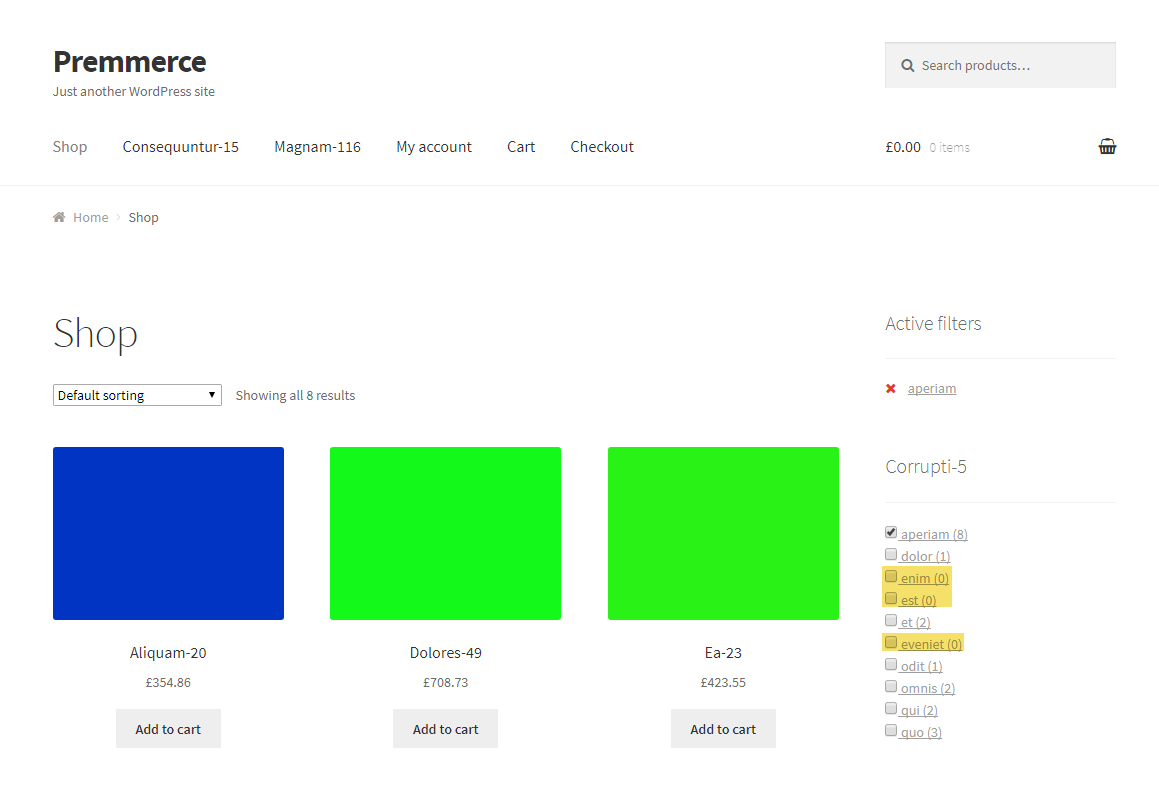
The Premmerce Active Filters widget
It’s a widget of all active filters (attributes, prices and brands). It’s displayed as a regular WordPress widget via the Widgets page in the dashboard:
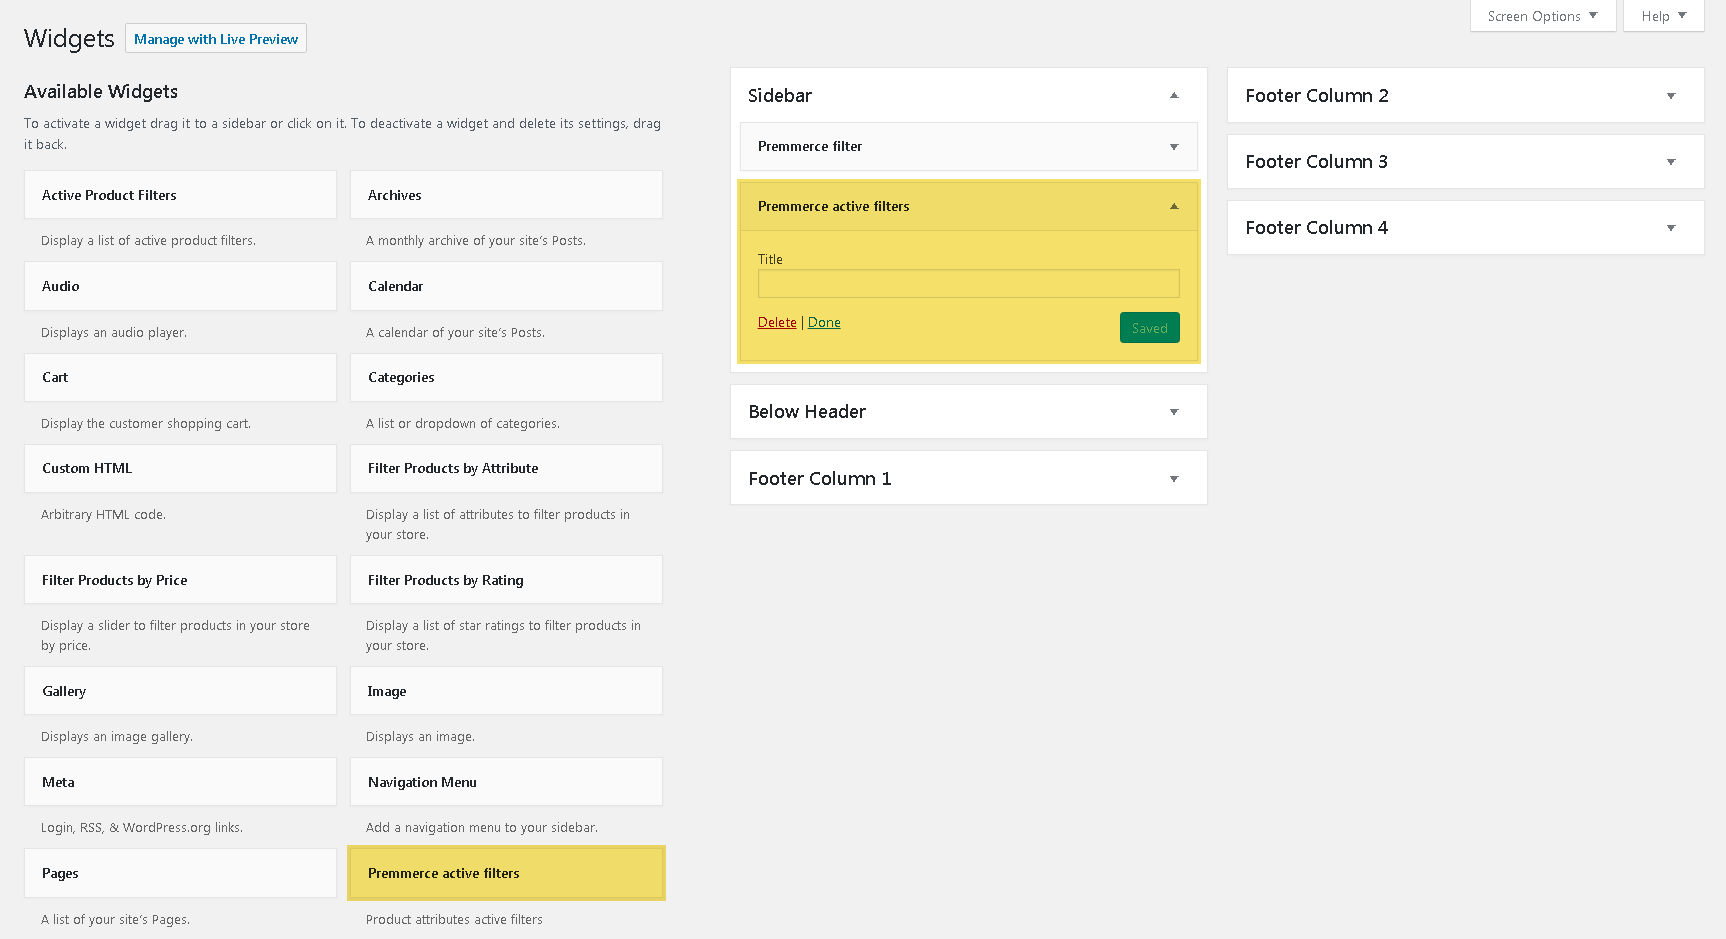
or via the Customizer:
An example of displaying the widget on the Shop page:
The Managing Filters Page in the Dashboard
The page contains three tabs:
- Attributes – filter elements settings
- Settings – general filter settings
- Cache – managing the filter cache
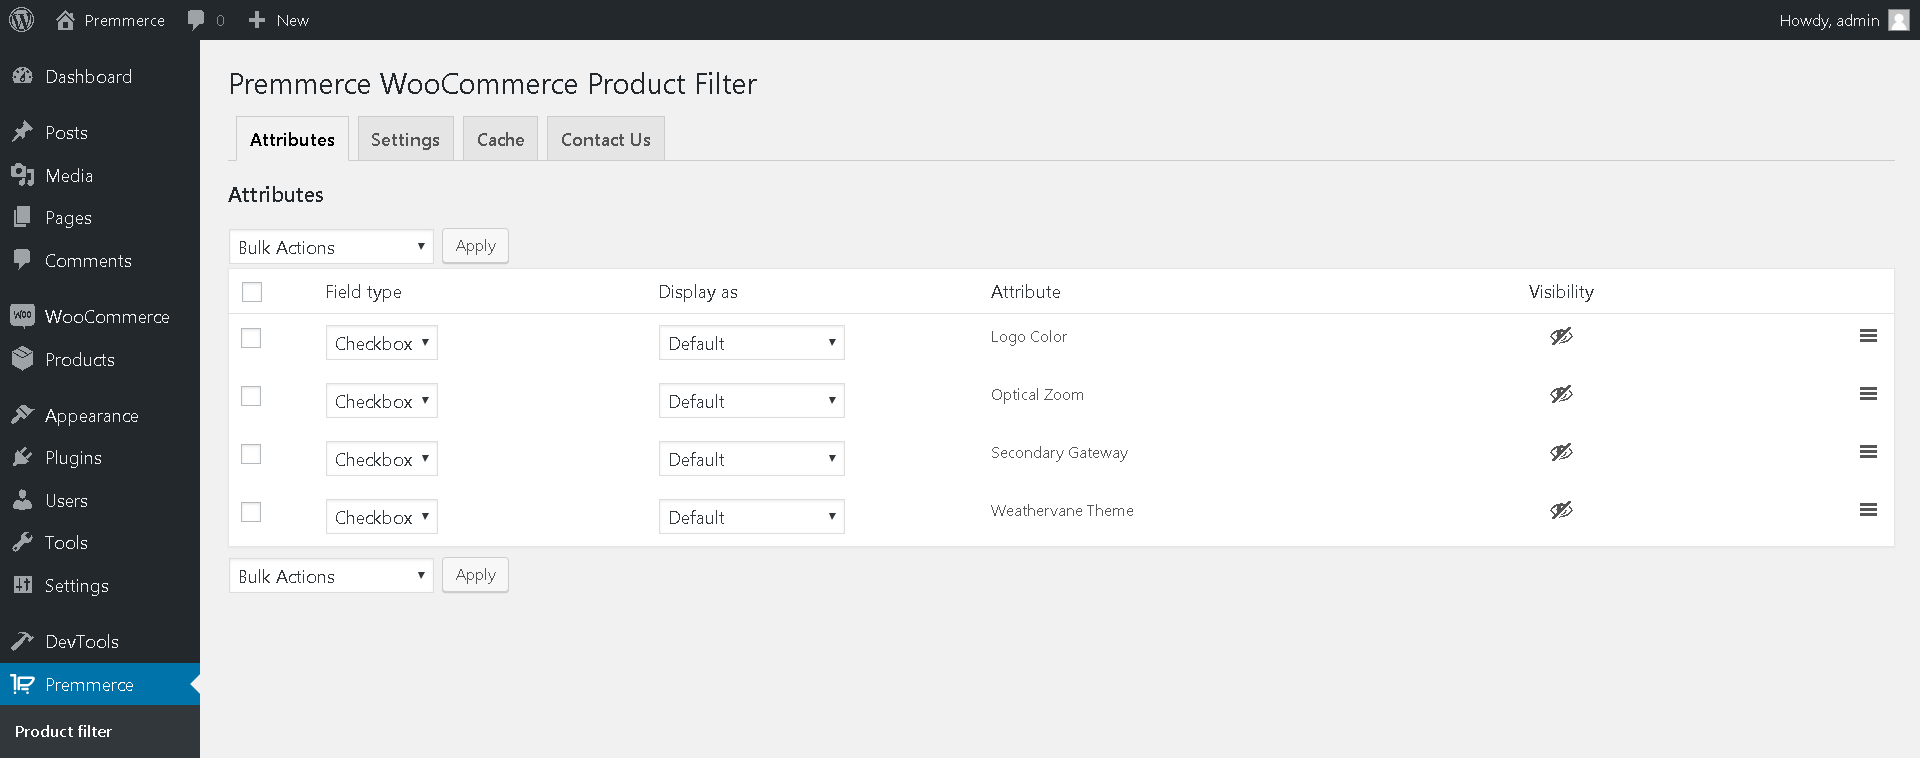
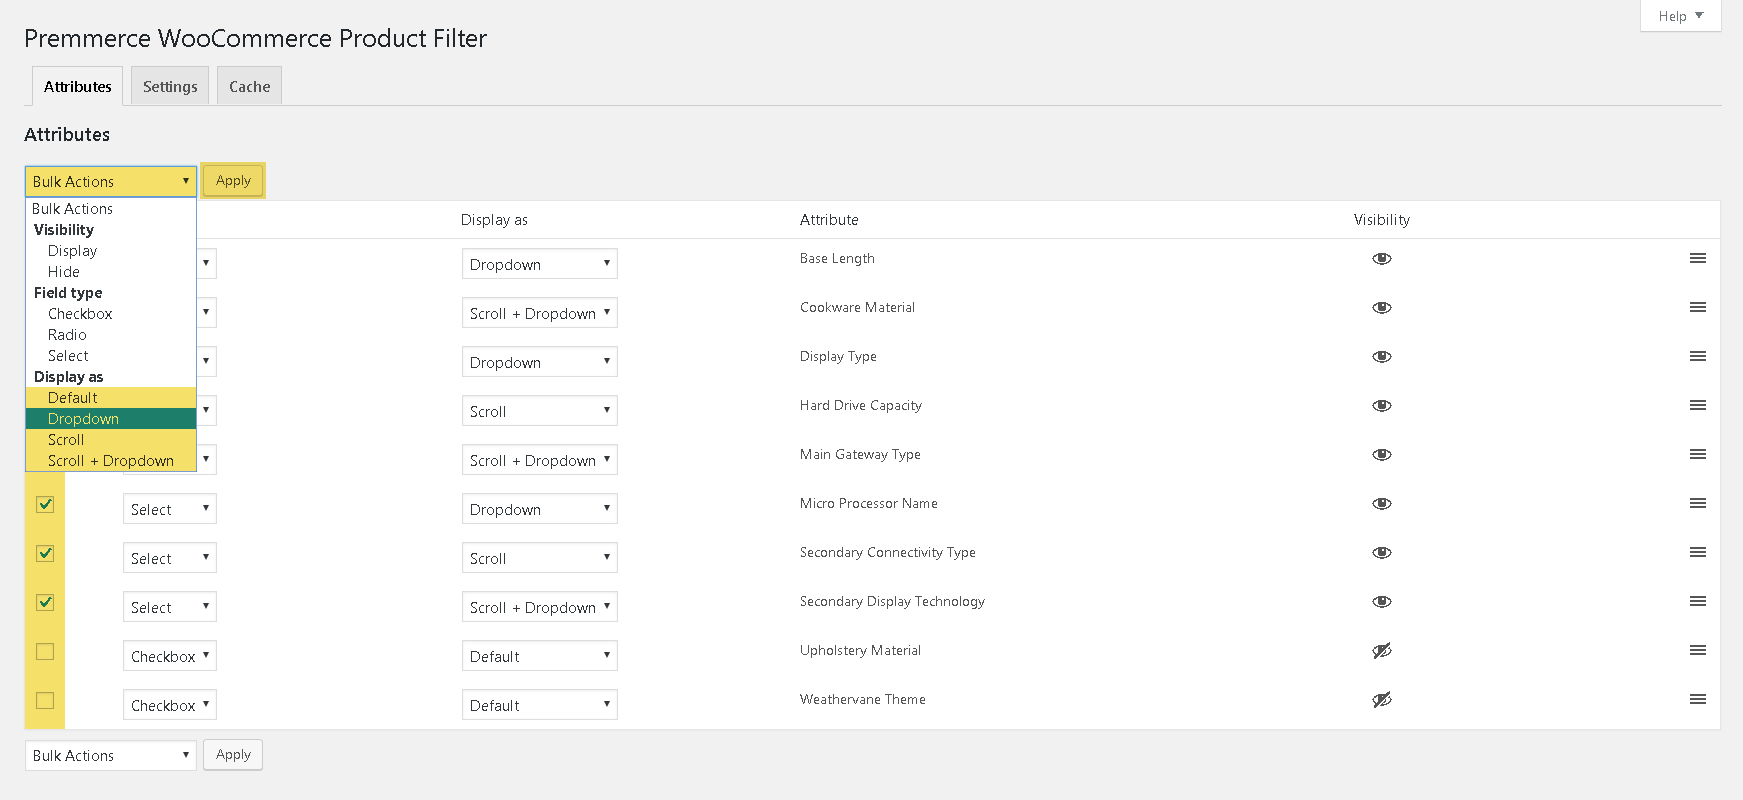
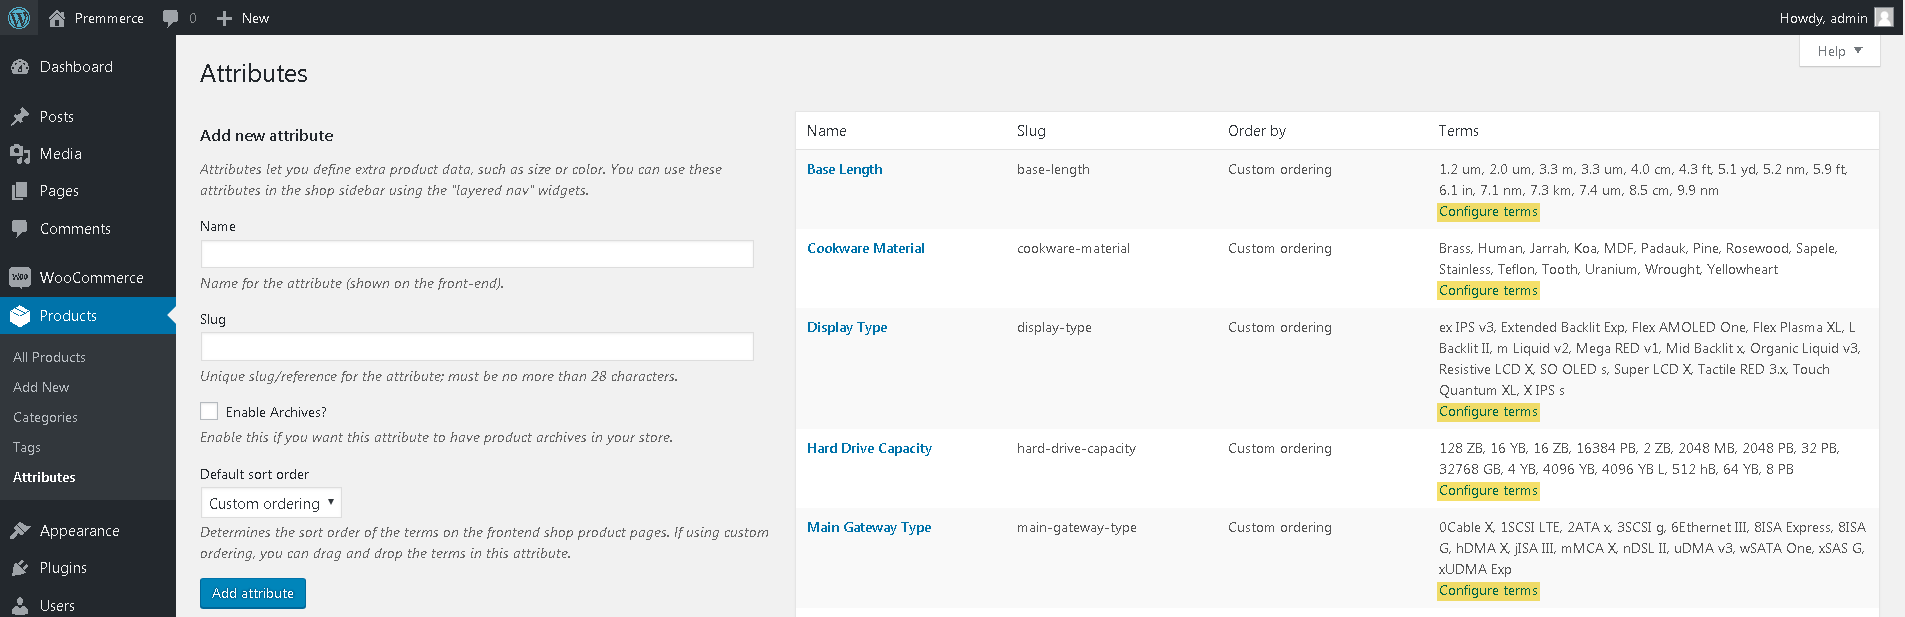
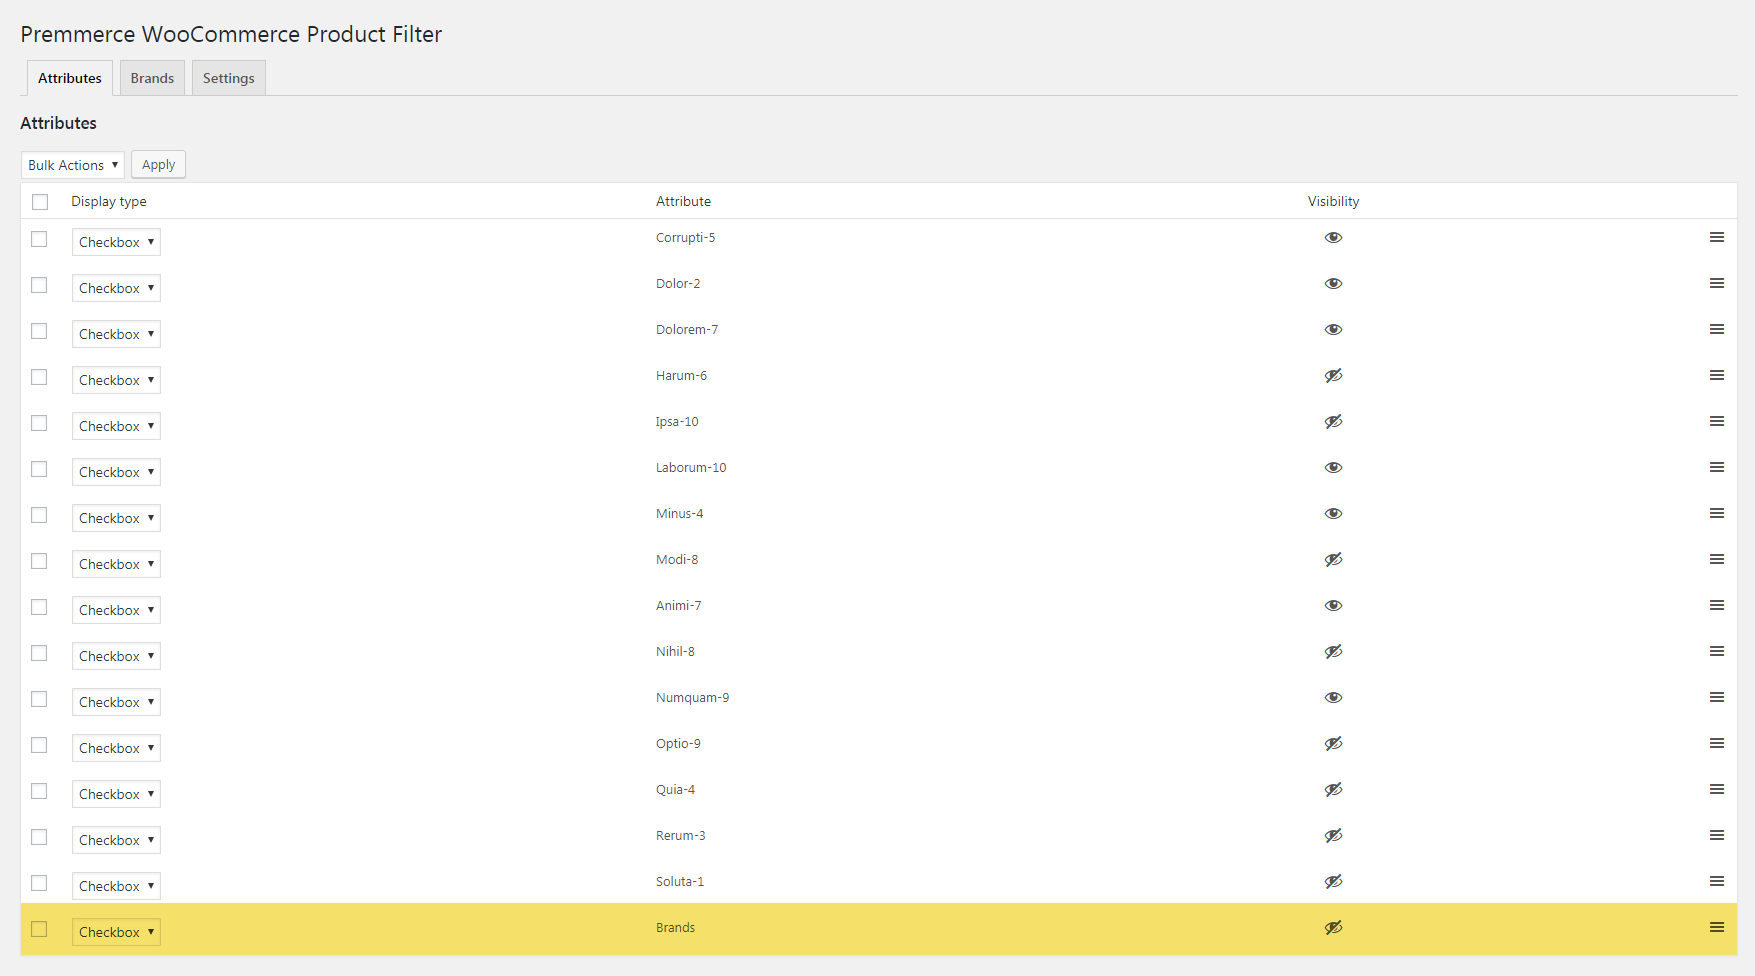
The Attributes Tab
In this tab you can setup the content and display of the Premmerce Filter widget.
Setting up the attributes display in the filter
To hide or display an attribute in the filter, click the icon in the ‘Visibility’ column.

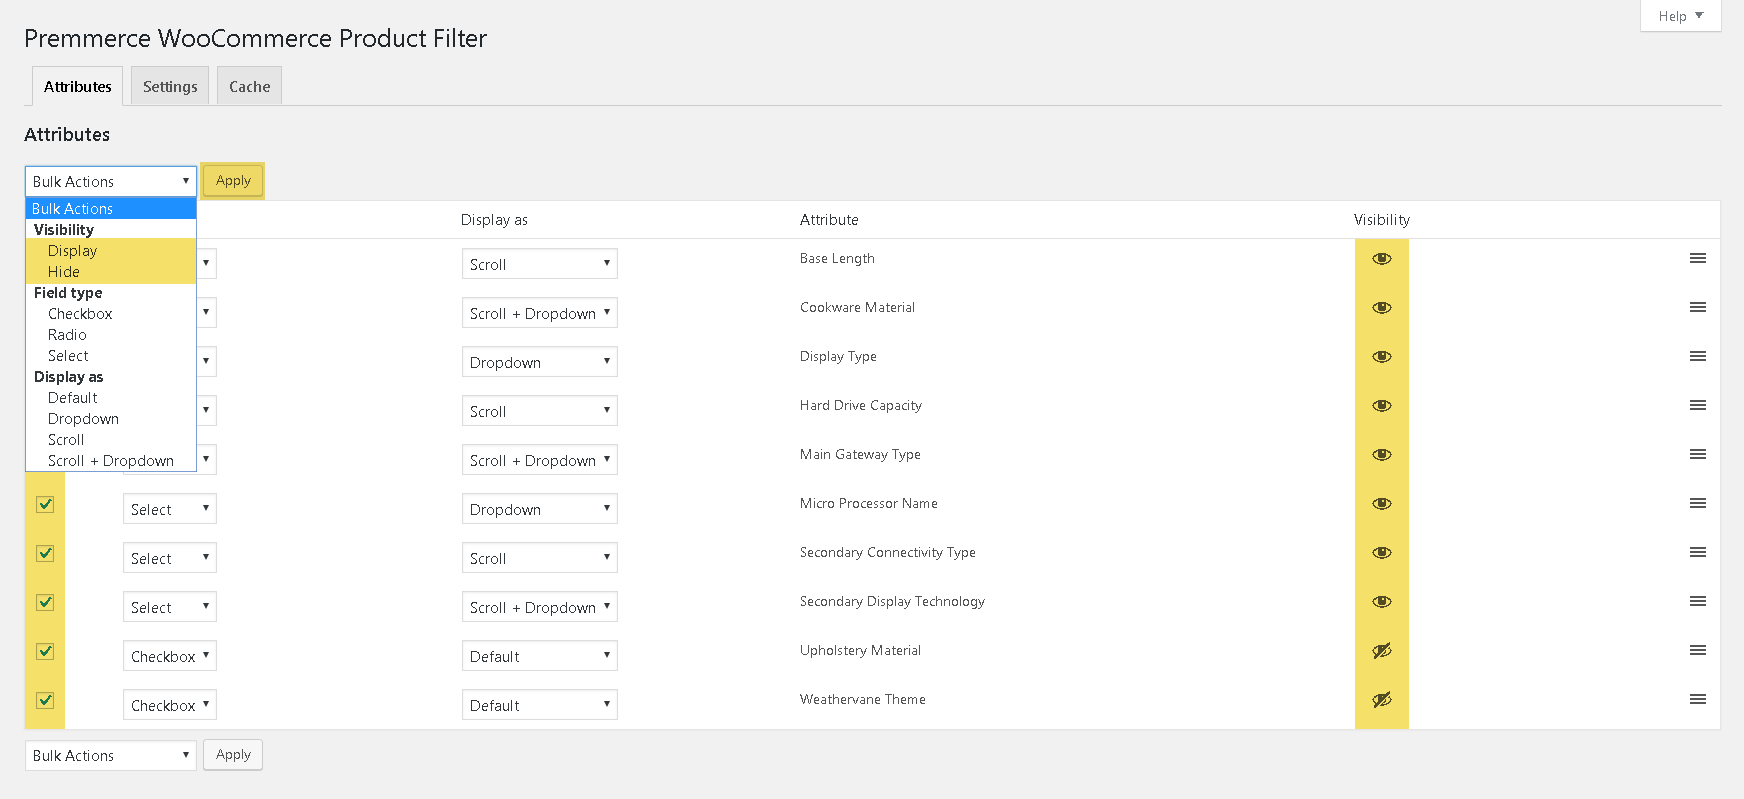
The bulk change of the attribute status:
- Activate the checkboxes of the needed attributes.
- Select ‘Display’ or ‘Hide’ from the ‘Bulk Action’ drop-down list.
- Click the ‘Apply’ button.
- In the ‘Visibility’ column you can see whether the attribute is displayed in the filter or not.
Important!
The filter automatically hides the individual attribute terms or the entire attribute if they are not used in any product.
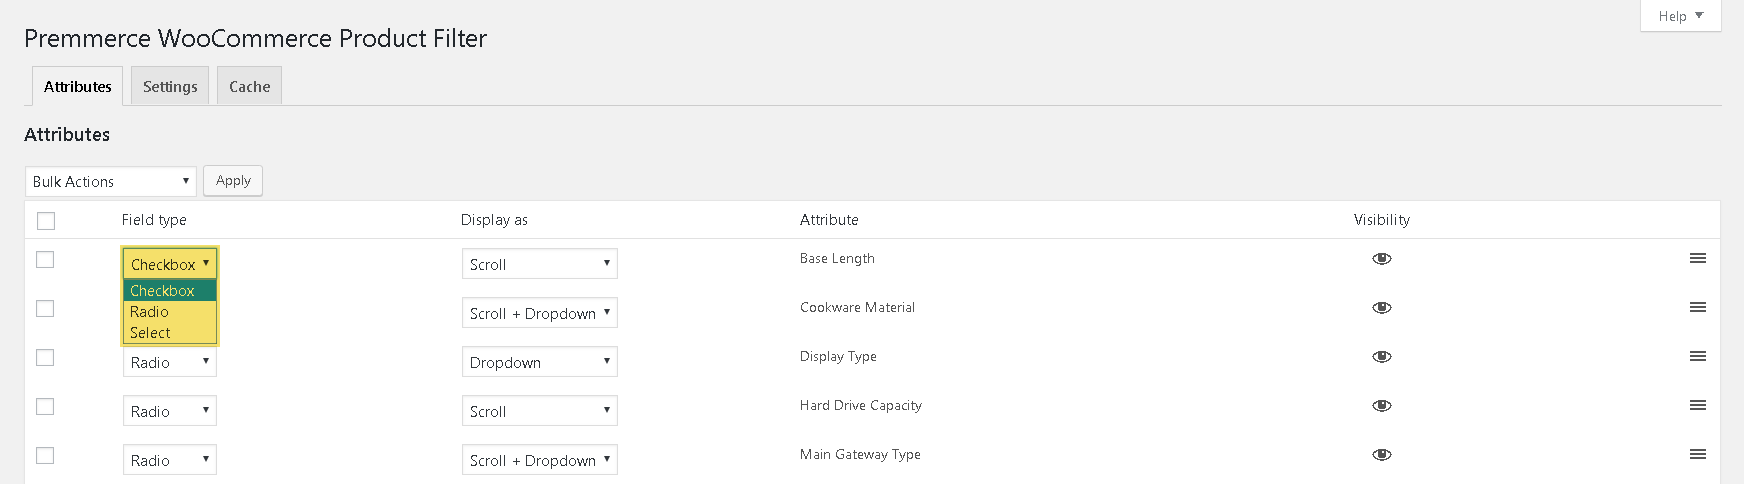
Setting up the attributes field type in the filter
For each filter attribute, you can choose the field type – Select, Checkbox, or Radio box. To do this, please follow the steps:
- Click the drop-down list in the ‘Field type’ column in the needed attribute row.
- Click the display type you need, the change is saved automatically.
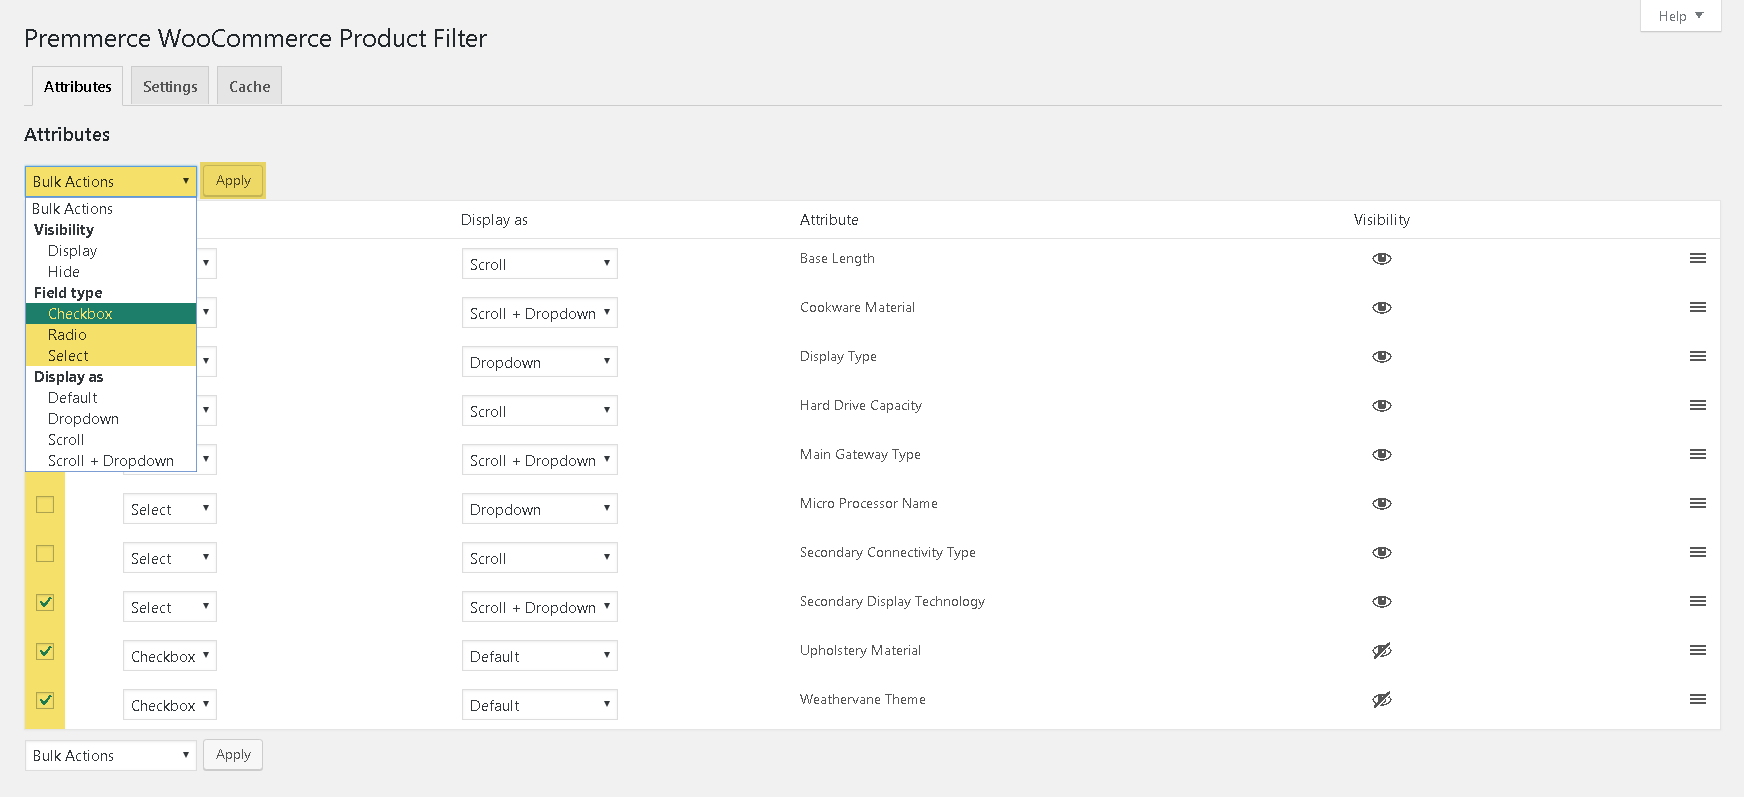
You can also make the bulk change of the display type by doing the following:
- Mark the checkboxes of the attributes you want to change the display type for.
- Select the display type you need from the Bulk Actions drop-down list and click ‘Apply’.
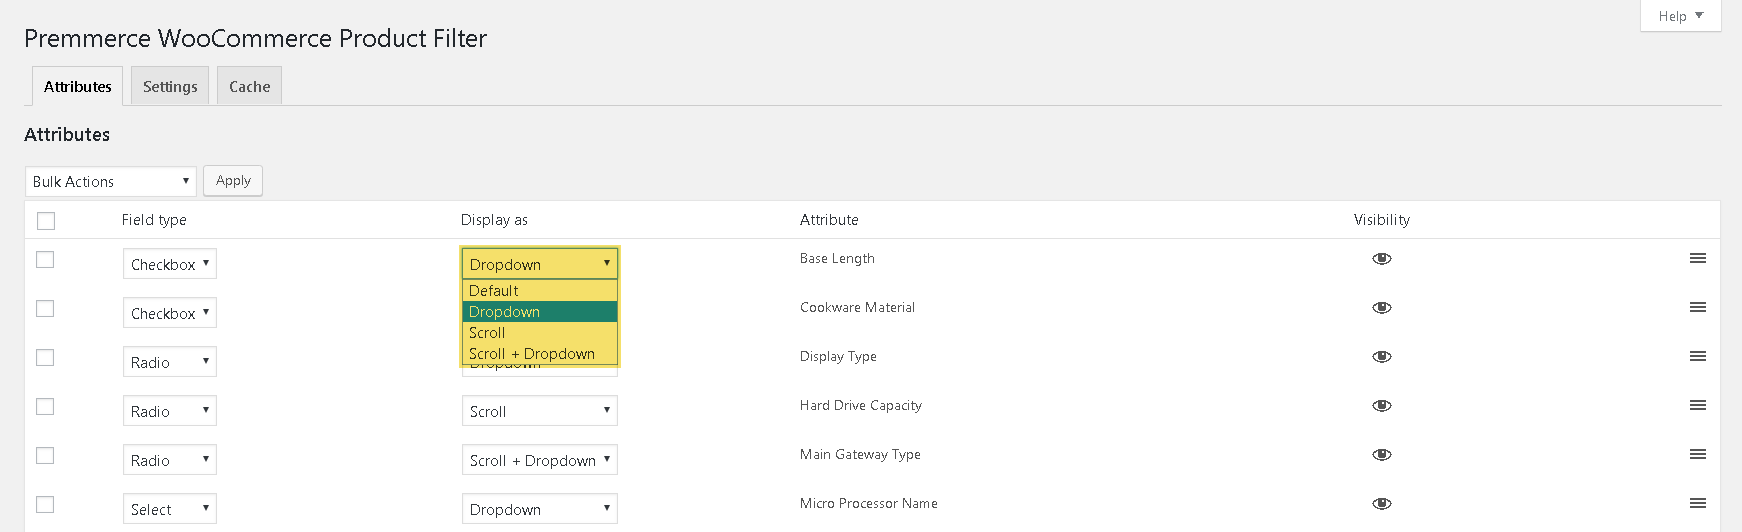
Choosing the attributes display type in the filter
There are 4 options to choose from: Default, Dropdown, Scroll або Scroll + DropDown:
- Click the drop-down list in the ‘Display as’ column in the needed attribute row.
- Click the display type you need, the change is saved automatically.
You can also make the bulk change of the display type by following the steps below:
- Mark the checkboxes of the attributes you want to change the display type for.
- Select the display type you need from the Bulk Actions drop-down list and click ‘Apply’.
The examples of displaying attributes in the filter:
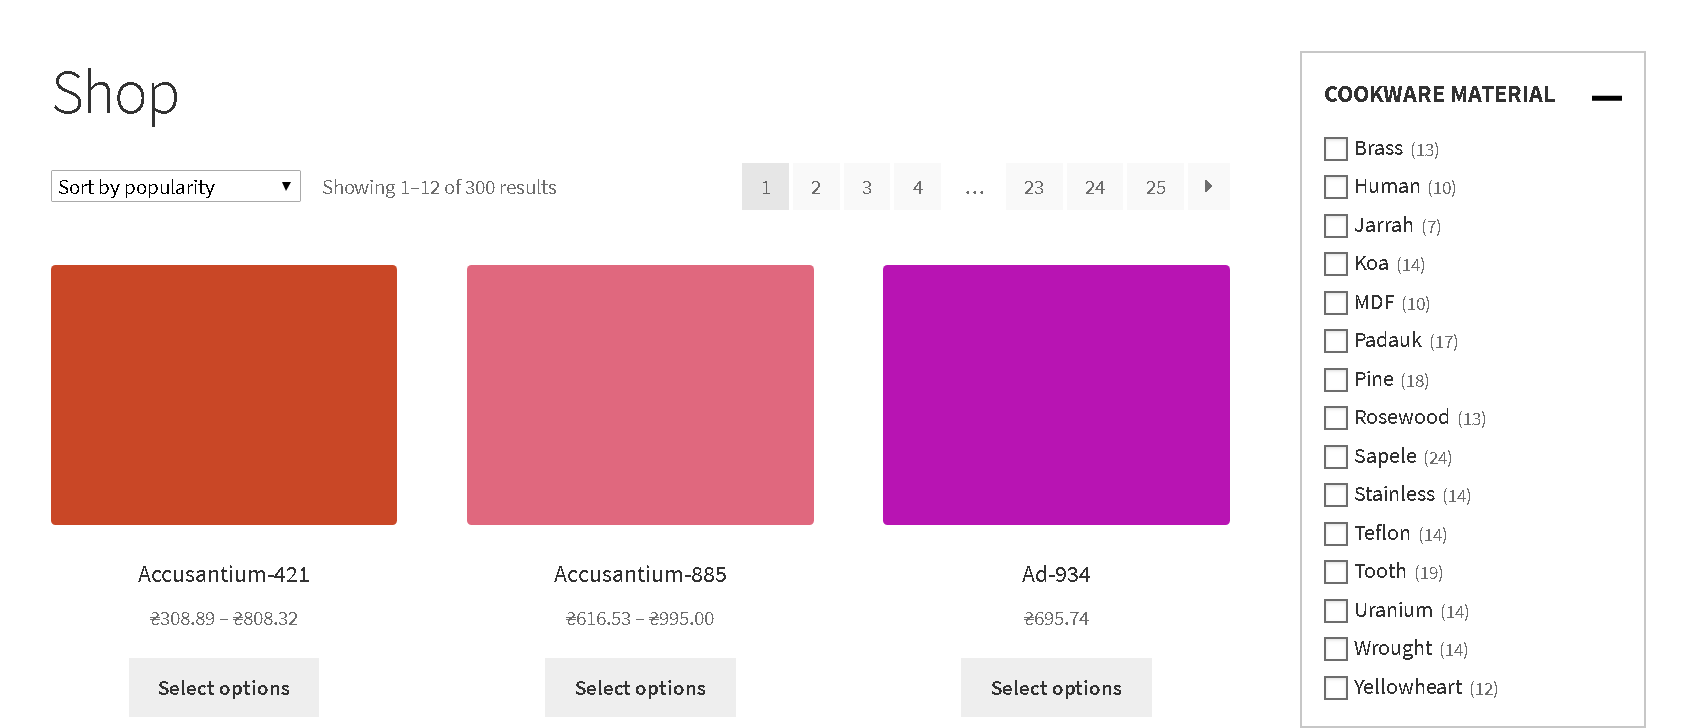
- Checkbox

- Radiobox
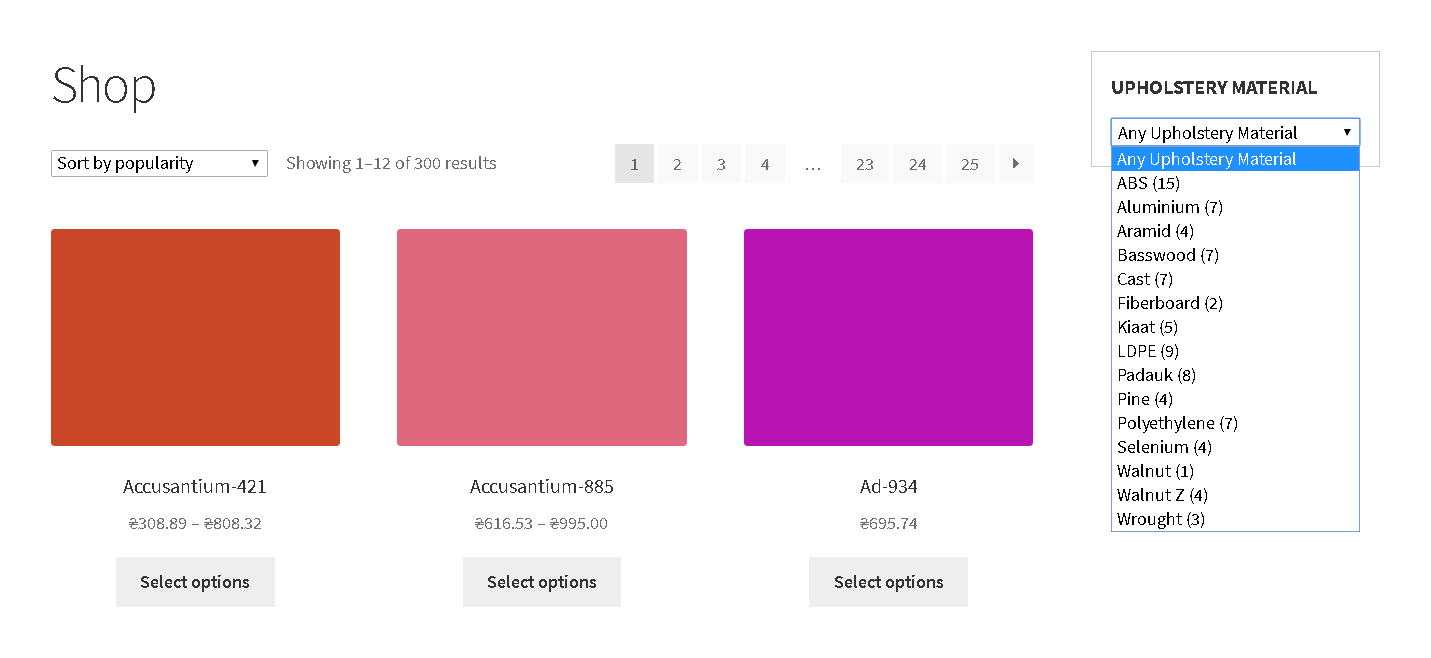
- Select

After clicking the drop-down list
- Dropdown

After clicking ‘+’
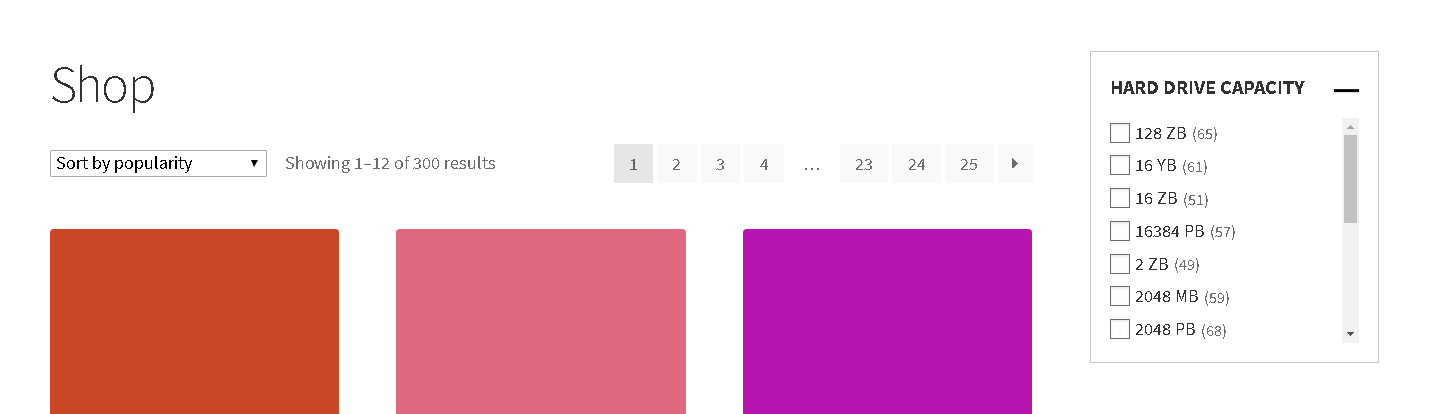
- Scroll
- Scroll + Dropdown
Changing the attributes display order in the filter
Drag and drop the attribute to the position you need using the position change button highlighted in the screenshot. The position changes are automatically saved:
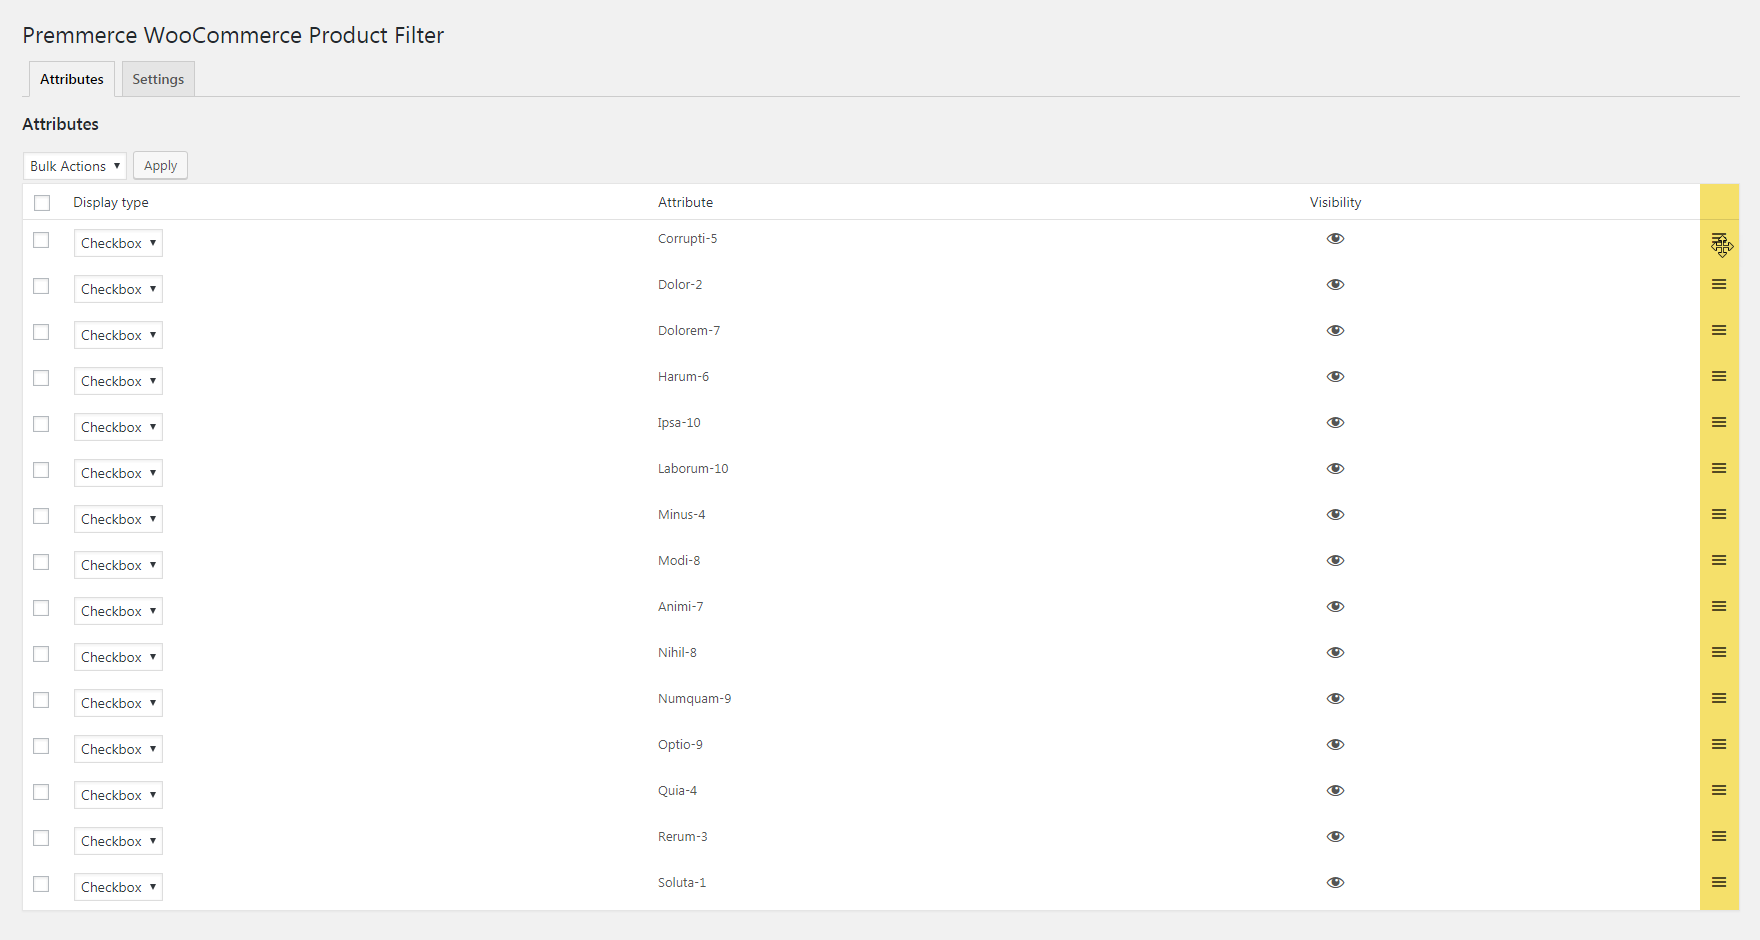
If you need to change the order of the attribute terms in the filter, change it on the ‘Configure terms’ page which you can find on the Attributes page.
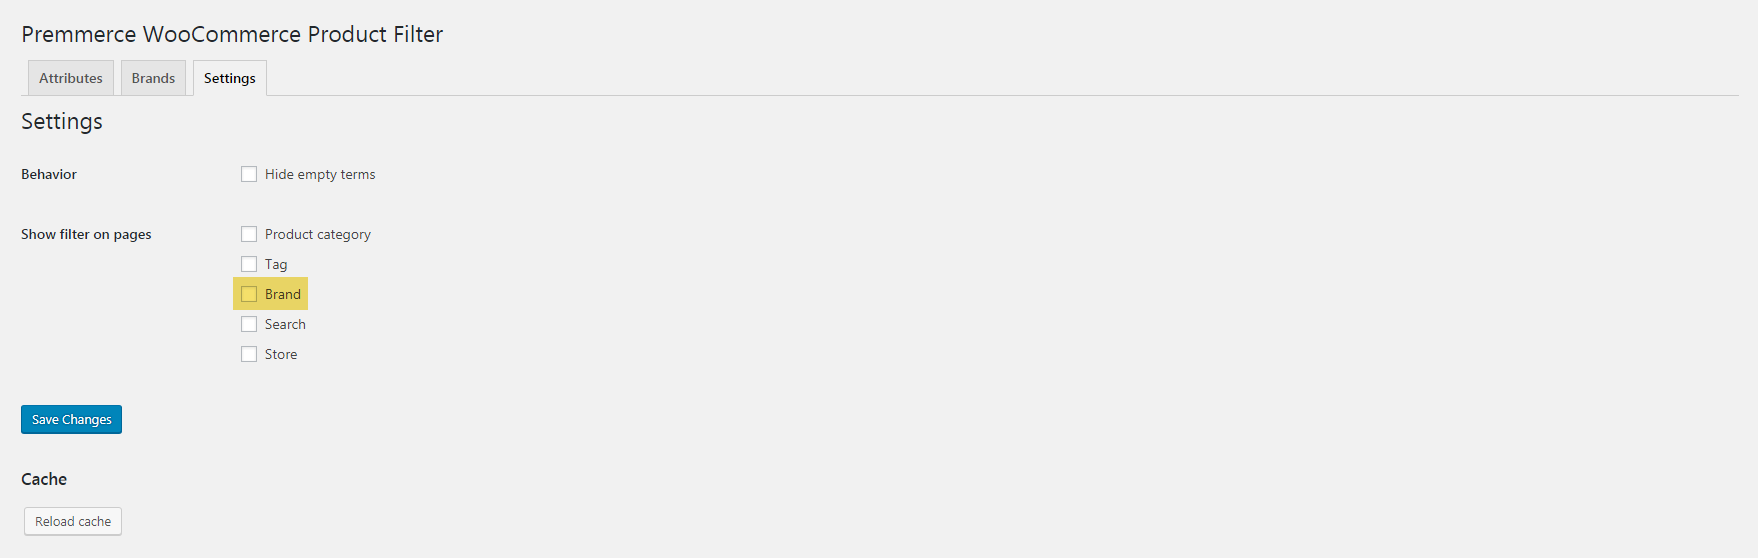
Settings tab
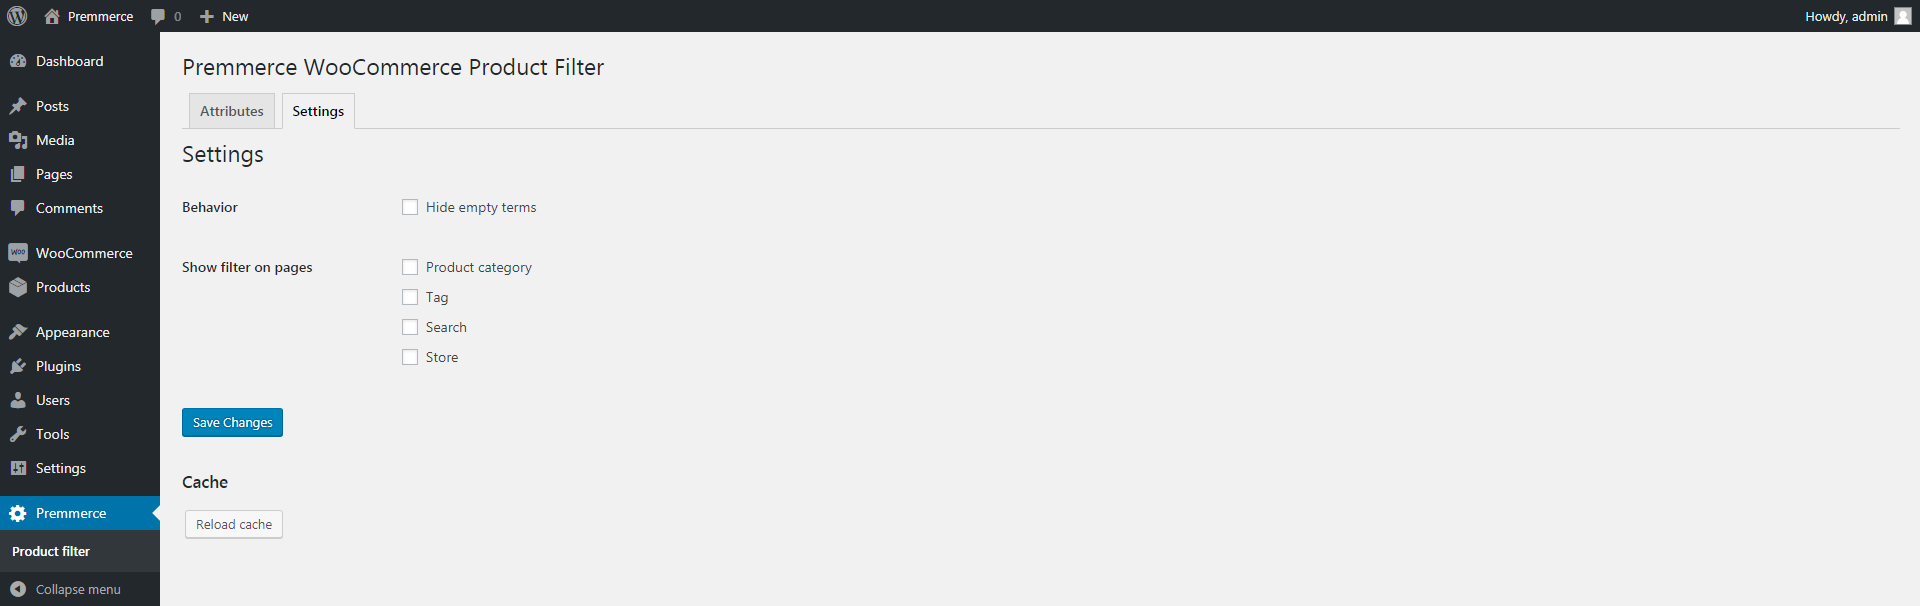
In this tab, you can customize the filter settings:
Hide empty terms
Activate this checkbox if you want only the terms of product attributes to remain after filtering.
The way filter looks before the activation of this option:
and after:

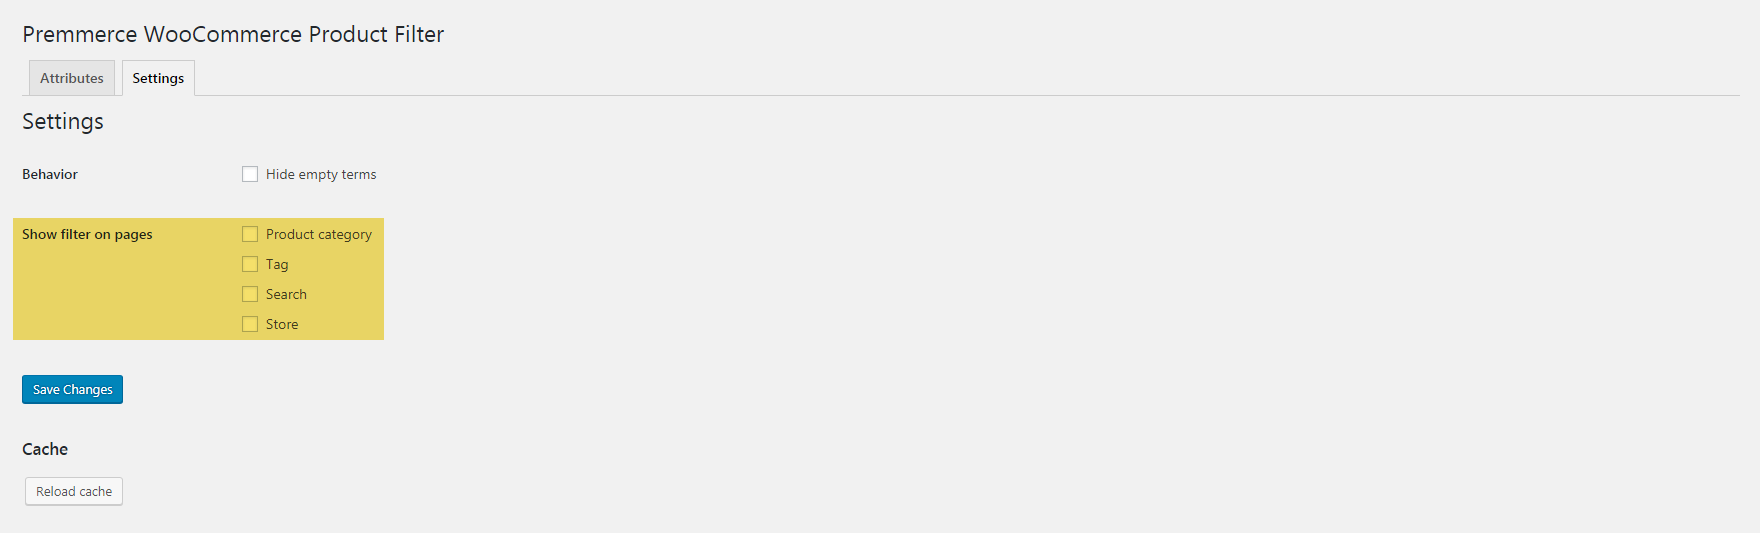
Show filter on pages
Activate the checkboxes of the pages you want to see the filter on.
Integration with Premmerce WooCommerce Brands
If you have the Premmerce WooCommerce Brands plugin installed, you will have an option of adding the brands to the filter.
You will see a new tab called Brands on the Premmerce WooCommerce Product Filter page.
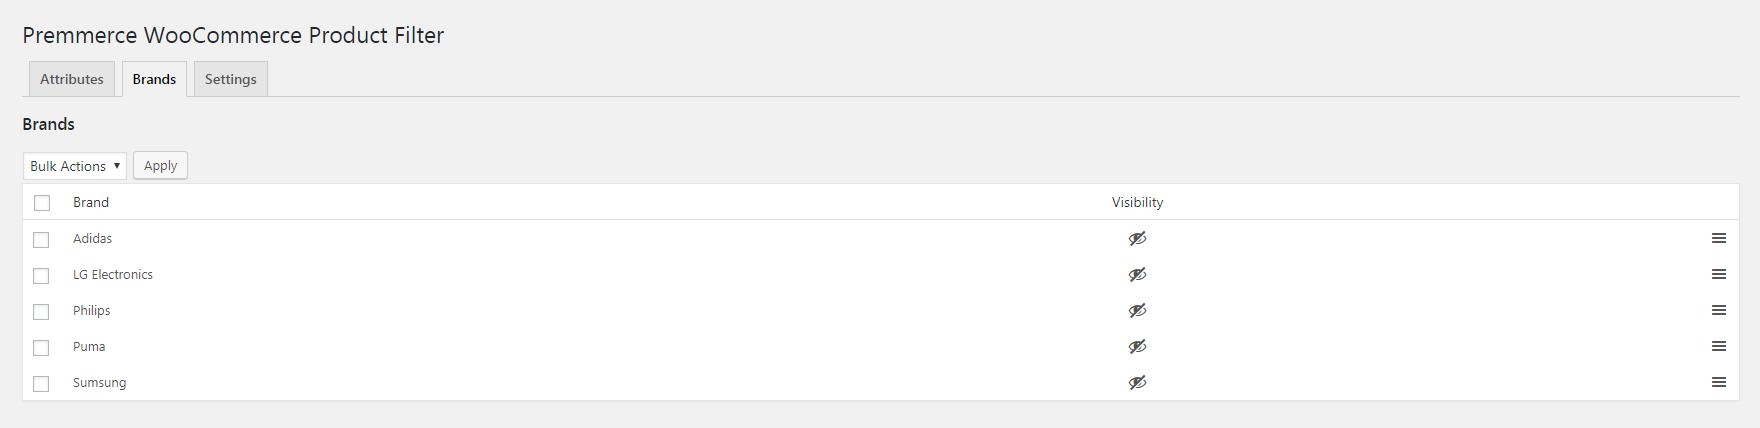
In this tab, just like in the Attributes tab, you can choose which brands will be displayed in the filter and which will not, and also define the order of their display within the Brands filter.
At the end of the Attributes tab table the Brands element will appear. You can apply the same actions to it as to the attributes: change the visibility, position and type of display in the filter.
The Settings tab will have an option to display the filter on the brand pages:
Premmerce WooCommerce Product Filter Premium
In this section you can read the documentation on the WooCommerce Product Filter functionality, available only in the premium version.
Installation
After the purchase of Premmerce WooCommerce Product Filter Premium, you’ll be able to access it in your Personal Account on the Premmerce website.
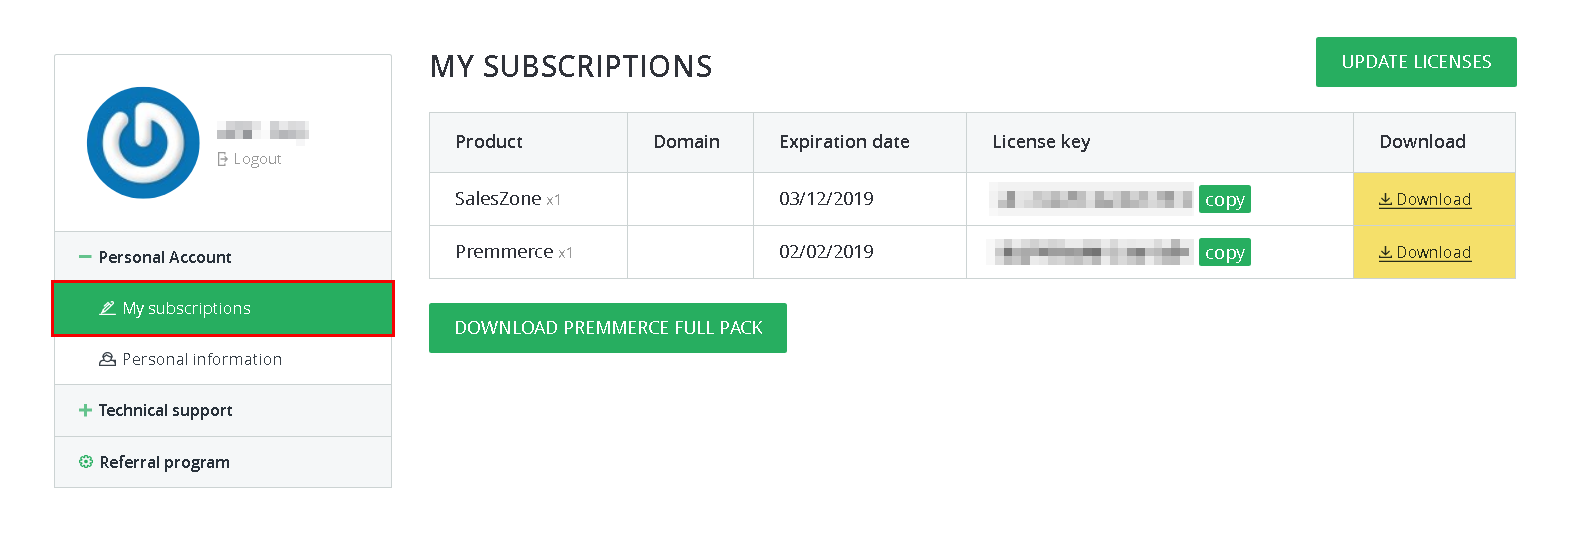 Download the plugin premium version archive and follow the steps below:
- Log in your site dashboard and go to the ‘Add New’ page.
- Click ‘Download plugins’.
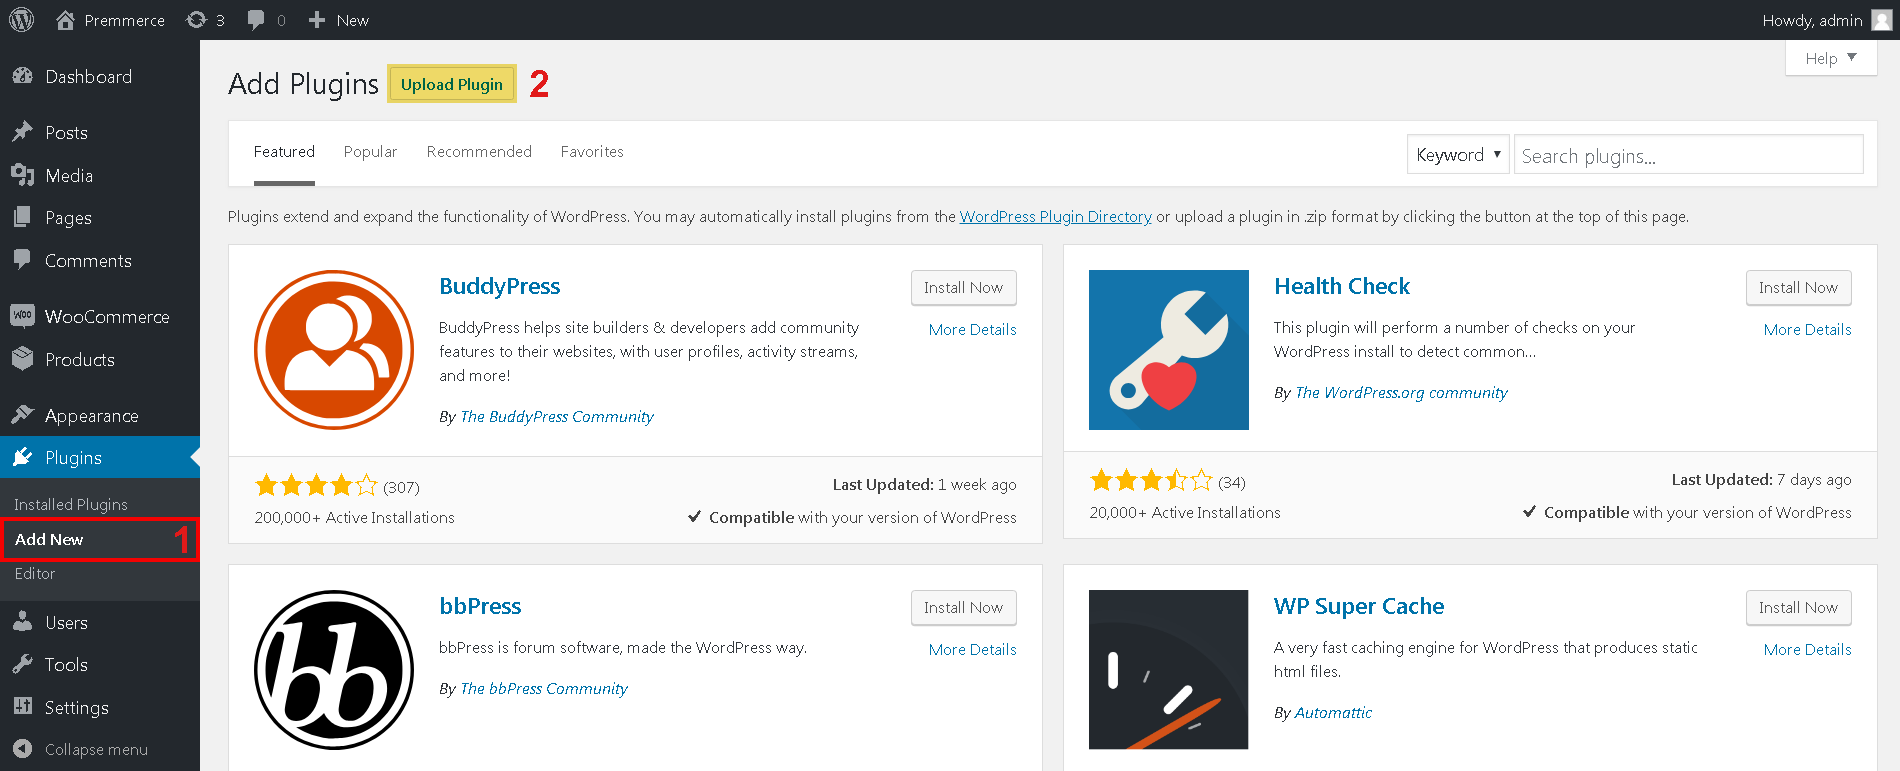
- Choose the downloaded plugin archive.
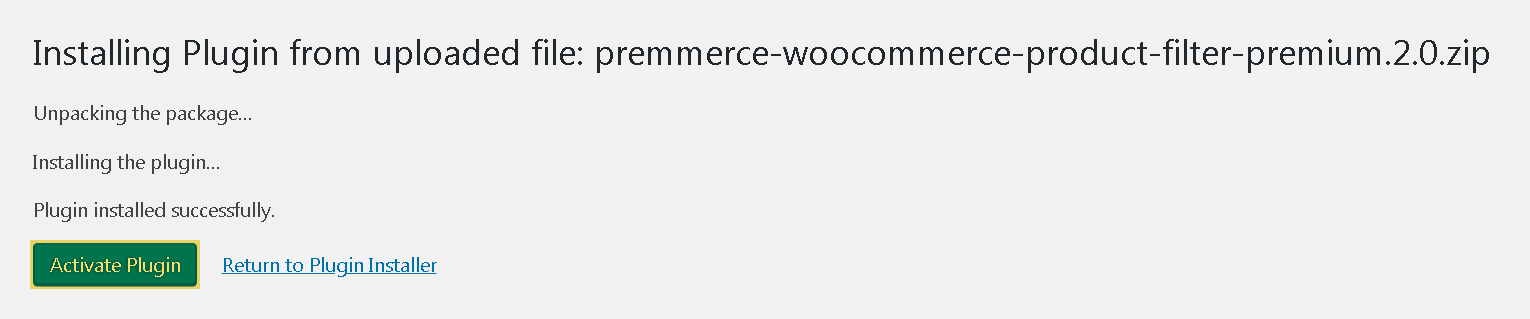
- Click ‘Install’.
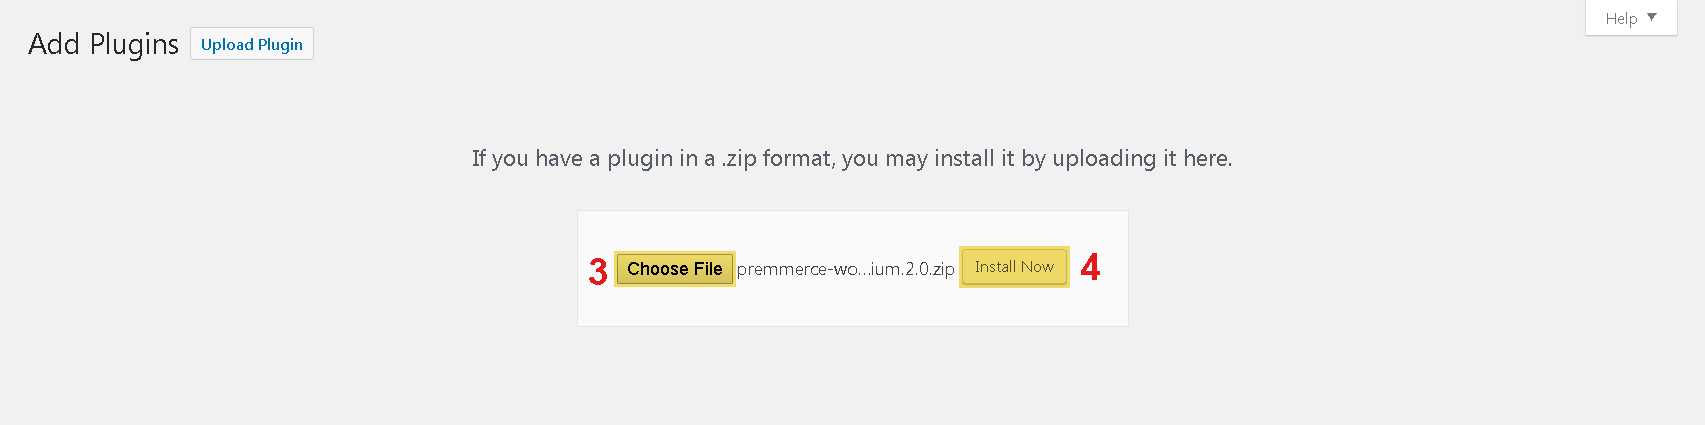
- Click ‘Activate’.
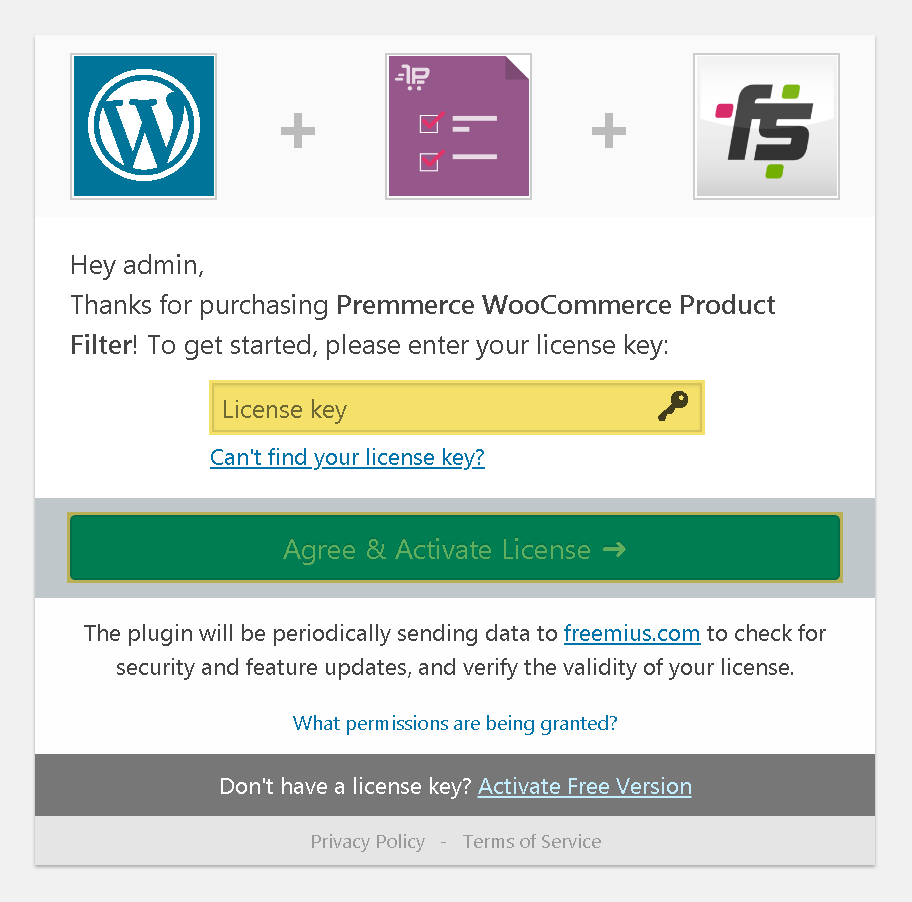
- Enter the license key (you can find it in your Personal Account) and click ‘Agree & Activate License’.
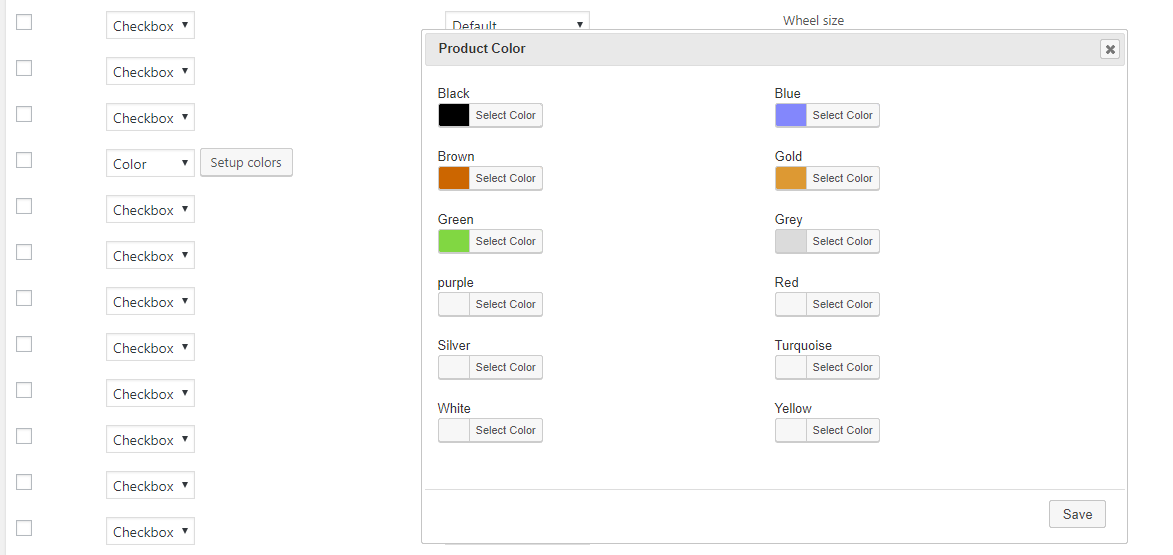
The additional field type – ‘Color’:
To assign a color to the attribute terms, click ‘Setup colors:
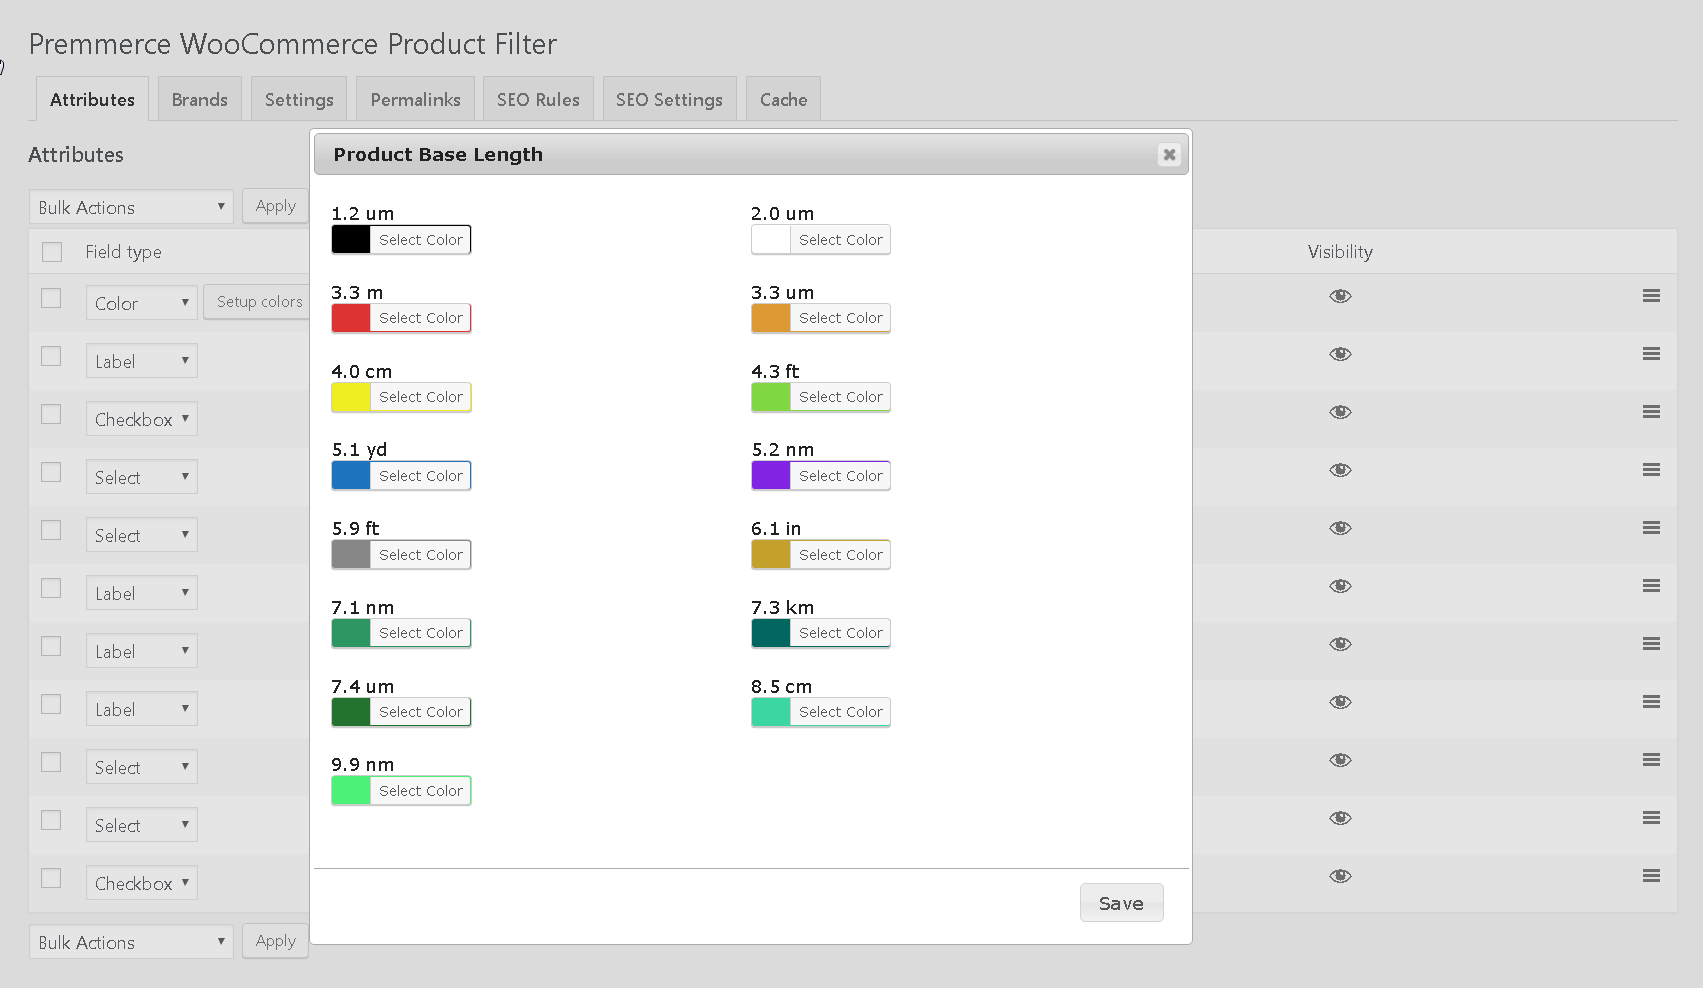
After the changes have been made, click ‘Save’.
The view on the Shop page:
The additional type of the field ‘Label’:

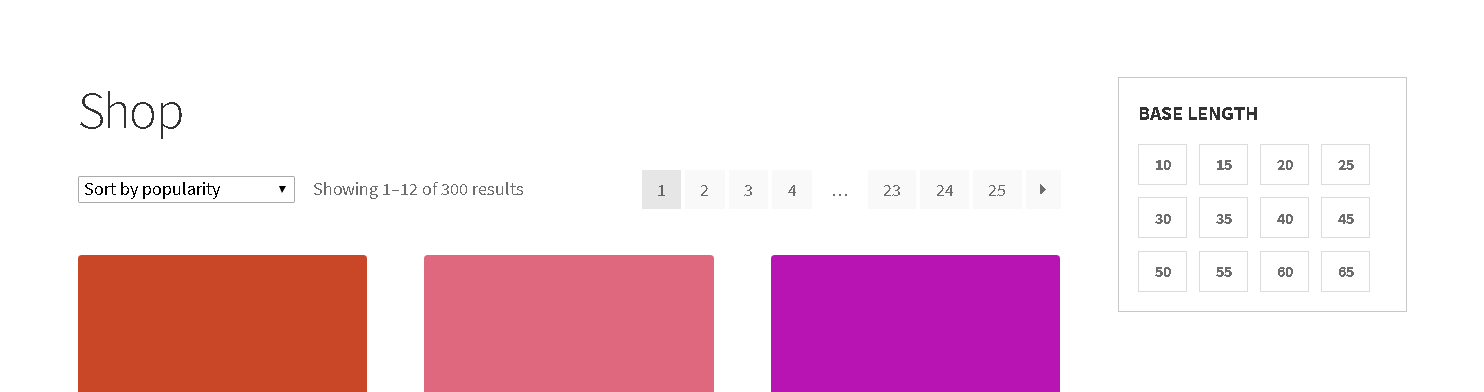
The Permalinks Tab

When the ‘Use permalinks’ option is enabled, instead of GET parameters, the Clean URL will be formed during the filtering process.
before activation:
http://test.loc/shop/?filter_secondary-connectivity-type=1fibre-channel-plus&query_type_secondary-connectivity-type=or
After activation:
http://test.loc/shop/attribute-secondary-connectivity-type-1fibre-channel-plus/
Also, on this page you can specify prefixes and a separator to form the Clean URL of filtering.
Search Engine Optimization
The ‘SEO Rules’ and ‘SEO Settings’ tabs are intended to assign unique metadata for landing pages created by filtering products by a user on the product category page.
The plugin purpose is to promoting the store in the search engine by using quite specific request (for example: ‘buy a black Nokia phone’ – where:
‘black’ – the term of the conditional attribute ‘Color’
‘phone’ – the product category
‘Nokia’ – manufacturer brand)
The result is achieved by creating a separate landing page of active filters and assigning unique metadata to it.
The SEO Rules Tab
On this tab you can setup rules of adding metadata to the separate landing pages with active filter values or generate rules for product categories.
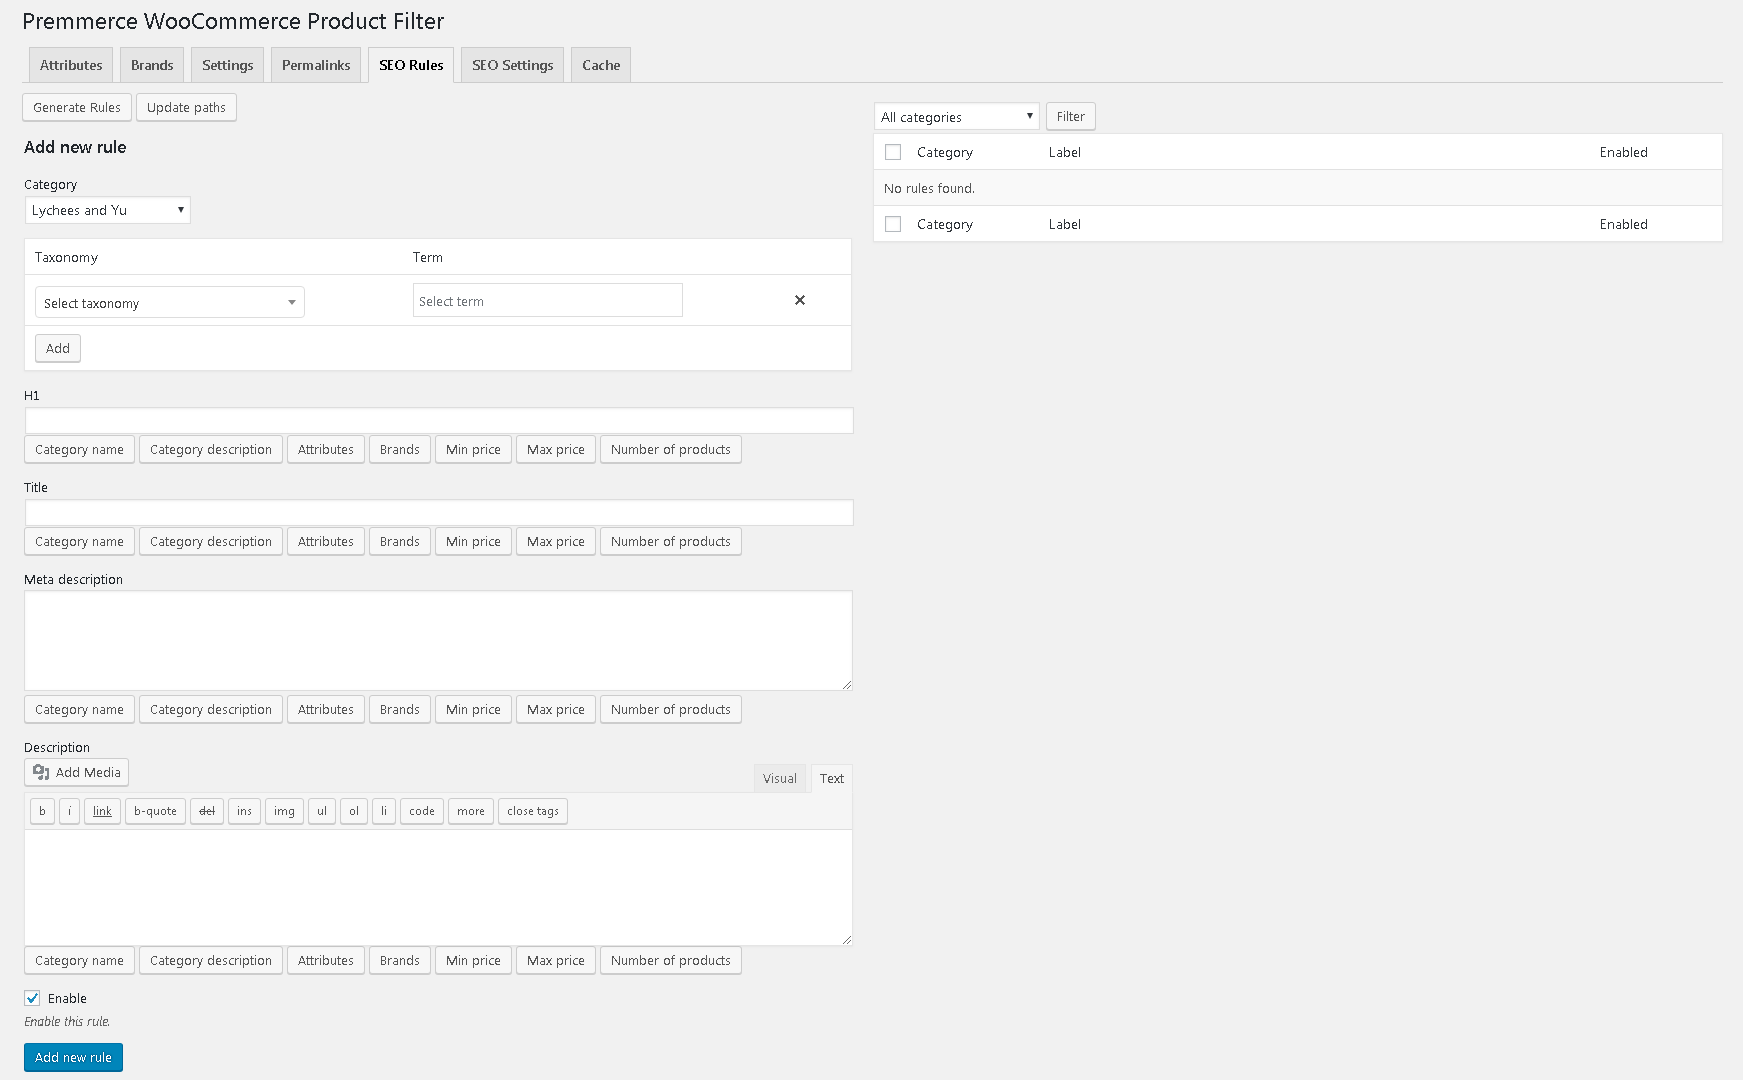
Adding a New Rule
- Select the category.
- Select the taxonomy (attribute or brand).
- Select the taxonomy term.
- Fill in the necessary metadata (each field has buttons that add your store variable values: Category name, Category description, Attributes, Brands, Min price, Max price, Number of products).
- Click ‘Add new rule’.

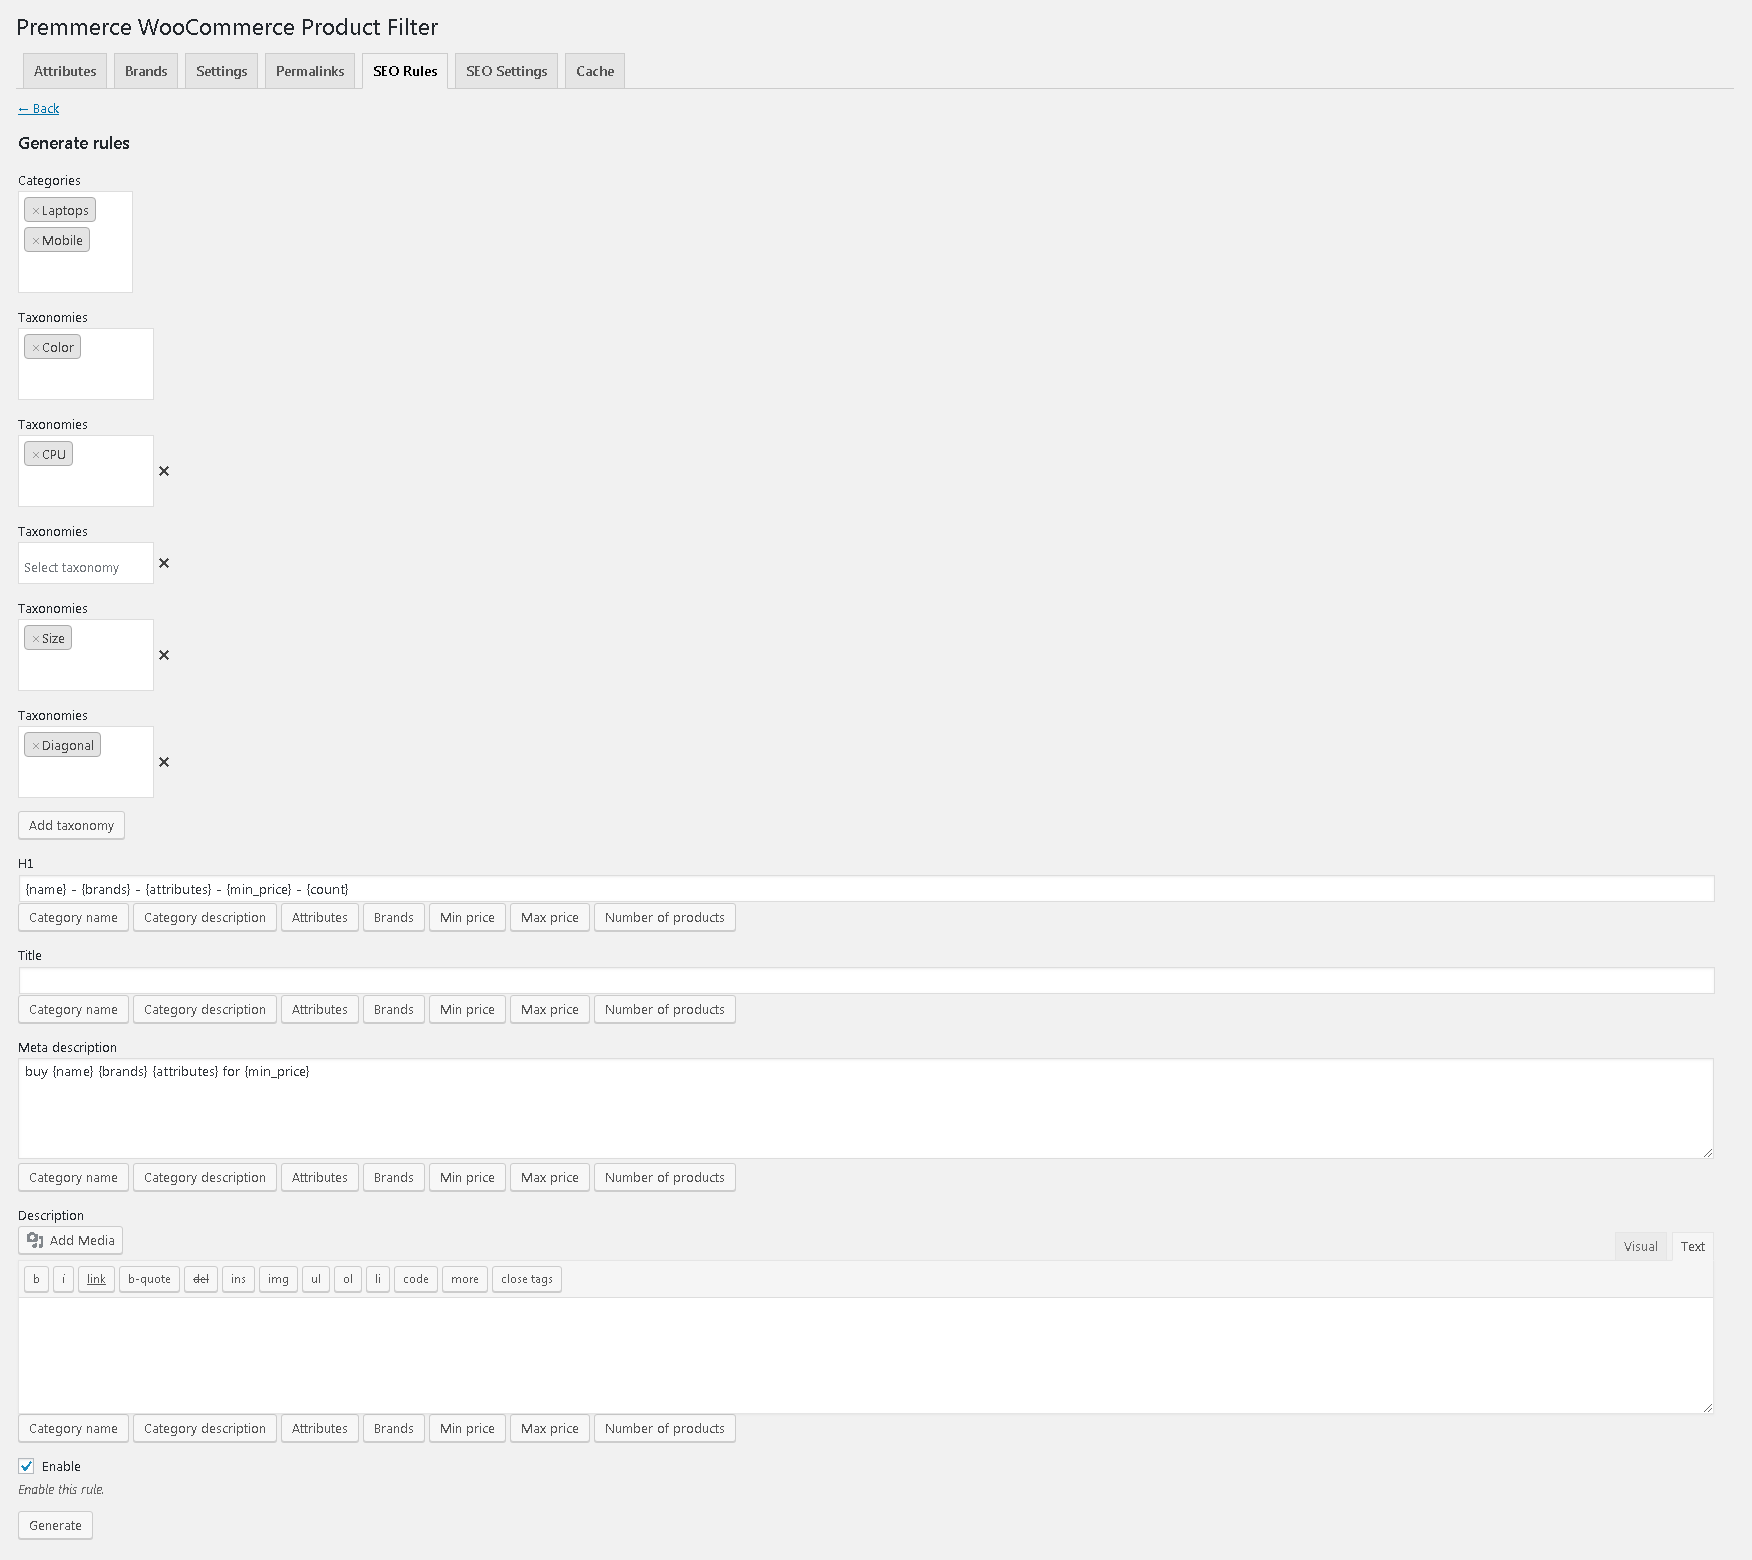
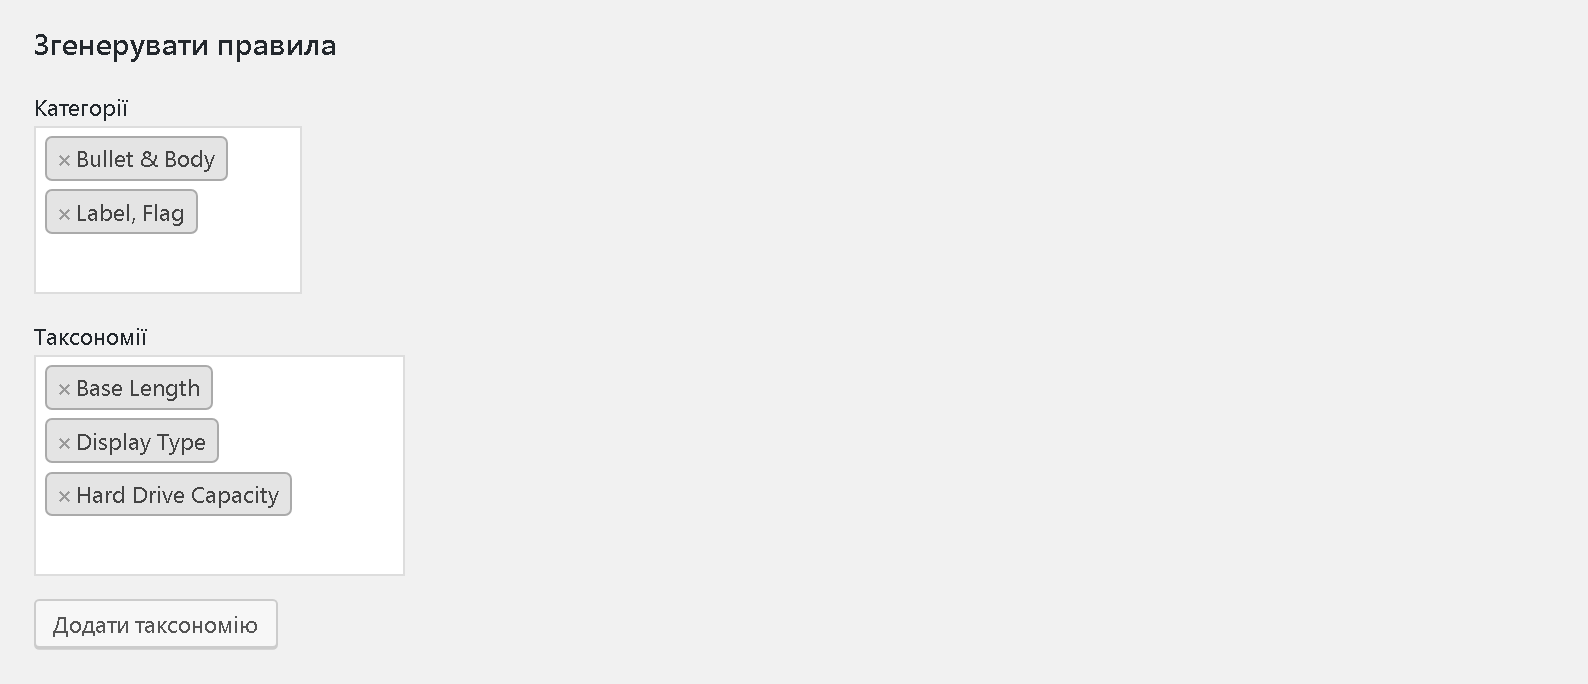
Rules Generation
To go to the Generate Rules page click ‘Generate Rules’ in the ‘SEO Rules’ tab.
Follow the steps below:
- Select the categories for which you need to generate the rules.
- Select the taxonomies.
- Fill in the necessary metadata (each field has buttons that add your store variable values: Category name, Category description, Attributes, Brands, Min price, Max price, Number of products).
- Click ‘Generate’.
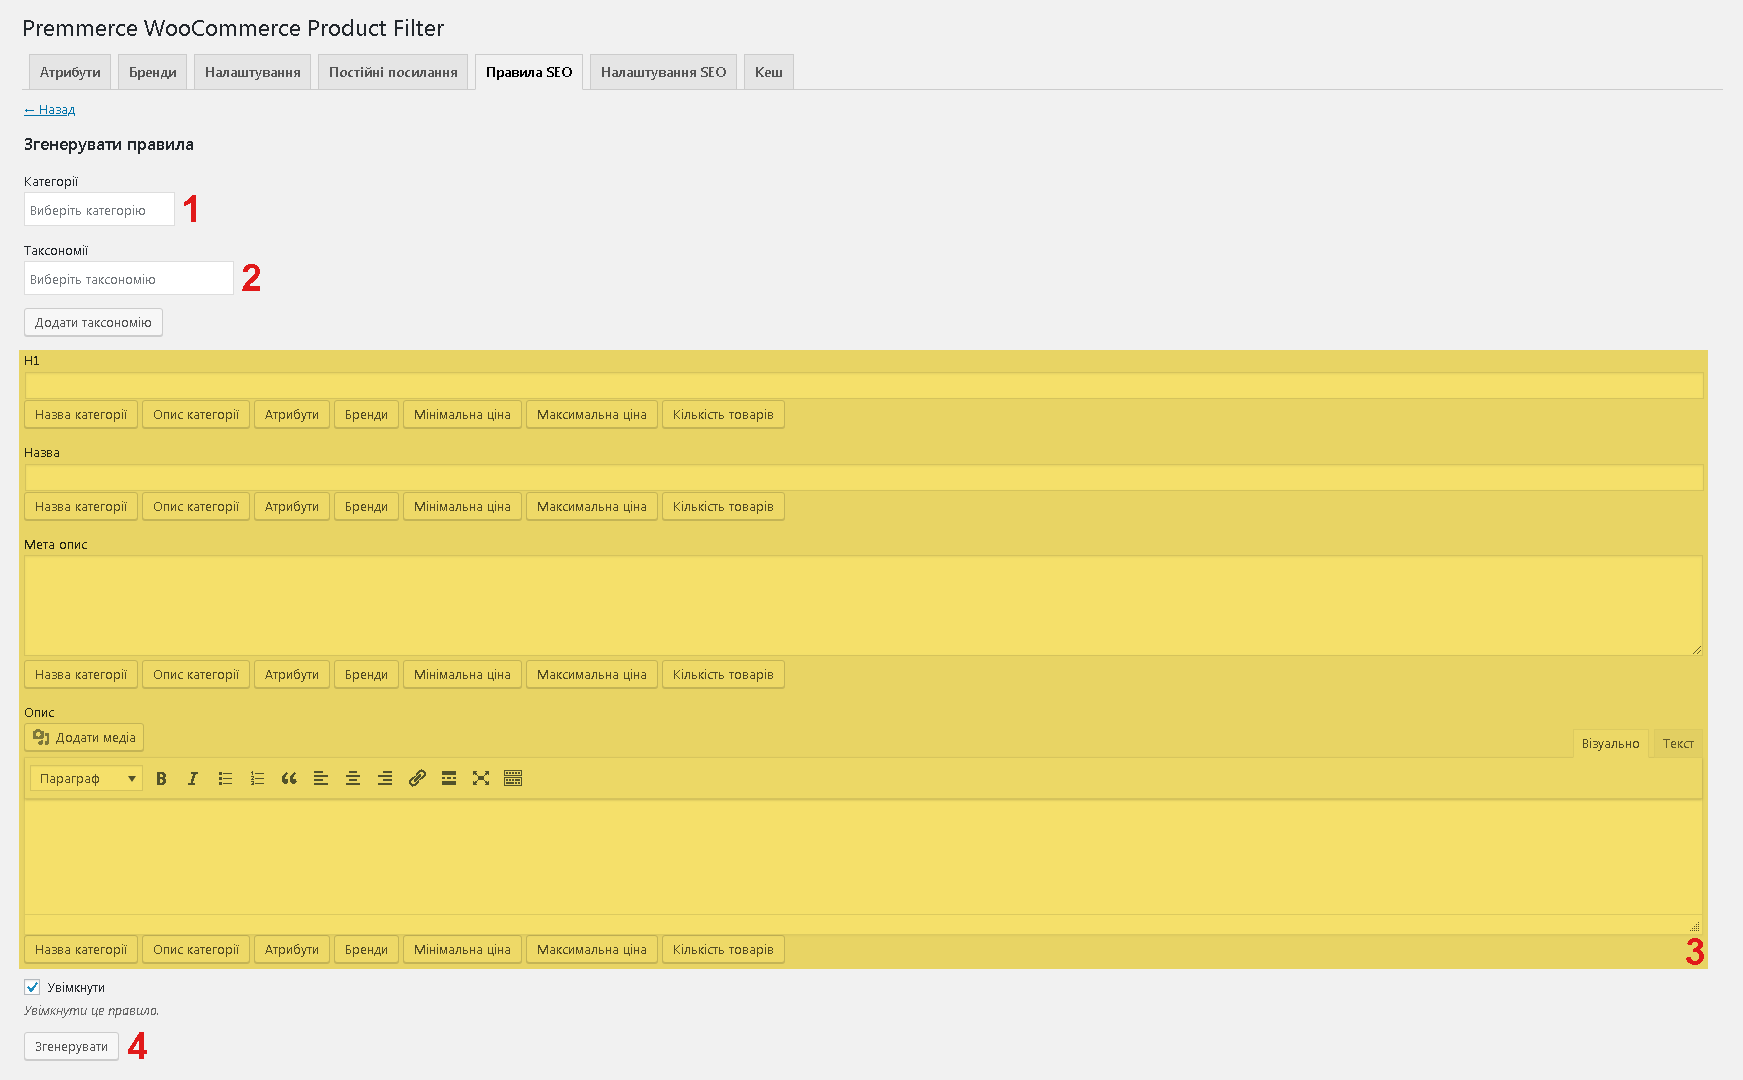
- Wait until the rules will be generated.

Some peculiarities of rule generation:
If you select taxonomies in the same field, the rules for the categories will be generated according to the principle: ‘category’ – ‘term of one attribute’:
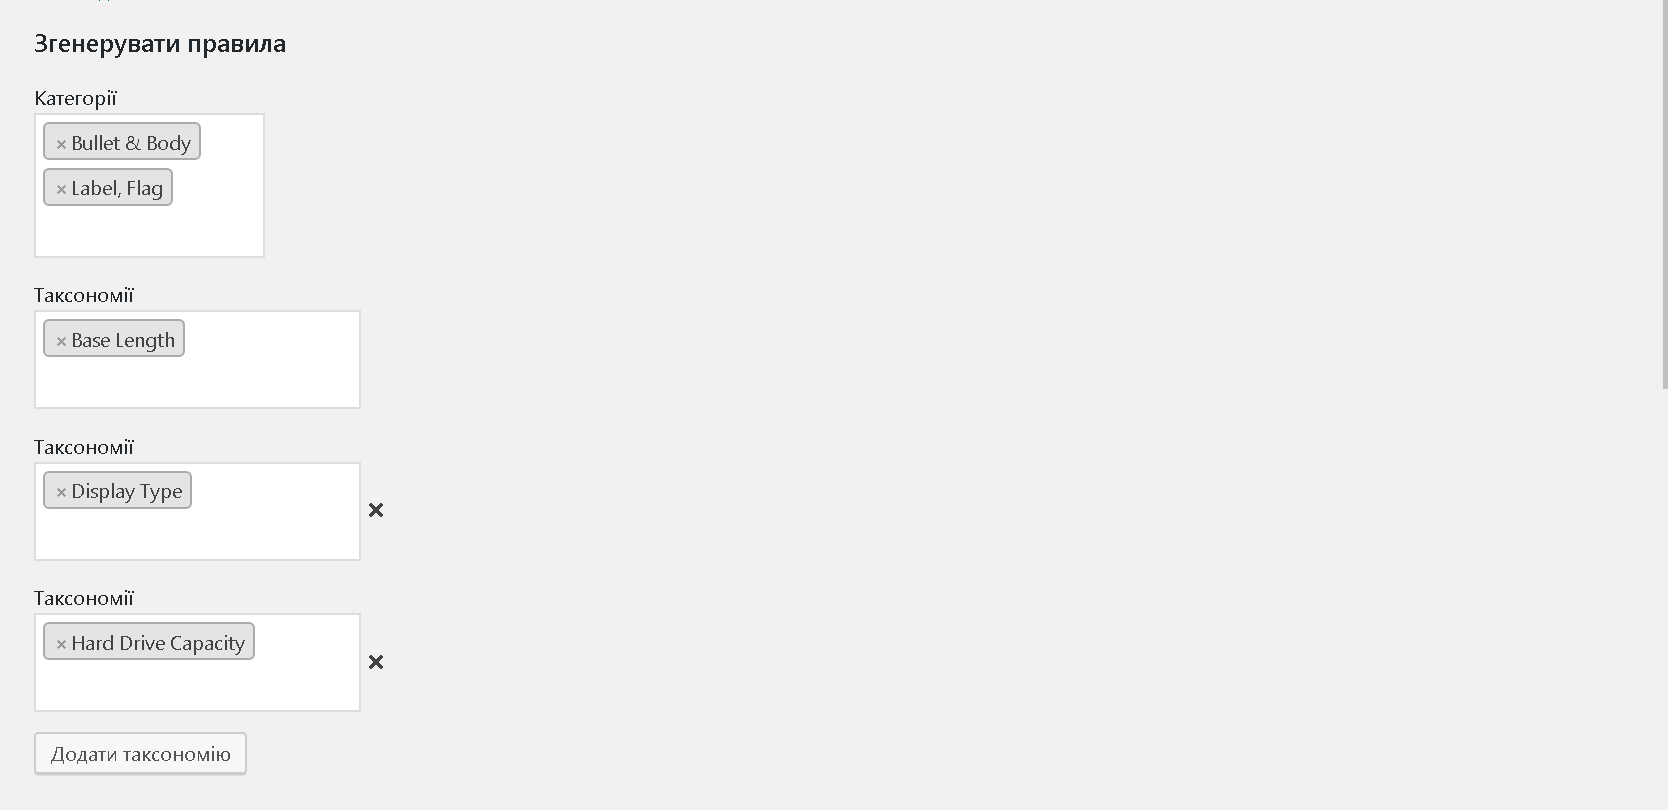
If you need a combination of several attribute terms, add the additional taxonomy field and select the needed attribute. In this case, the rules will be generated by the rule: ‘category’ – ‘term of one attribute’ – ‘term of the second attribute’. So all possible combinations of taxonomy terms will be generated:
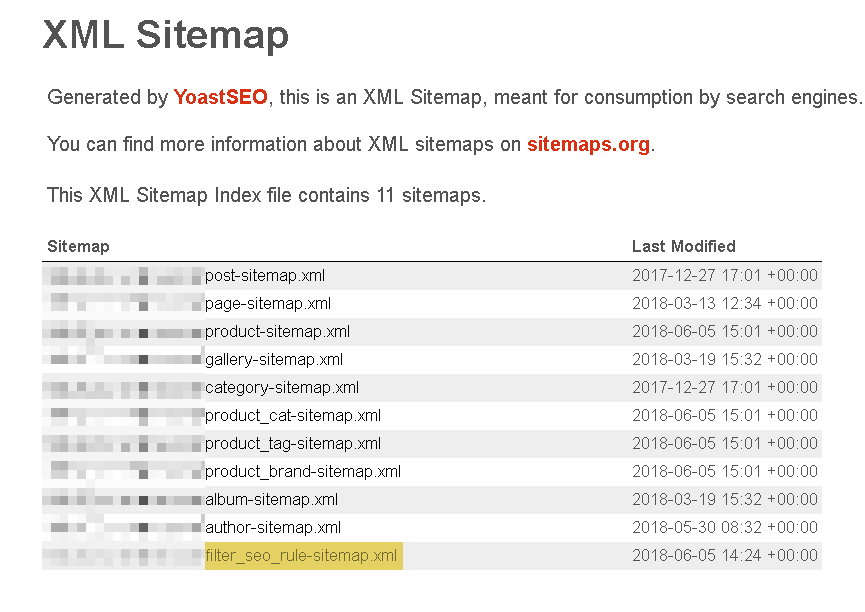
Yoast SEO XML Sitemap
If you’ve installed and activated the Yoast SEO plugin, and the XML Sitemap has been activated, then all the added and generated rules (only those listed in the SEO Rules tab) will be automatically added to the XML Sitemap:
Comments

Ready to Get Started?
Join over 100,000 smart shop owners who use Premmerce plugins to power their WooCommerce stores.
Get started