WooCommerce Shipping Guide: Zones, Classes, Calculator, Labels
As it has been found out from various studies, one of the main reasons for shopping cart abandonment are different hidden shipping and processing costs. It is not always possible to completely avoid shipping costs, but you can make sure your customer knows what he or she pays for. This will allow you to avoid customer’s frustration and resentment regarding an unpleasant ‘surprise’.
One of the main features of WooCommerce is the calculation of shipping cost right on the Cart or Checkout pages – WooCommerce Shipping method. Also you can see at Premmerce WooCommerce Plugins made to provide additional features for store management and to increase SEO rank of your store.
WooCommerce offers various shipping parameters and tax settings. An online store owner can calculate shipping costs using different shipping methods and classes from WooCommerce.
WooCommerce has several basic shipping methods: Flat Rates, Local Pickup and Free Shipping.
This guide provides the instructions for setting up the shipping features available on WooCommerce.
Basic WooCommerce settings
In order for your delivery to work properly, you need to edit the basic WooCommerce settings:
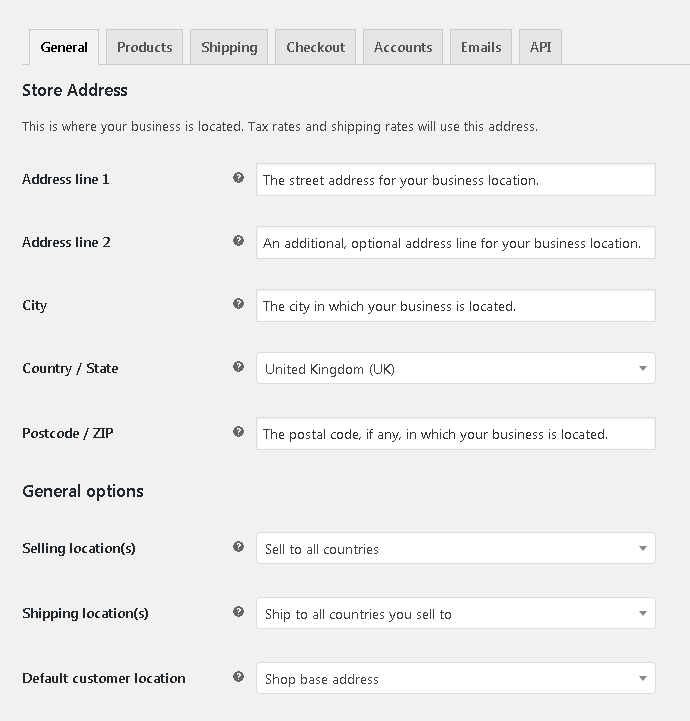
Fill in the following fields in the Store Address section:
- Address line 1 – the street address for your business location;
- Address line 2 – an additional, optional address line for your business location;
- City – the city in which your business is located;
- Country/State – select the country and state or province, if any, in which your business is located;
- Postcode/ZIP – the postal code, if any, in which your business is located.
Fill in the following fields in the General options section:
- Selling location(s) – Select the locations where you wish to sell your products. You can select any of the options given below from the dropdown:
- Sell to All Countries
- Sell to All Countries, Except For…
- Sell to Specific Countries
- Shipping location(s) – Select the locations to which you wish to ship your products. You can select any of the following options from the dropdown:
- Ship to all countries you sell to
- Ship to all countries
- Ship to specific countries only
- Disable shipping and shipping calculations
- Default customer location – this is the customer location that you set by default in your online store. This will enable you to determine tax and shipping costs before the customer enters the address information. Besides, there are following options as well in the dropdown menu that you can choose as the default customer location:
- No location by default – here, the store owner does not set any default location, and hence no taxes are calculated.
- Shop base address – in this option, you can set the base location of your store as the default customer location.
- Geolocate – selecting this option enables you to determine the customer’s default location based on the IP address through which the customer logs in.
- Geolocate (with page caching support) – as in the previous option, here also, you can determine the customer’s default location based on the IP address through which the customer logs in. The only difference is that you have to select this option only if your store has a page caching support.
After configuring the settings mentioned, you can Save Changes.
WooCommerce Shipping settings
In the WooCommerce Shipping tab is divided into 3 sections: Shipping zones, Shipping options and Shipping classes.
Read also: Complete WooCommerce Tutorial Step By Step.
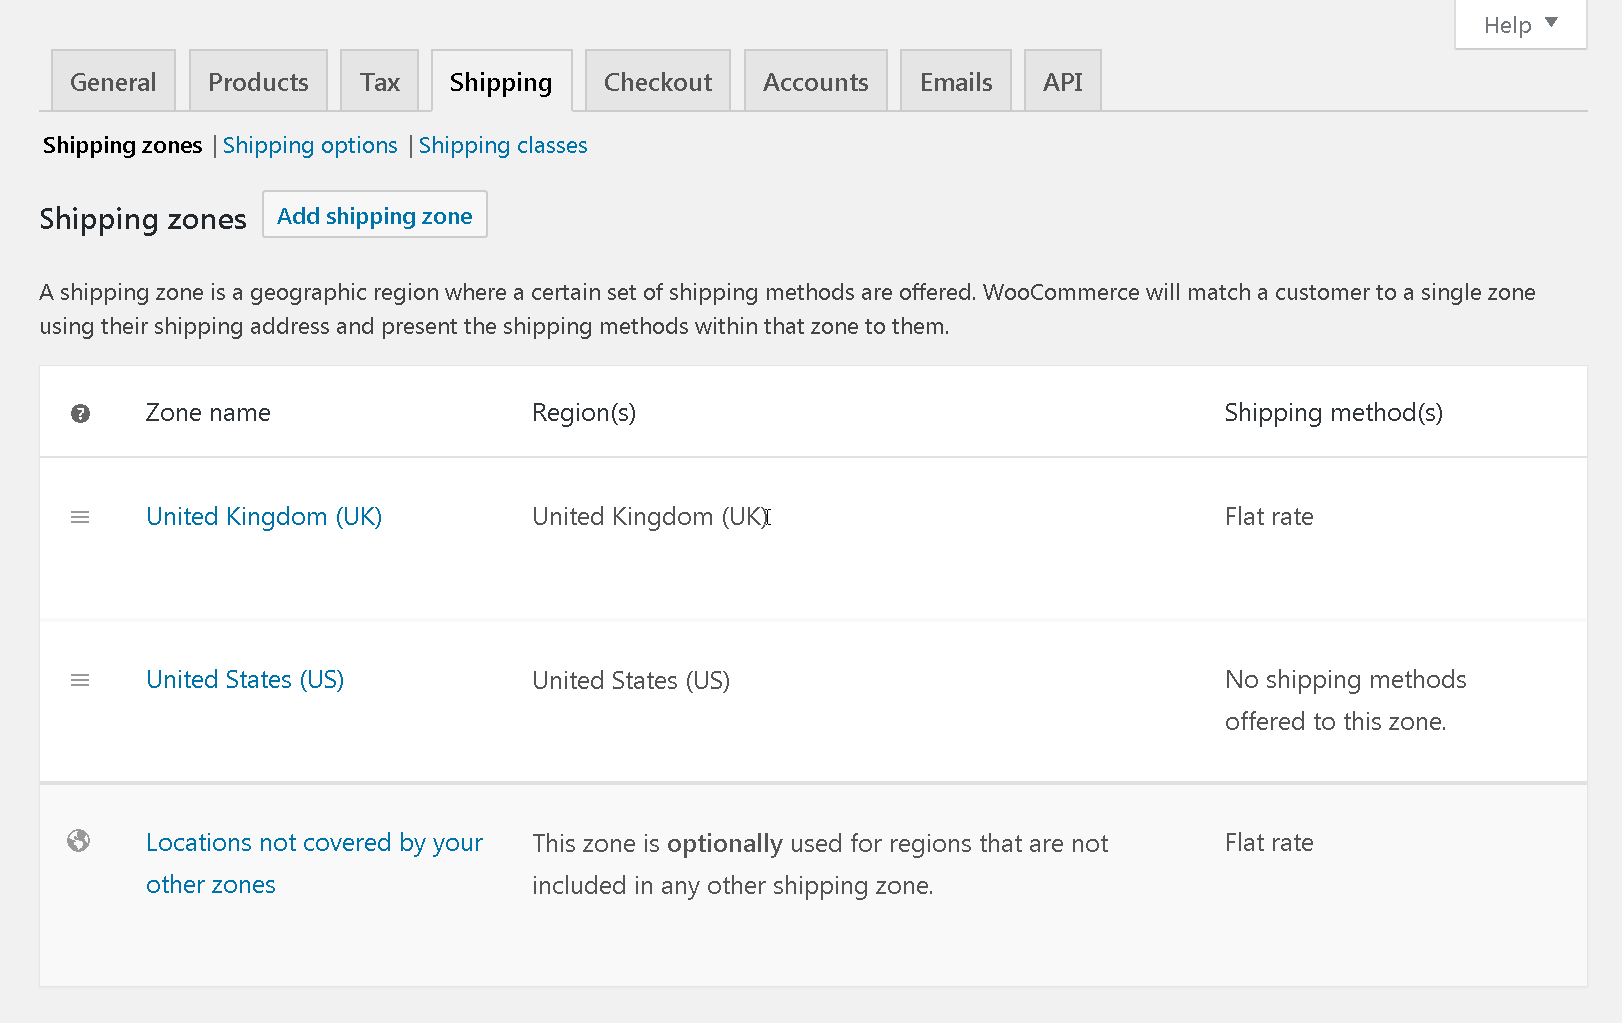
WooCommerce shipping zones
The shipping zone is a geographic region where a certain set of shipping methods is offered. WooCommerce will choose the shipping zone according to the customer’s address and provide the shipping methods available in this zone.
On this page, you can add, remove, edit shipping zones, and set shipping methods for regions that are not included in any of the shipping zones.
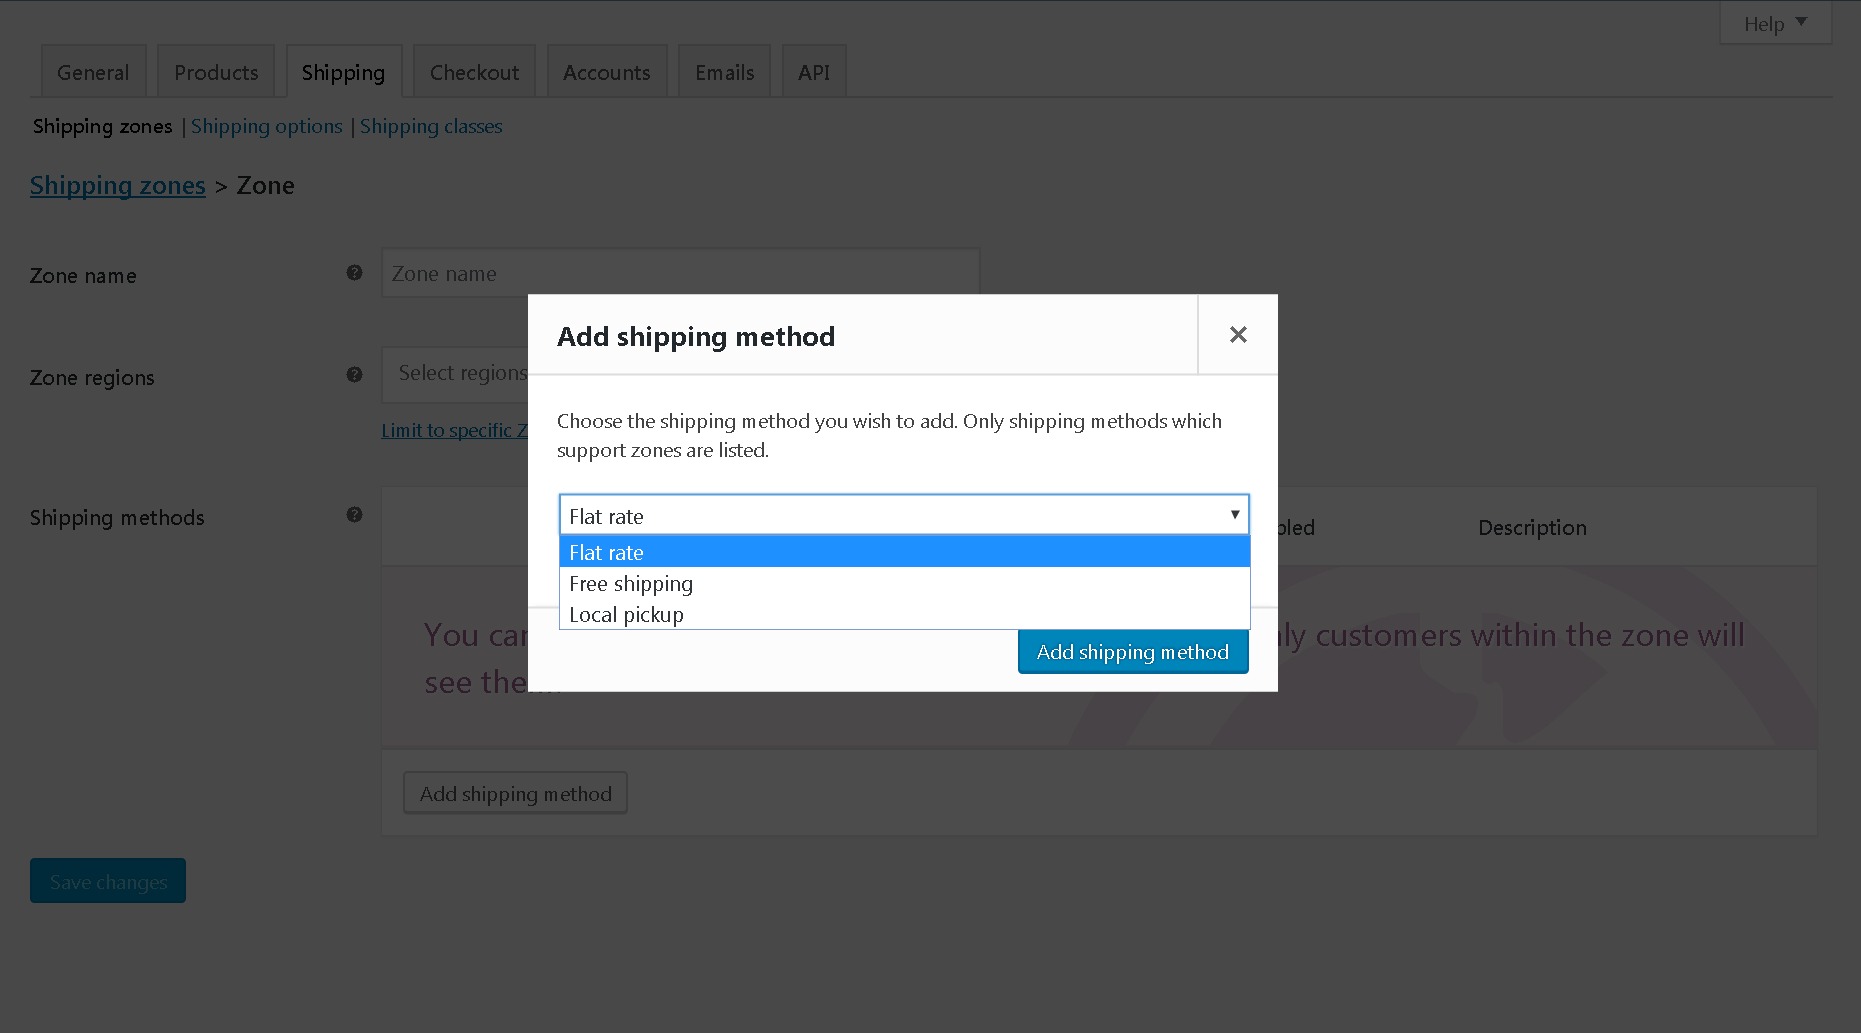
Creating/editing the shipping zone

Zone name is just for you as it is not displayed on the site.
Zone regions – the system will check customers for the selected regions. You can also limit the regions by postal codes.
WooCommerce shipping methods
After creating a shipping zone, you can add a shipping method from the dropdown menu. To do this, you can choose either of these three shipping methods listed below:
- Flat rate
- Free shipping
- Local pickup
You can add an unlimited number of shipping methods. You can also delete, edit, and organize your shipping methods.
WooCommerce flat rate shipping method
Flat rate is a shipping method that allows you to determine the standard rate for the product, shipping class or order.
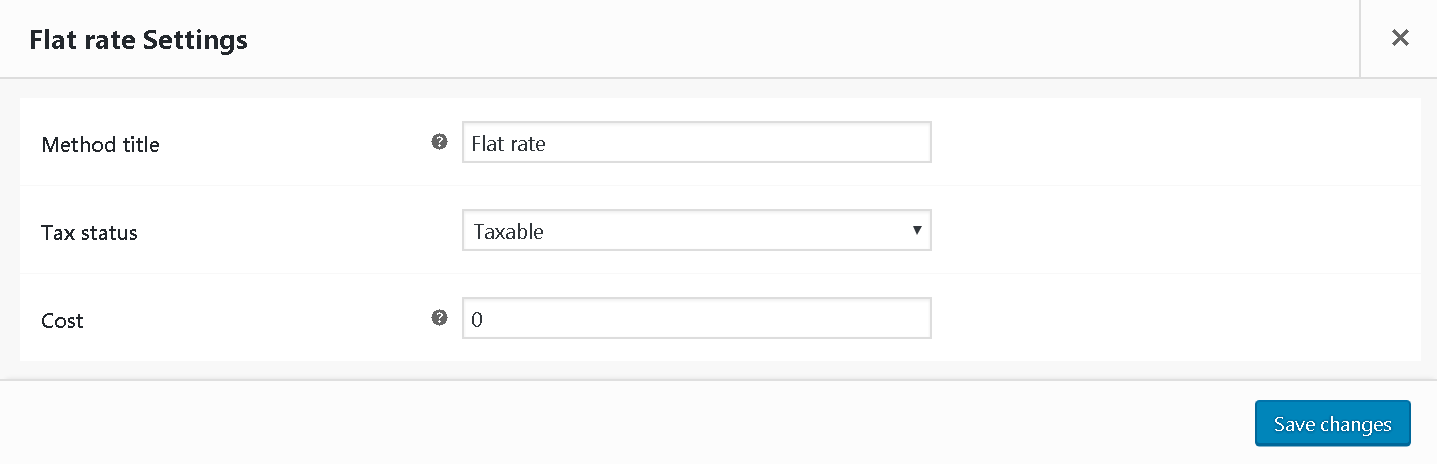
Method title – “Flat rate” is set by default, but you can change the name of the shipping method if needed. The title will appear on the Shop and Checkout pages.
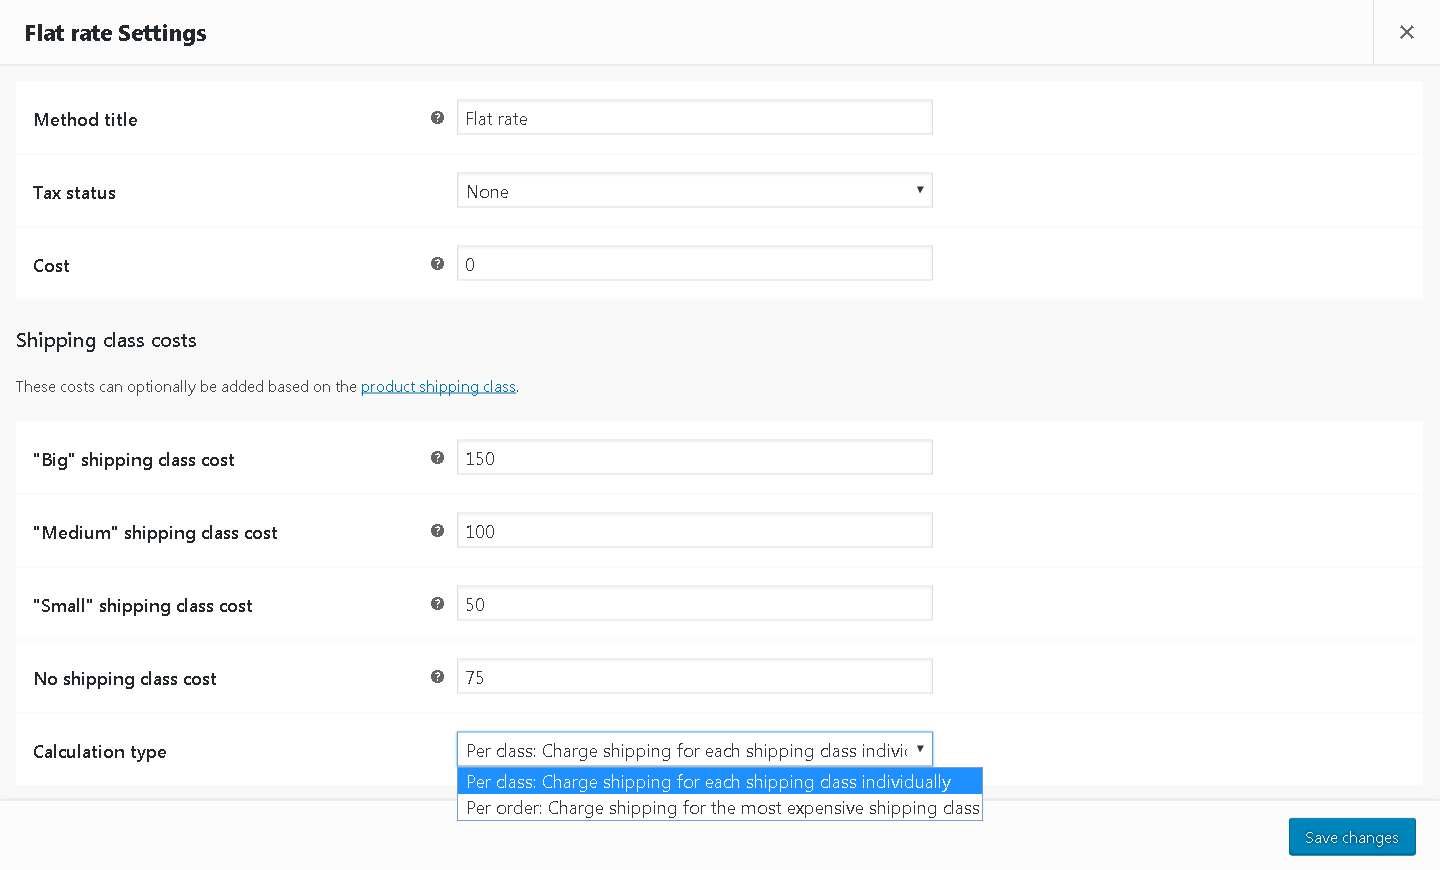
Tax status – Here, you determine whether this shipping method is taxable or not. The dropdown list has two options:
- Taxable – this parameter indicates that the method is taxed. Taxes include sales tax, value added tax, etc., which can be customized in the Tax tab of the WooCommerce Settings page.
- None – this parameter indicates that you did not include taxes in the shipping cost.
Cost – the shipping cost of the products excluding taxes. There are three placeholders that you can use here in turn:
[qty] for the number of items (for example, if you want to get $50 for each item in the order, write the following phrase in the Price field: 50*[qty]);
[cost] for the total cost of the items;
[fee percent = “10” min_fee = “20” max_fee = “”] for percentage on a fee.
Read also: Complete WooCommerce SEO Guide and Tips.
Shipping class costs
These are optional, non-mandatory shipping costs. This section will appear after you set up the shipping classes. The detailed settings are described below.
The shipping costs set for the added shipping classes will be added to the established rate. Below is a screenshot of the example of different shipping costs set for different shipping classes:
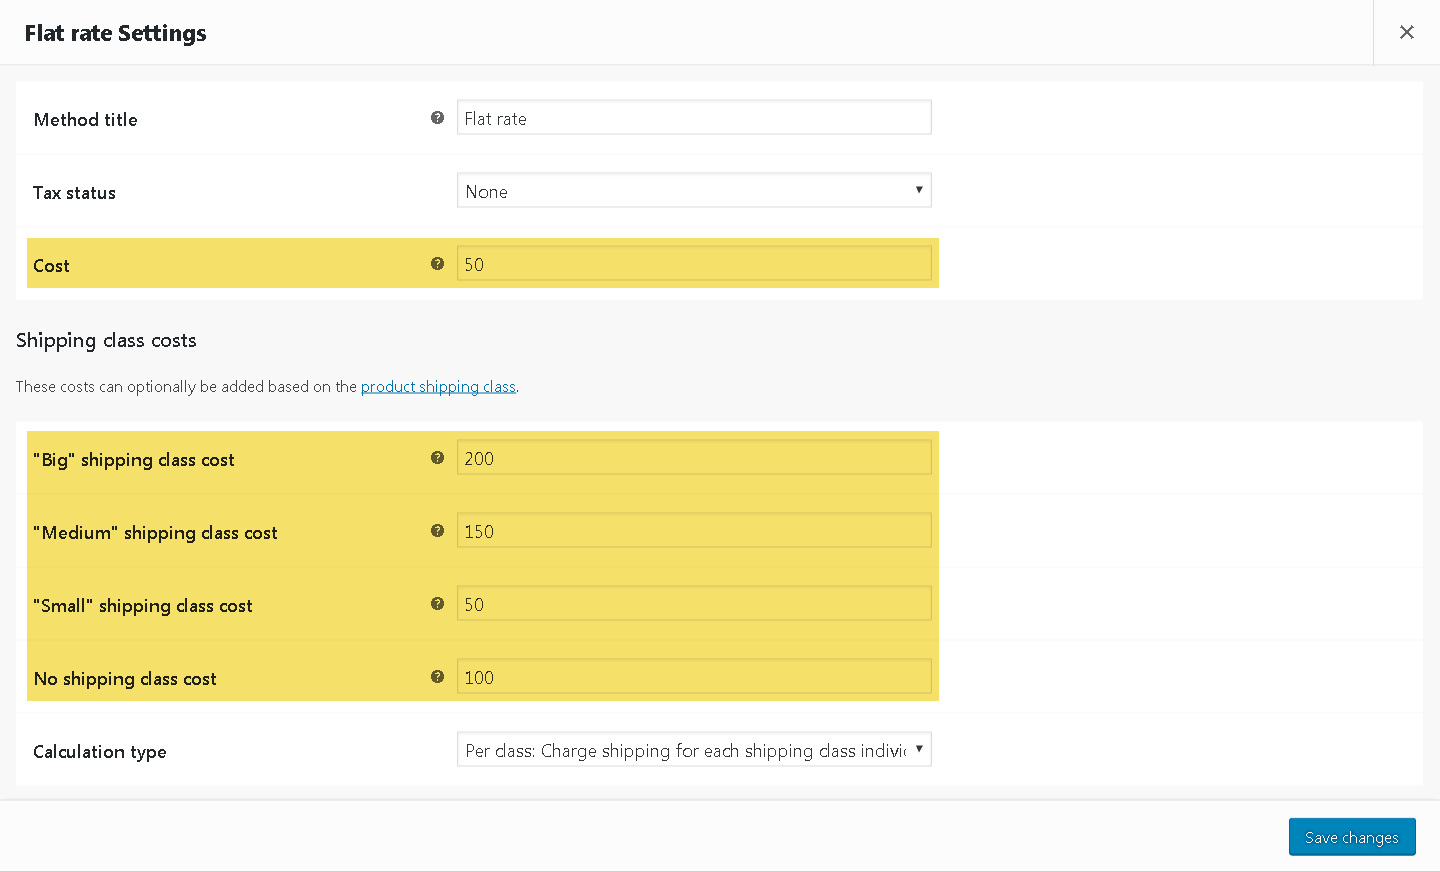
If the item shipped does not belong to any of the classes, in this case you can set the price in the No shipping class cost field.
WooCommerce shipping calculator
Calculation type – the shipping cost calculation setting:

The dropdown menu has two options:
- Per Class: Charge shipping for each shipping class individually – the shipping cost will be calculated individually for each shipping class and its cost. The total shipping cost will be the sum of each individual shipping costs in accordance with the items of the order.
- Per Order: Charge shipping for the most expensive shipping class – The most expensive shipping class will be used to calculate the shipping cost.
WooCommerce free shipping method
Free shipping does not charge a customer for the delivery of the products ordered. This method can be configured to work with a coupon, a minimum order amount, or both. The minimum order amount is a good way to make the customer spend more in the online store.
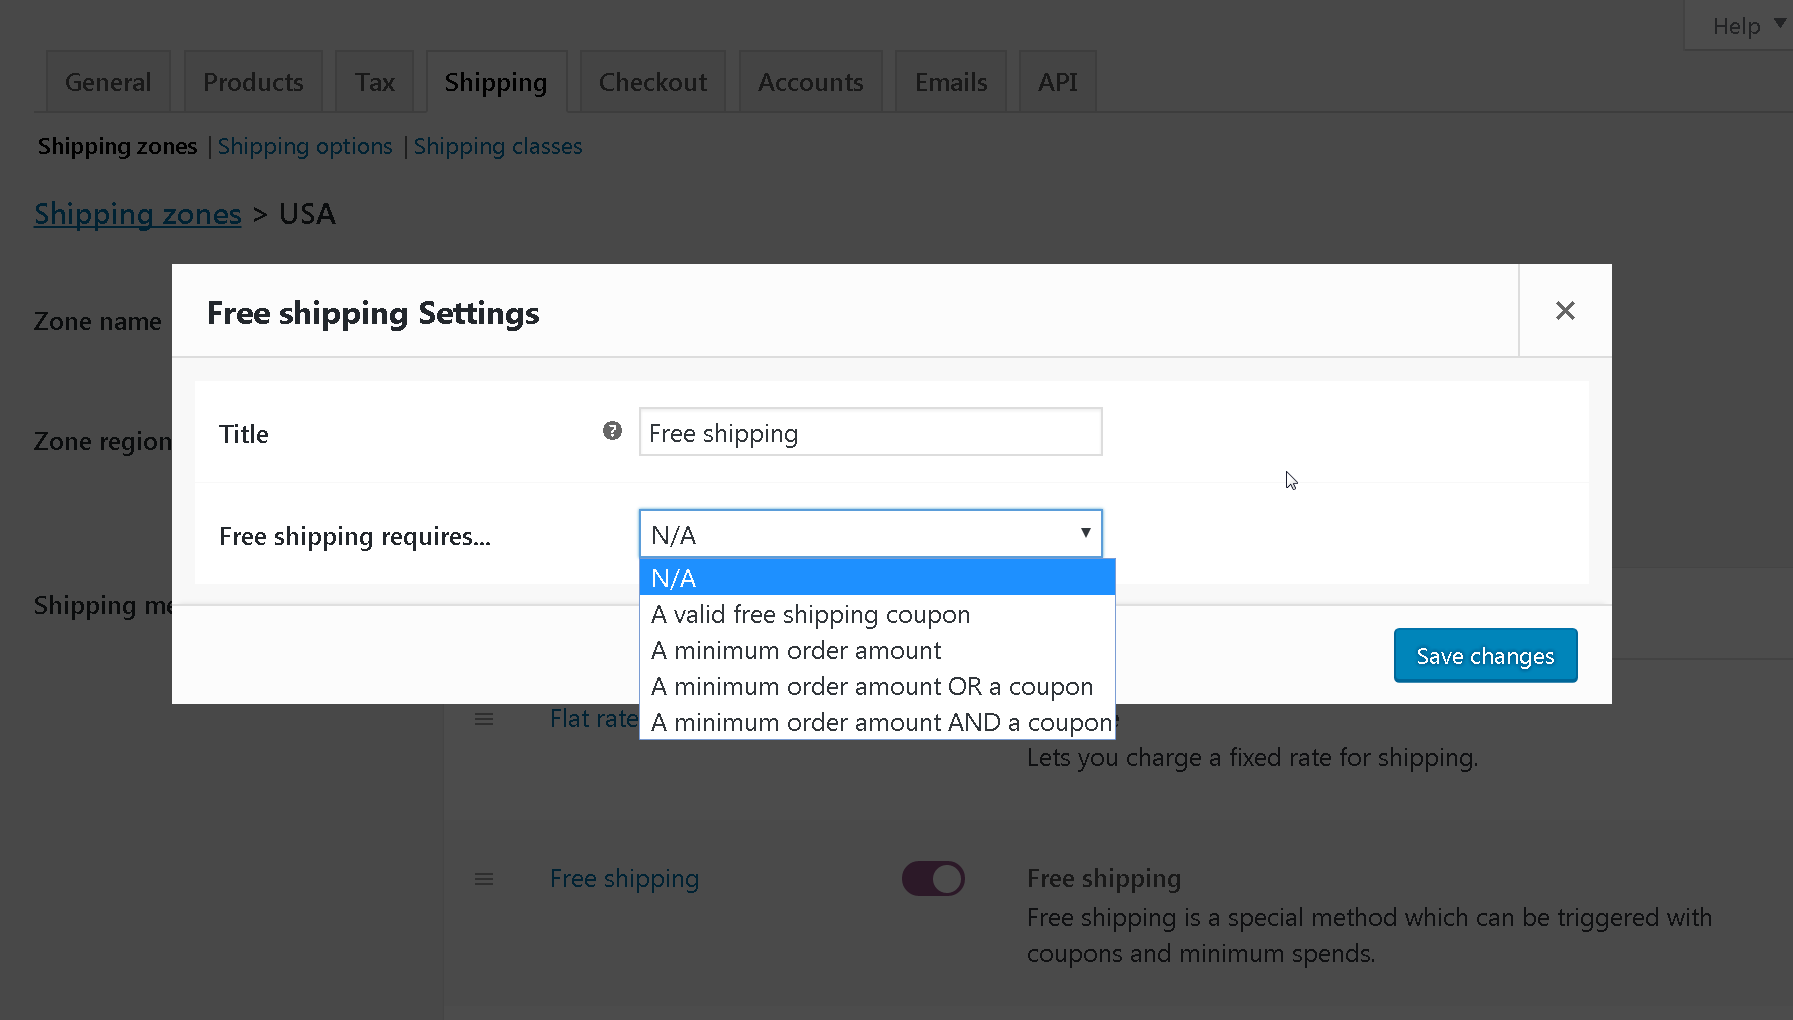
Title – “Free shipping” is set by default, but you can change the name of the shipping method if needed. The title will appear on the Shop and Checkout pages.
Free shipping requires … – a condition for free shipping. You need to select the desired option from the dropdown list:
- N/A – this option means there are no conditions;
- A valid free shipping coupon – in this case, the customers must provide a free shipping coupon to use a free shipping service;
- A minimum order amount – in this option, the amount of the order must be equal to or greater than the set order amount to use free shipping;
- A minimum order amount OR a coupon – in this option, the customer can meet the minimum order amount or use a free coupon to get free shipping.
- A minimum order amount AND a coupon – in this option, the client must comply with the minimum order amount and the free coupon at a time.
Minimum Order Amount – this additional field will appear if you select any of the last three options. You have to enter the minimum amount for free shipping here.
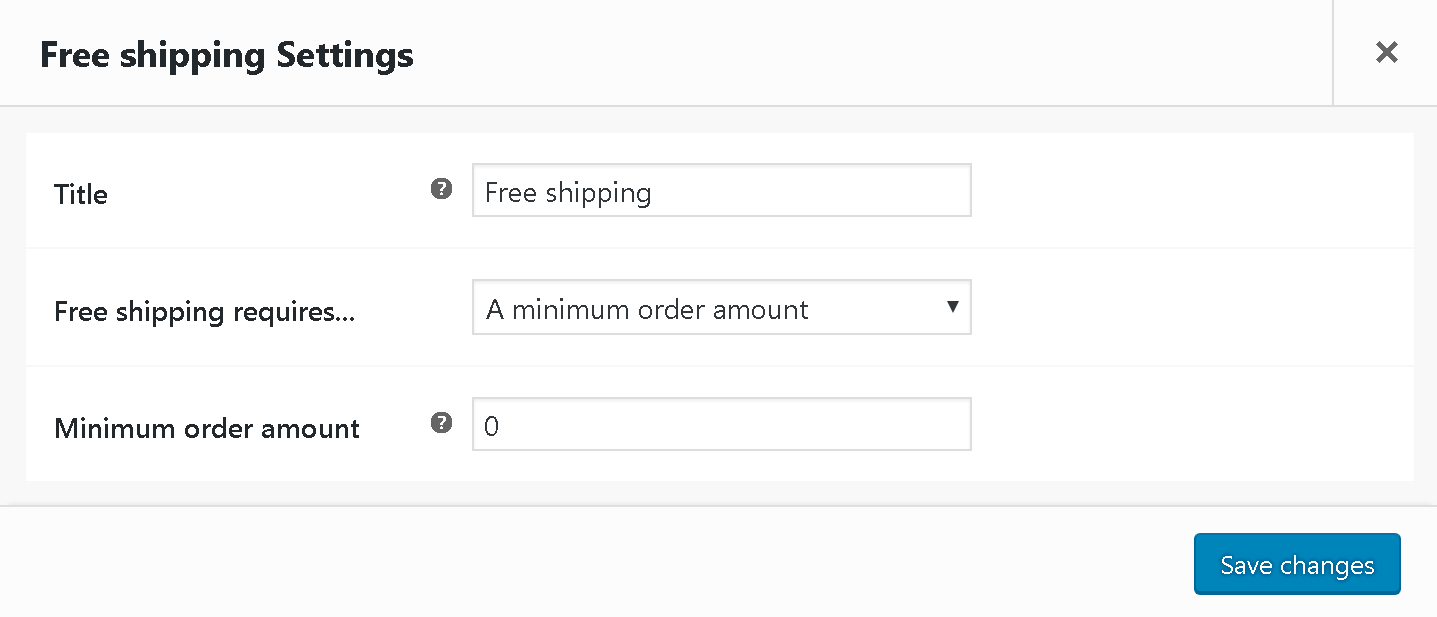
Save your changes.
WooCommerce local pickup shipping method
This option can be used by the customers if they have the opportunity to pick up the products from a local store or warehouse. An online store owner may charge an additional fee if necessary. The settings for this method are described below:
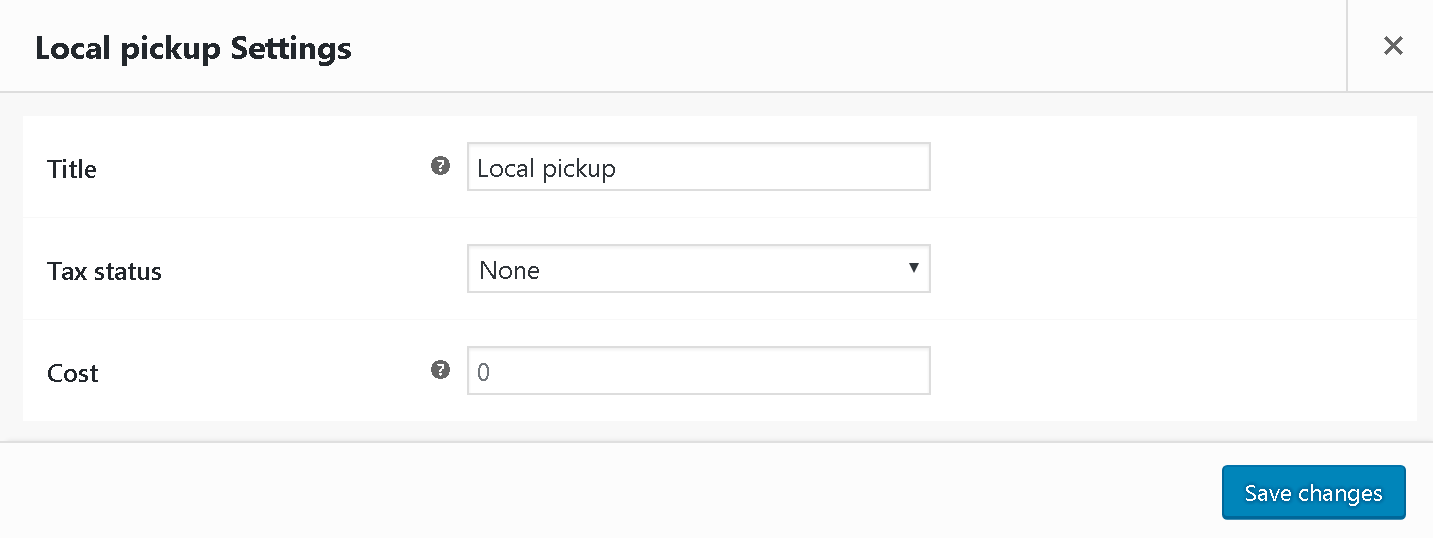
Title – “Local pickup” is set by default, but you can change the name of the shipping method if needed. The title will appear on the Shop and Checkout pages.
Tax status – here you determine whether this shipping method is taxable or not. The dropdown list has two options:
- Taxable – this parameter indicates that the method is taxed. Taxes include sales tax, value added tax, etc., which can be customized in the Tax tab of the WooCommerce Settings page.
- None – this parameter indicates that you did not include taxes in the shipping cost.
Cost is the extra cost the store owner can charge for this shipping method.
Save your hanges.
Important notice
Shipping methods you choose in the shipping zone will only be applied to the customer’s address within this particular shipping zone.
WooCommerce shipping options
In this shipping submenu, you can set up general configurations. Activate the needed options and save your changes.

Calculations
This option allows you to set up shipping cost calculation methods:
- Enable the shipping calculator on the cart page – if activated, the customer can view the shipping cost on the Cart page for each individual item that he or she adds to the cart or for all items at once.
- Hide shipping costs until an address is entered – if activated, the customer can view the shipping cost of his or her order only after he or she enters the address on the Checkout page.
Shipping Destination
This option allows you to select the customer’s address to which the order will be delivered. These are the available parameters:
- Default to customer shipping address – by default, WooCommerce chooses the shipping address of the customer, which he or she entered when signing up on the site. The shipping address can be changed on the Checkout page.
- Default to customer billing address – by default, WooCommerce chooses the customer’s billing address, entered while signing up on the site, as shipping address. The shipping address can be changed on the Checkout page.
- Force shipping to the customer billing address – WooCommerce chooses the customer’s billing address as shipping address with no option to change it on the Checkout page.
Debug mode – enable shipping debug mode to show matching shipping zones and to bypass shipping rate cache.
Save your changes.
WooCommerce shipping classes
The shipping classes can help to group similar products and be used by the Flat rate shipping method to provide different rates for different classes of products.
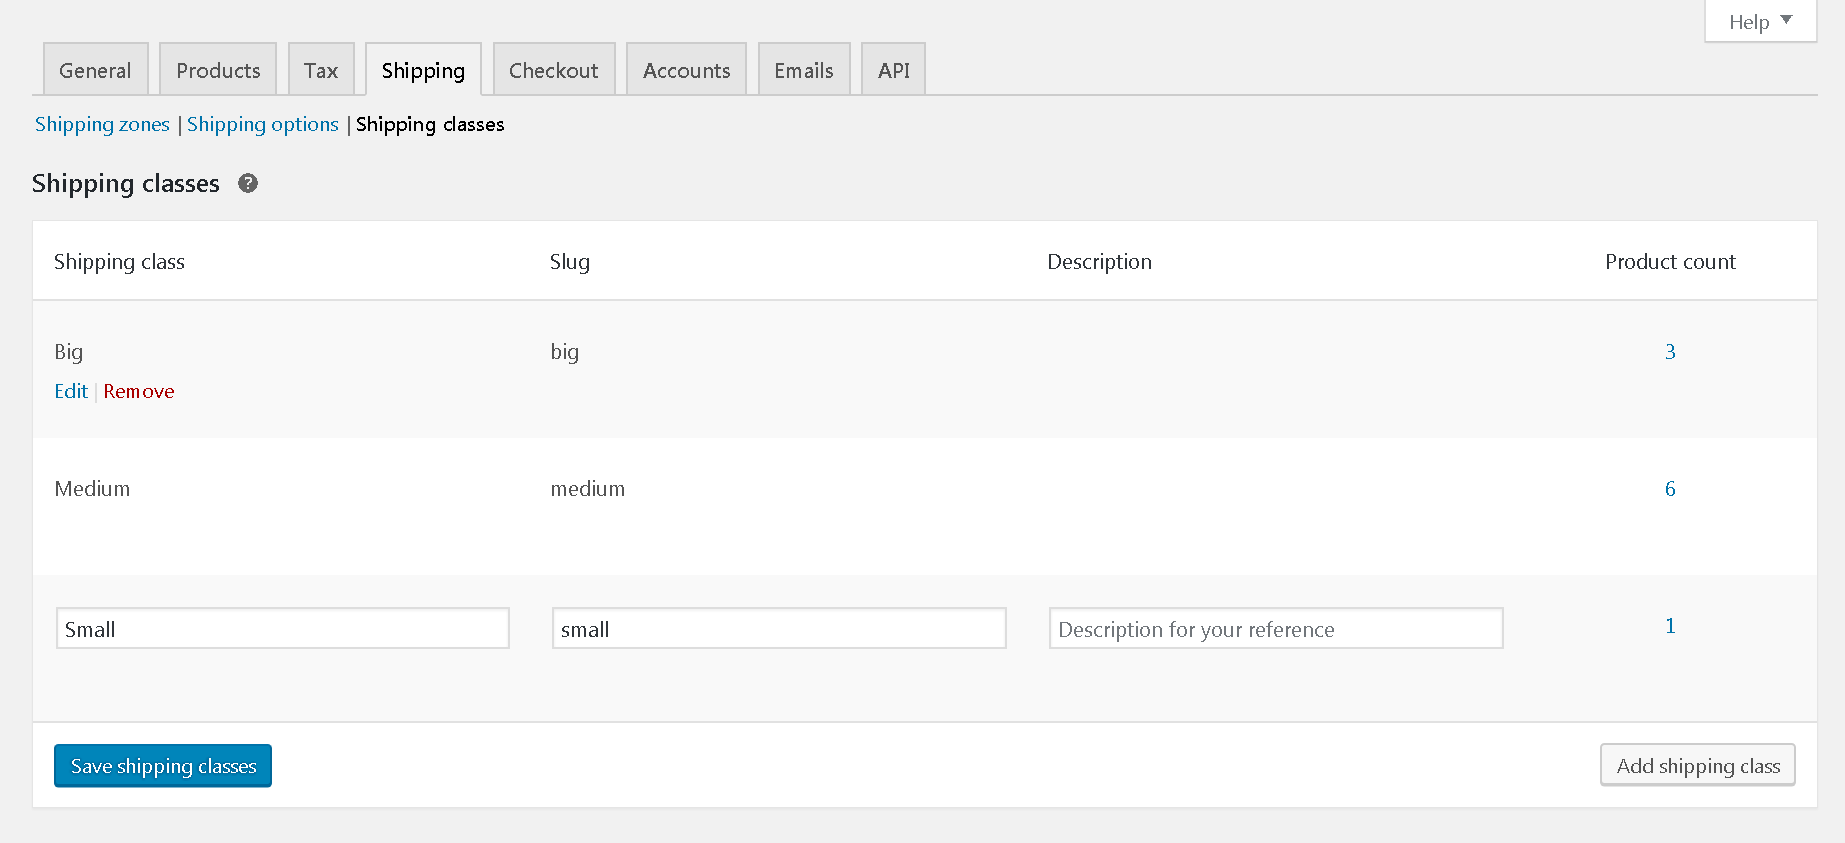
Creating a delivery class:
- Click the Add shipping class button.
- Enter the delivery class name in the Shipping class column.
- Enter Slug or leave this field blank; the system will automatically fill this box.
- In the Description, you can enter a description of the class just for yourself; the field is optional.
- Product count – displays the quantity of the products of a certain class. After clicking on a number, you will see a list of the products that are part of this class.
- Save your changes.
Adding shipping classes to the products in WooCommerce
You can add the shipping class to the product on the product adding/editing page.
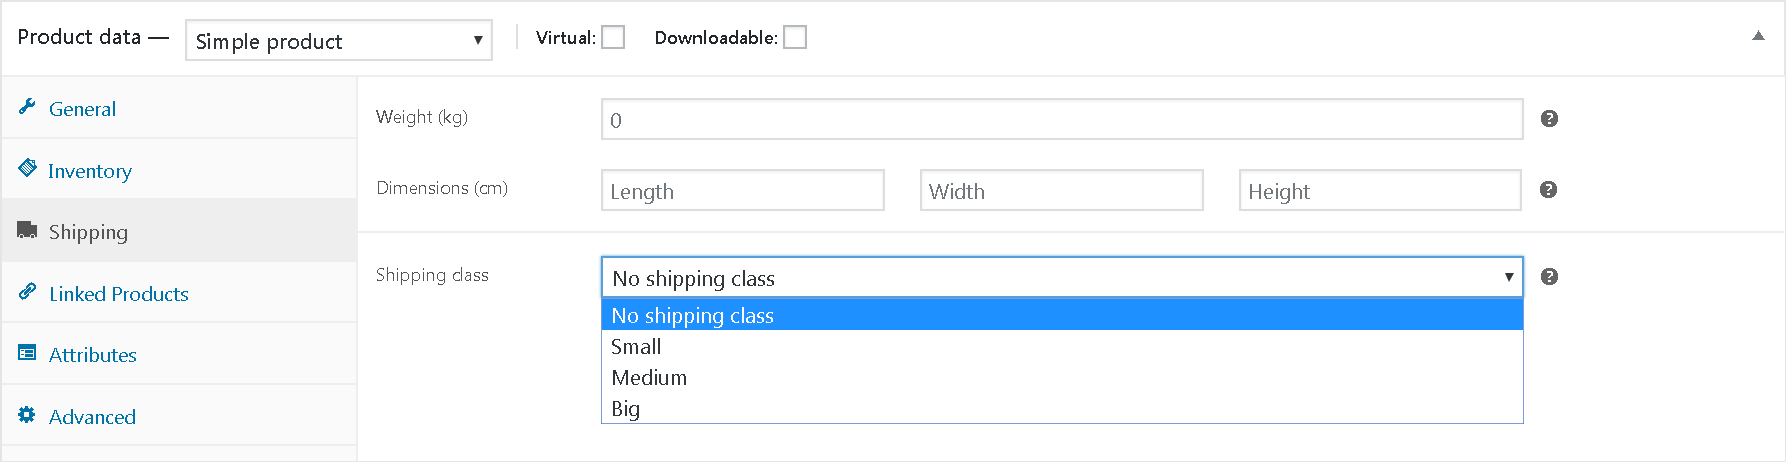
or while quick editing of the product.

Conclusion
The standard WooCommerce shipping methods are enough for most online store owners. But if you need smoother and more flexible shipping settings, there are plenty of free and commercial plugins available. They will help you to do some simple, as well as complicated shipping cost calculations. For example, they can help you figure out the shipping cost of your product by different parameters, such as weight, size, destination, quantity of products in an order, etc.
In our next tutorials, we’ll look at the ways of integration with popular shipping services.
You can also see at our Premmerce WooCommerce Plugins to increase SEO rank of your store and get additional features for store management.
Comments

Ready to Get Started?
Join over 100,000 smart shop owners who use Premmerce plugins to power their WooCommerce stores.
Get started